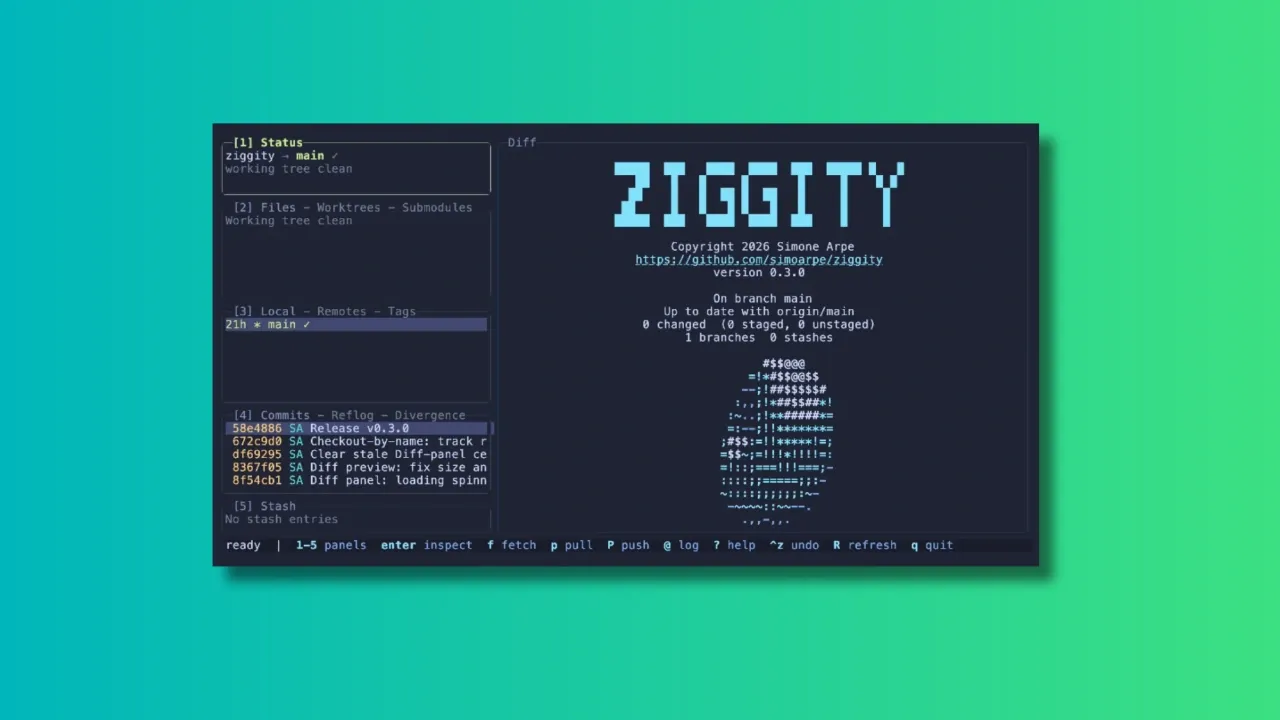
In the age when people are not even looking at the code generated by AI, I am reviewing a terminal-based client that gives full visibility and control over your git repositories. Because not everyone has handed over all the critical thinking to AI, I presume.
Over the years, many Git clients, both GUI and TUI, have emerged to make working with repositories easier. Tools like lazygit have become popular among terminal users, and Ziggity is another addition to the world of terminal-based Git interfaces.
What Makes Ziggity Special?
Let me show you some of the main features of Ziggity.
Ziggity Is Small and Quick to Launch
One of Ziggity's main selling points is its lightweight design. It compiles into a single static binary, and the footprint stays small by design rather than by tuning.
The project also leans entirely on the Git installation already on your system instead of bundling something like libgit2, which keeps the binary itself down to a couple of megabytes. The project's own benchmarks, run on a Mac against lazygit, put Ziggity's process startup at a few milliseconds against tens of milliseconds for lazygit, with a noticeably smaller resident memory footprint once things settle.
Of course, benchmark numbers will vary depending on your hardware, your repository size, and the machine's other workload at the time.
Git Operations Don't Get in Your Way
Speed at launch is one thing, but a responsive interface while you actually work matters just as much.
Ziggity handles potentially slow operations such as fetching, pulling and pushing away from the main interface. This means you can continue browsing your repository, checking diffs, or reviewing commits while the operation runs quietly in the background.
A spinner in the Status panel is the only indication that something is happening, and a short one-line summary appears once the task wraps up. If it fails, that's when you actually get interrupted with a dialog.
The same philosophy carries over to longer, multi-step operations such as merges, rebases, autosquash, bisect sessions, and applying patches. Rather than dropping you back into a raw terminal and asking you to press a key to "return" to the app, something anyone who has used git clients will recognize, Ziggity simply keeps its interface up the whole time.
Even authentication is handled without leaving the app. If a push over HTTPS needs a username and token, Ziggity opens an in-app prompt, masks the token as you type, and retries the operation once you're done. There's no dropping to an external credential helper, and if a saved keychain is configured, it's reused automatically the next time around.
First-Class Mouse Support
Terminal applications are usually associated with keyboard-only workflows, and Ziggity absolutely supports that. But if you are more comfortable with mouse, you can very well use it.
You can click on any panel to focus it, click a row to select it, and use the scroll wheel across lists, diffs, dialogs, and even the commit graph. In the staging view, you can click directly on a line and stage just that line with a keypress.
Ziggity also supports proper text selection. Click and drag over a diff, a commit, or any other panel, and the selected text lands straight on your clipboard, with color codes stripped out and indentation preserved. This even works over SSH, since it relies on the OSC 52 clipboard mechanism rather than anything terminal-local.
A Better Way to Look at Git Diffs
Diffs are where you spend a good chunk of your time reviewing changes, so a clear way to read them matters.
Ziggity supports comparing branches and commits with a single keystroke.
The diff view also does word-level highlighting. Instead of painting an entire changed line red or green, Ziggity picks out the specific words that changed within a line, so a one-character edit in a long line doesn't get buried.
For long lines, think Markdown or documentation files, you can toggle soft wrapping on demand instead of having to scroll horizontally. The word-level highlighting keeps working correctly even once a line wraps across rows.
History Navigation That Understands What You Want
The commit graph is a real rendering of git log --graph, in git's own colors, and it loads without freezing the interface. By default it shows your current branch and its upstream so you immediately see what's incoming, and there's a shortcut to widen it to every branch or jump straight back to HEAD.
There's also a dedicated Divergence view that separates your outgoing commits from incoming ones relative to upstream, and history-editing actions are deliberately disabled there so you can't accidentally try to rewrite commits you haven't even pulled yet. Commit hashes are color-coded by push state, so commits that haven't left your machine, and are therefore safe to rewrite, stand out at a glance.
A More Flexible Way to Stage Changes
Staging changes is a routine part of the Git workflow, and Ziggity gives you a few ways to handle it without overcomplicating things.
You can work directly from the staging view and use the mouse to select individual lines before staging them, which gives you finer control when a file contains several unrelated changes that shouldn't land in the same commit.
It's a small feature, but a genuinely useful one if you care about keeping commits focused rather than staging an entire file at once.
Checkout by Name, Without the Detached HEAD Surprise
Press the checkout shortcut, start typing any ref, and pick from live suggestions.
If you type the name of a remote branch, Ziggity checks it out with tracking set up automatically, landing you on a proper local branch rather than a detached HEAD. Existing local branches switch normally, and tags or commits detach, because that's the only thing that makes sense for them.
This is a small but real usability improvement over some other terminal Git clients, where typing a remote branch name in the checkout prompt can leave you in a detached state with no local branch created.
Writing Commit Messages Gets Some Extra Help
Ziggity puts real thought into the commit message experience. Its built-in editor nudges you toward the 50/72 commit message convention with live, configurable limits, and it supports prepare-commit-msg hooks including hooks that derive a ticket number from your branch name.
There's also optional AI-assisted commit message generation from your staged changes. Rather than locking you into one provider, Ziggity calls out to a configurable external command, so you can point it at whatever model or subscription you already use.
Installing Ziggity
Ziggity is easily installable via Homebrew. If you have Homebrew set up on your system, use the command below to install it:
brew install simoarpe/ziggity/ziggity
Other than that, Ziggity offers prebuilt binaries for several architectures. You can download the appropriate binary from the official GitHub releases page.
Extract and copy the binary to a folder that is in your PATH. You can then run Ziggity from the terminal using the command:
ziggity
Wrapping Up
Terminal-based Git clients are not new, and there are already some excellent options available for those who prefer managing repositories without leaving the command line.
Ziggity enters this space with a focus on staying lightweight, staying out of your way during slow operations, and getting small usability details like checkout behavior and force pushes right.
The project is still a relatively new addition to the TUI Git client space, but it already offers a solid set of features. Whether it can replace an established tool like lazygit will ultimately depend on your workflow and the features you rely on.
Have you tried Ziggity yet? Or do you already have a favorite Git client for the terminal? Let us know your thoughts in the comments.
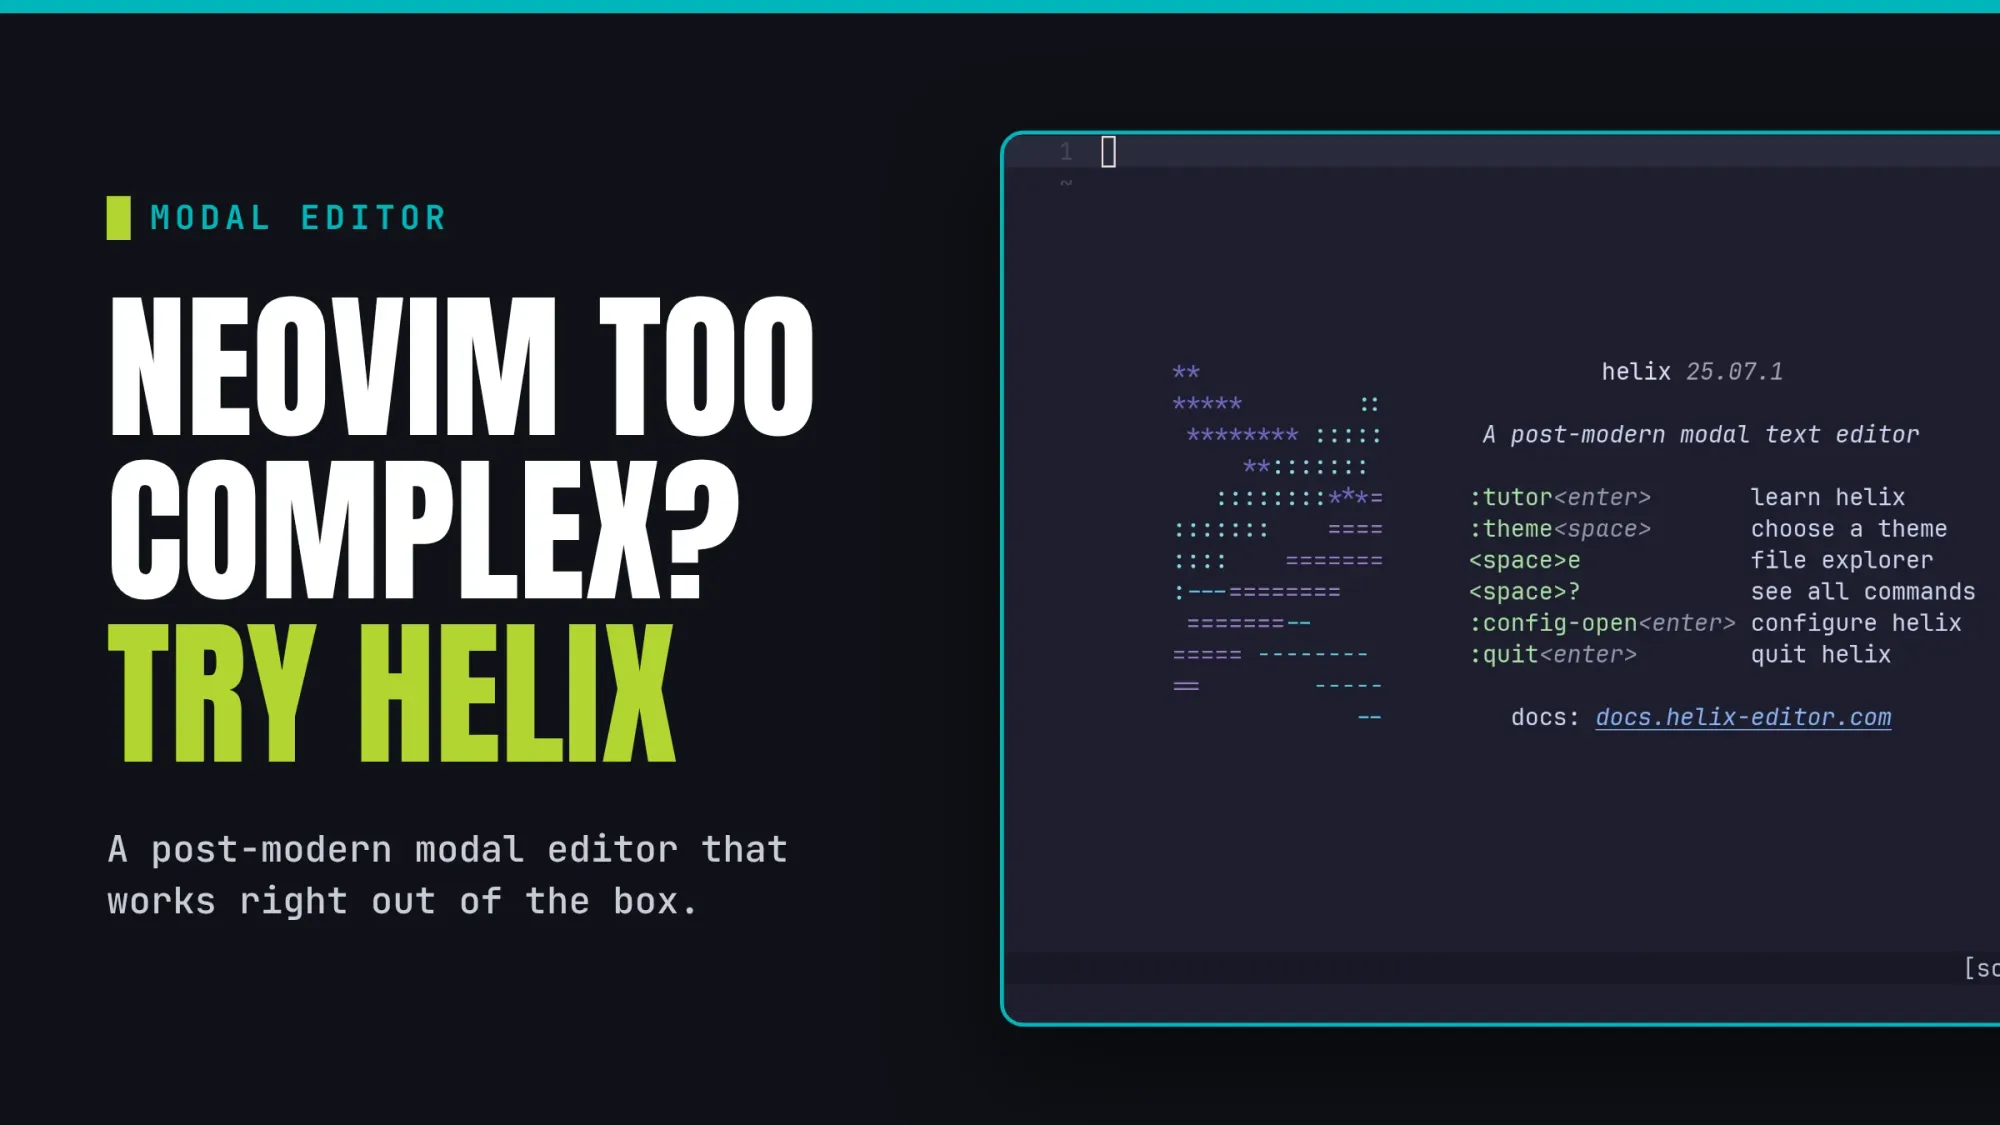
Helix is a modal text editor that operates much like Vim or Neovim. While switching from a GUI like VSCode takes some practice, mastering a terminal editor truly boosts your daily productivity.
Starting with Helix is a smooth experience if you have never used modal editors before. The default settings are intuitive, provided you are familiar with your keyboard layout.
You can avoid the hassle of learning a specific programming language just to configure your workspace. Helix delivers a complete and powerful experience right after you install it.
In my opinion, I suggest Helix if you want the Neovim vibe without the massive time investment. It includes modern tools like language server protocols and tree sitter support by default.
🚧
Helix does not have a plugin system at the moment.
Let's look at how you can get started with Helix as your very first modal text editor.
Installing Helix
Helix is available in the official repositories for several Linux distributions, like Arch Linux, Fedora, and Ubuntu. To install it on Arch Linux, use the command:
sudo pacman -S helix
If you are a Fedora user, install the editor with:
sudo dnf install helix
Ubuntu 26.04 LTS and above also includes Helix in its official repositories. You can install it using:
sudo apt install hx
📋
In Ubuntu, the command name is hx and not helix.
For all other users, pre-built binaries are available in the official Helix GitHub repository. You can follow the official documentation to complete the installation of these binaries.
Helix is a modal editor. It means Helix has different modes with dedicated purposes.
Without having an understanding of the modes, it is hard to grasp how the editor works. So, let's see them one by one.
💡
Unlike Vim, Helix follows a select → action model. You always highlight text first, then perform an operation on it. If something feels backwards coming from Vim, this is likely why.
The Normal Mode
Normal mode is the default state in most modal text editors, where you perform all text manipulations.
Whenever you are elsewhere in the editor, simply press the ESC key to return to this home base. Unlike a traditional editor where you are always in a typing state, modal editors use this mode as a starting point.
For example, you can scroll down a couple of lines by pressing j while in normal mode. You can also remove a character under the cursor by pressing d.
You cannot type any text while you are in this Normal mode. To start typing, you must enter insert mode by pressing i while the editor is in its normal state.
The Insert Mode
Insert mode is the state where you actually type your text. Most traditional GUI editors, like VSCode, have this mode only where all text actions are carried out with the help of keyboard and mouse.
While in insert mode, you generally focus on entering text rather than deleting or copying it. You can still use the arrow keys to move the cursor around in both normal and insert modes.
Whenever you finish typing, simply press ESC to return to normal mode.
💡
Some other text actions are supported in Insert mode, which takes help of the CTRL and ALT key. Take a look at the documentation for these commands in insert mode.
Select Mode
Select mode is the equivalent of Visual mode in Vim and is used specifically for highlighting text. You enter this mode by pressing v while in the Normal mode.
The character under your cursor is automatically selected as soon as you enter this mode. You then use navigation keys to extend that selection across your text.
For example, pressing l will extend the selection to the next character, and pressing it again adds the third. You cannot type any new text while you are in this state.
In my experience, combining this with movement shortcuts is incredibly powerful. For instance, I can press v followed by ge to instantly select everything from my cursor to the last line.
You can even press the END key to include the entire last line in your selection. This allows you to highlight massive blocks of text with just a few keystrokes.
Once your selection is finished, use the Normal mode keys to perform an action.
🚧
In Select mode, you can directly apply operators like d, y, c on your selection. No need to press Escape first. The operator acts on the selection and drops you back into Normal mode.
Pressing d will delete the entire highlighted block, while y will copy it for later use.
Other modes of purpose
The above three are the main modes in Helix. But there are some more modes that you may come across.
Command Mode
When you press : in normal mode, you enter the command mode. Here, you can enter supported commands.
Some important operations, like saving a file, quitting the editor, etc., are performed in the command mode.
Picker mode is triggered by pressing the Space key in normal mode. It is a fuzzy finder interface, where you can invoke a file picker, buffer picker, etc.
If you know Neovim, this picker mode can be a minimal close equivalent of the Telescope plugin.
For example, we can use Space + f to open a file picker.
Also, if I select a block of text and press Space + Shift + c, then you can block comment that section, and so on.
0:00
/0:21
Comment code in Helix
Helix shows the actions
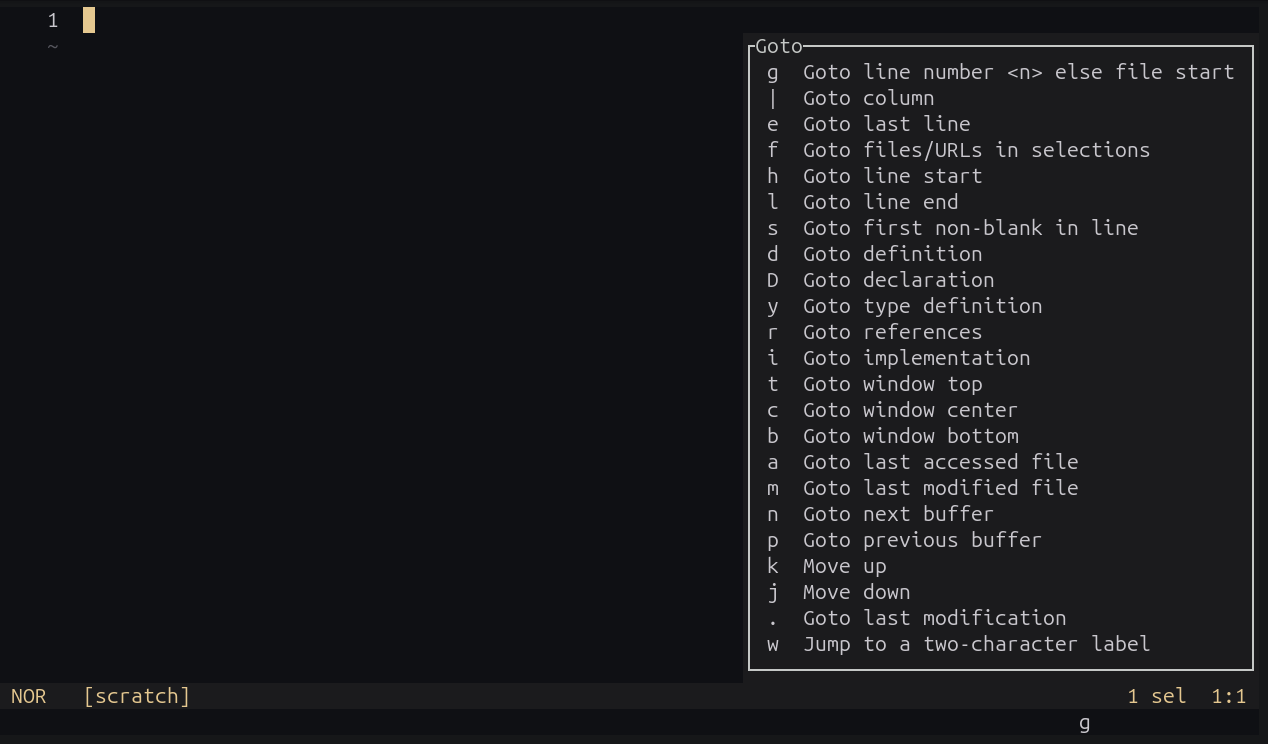
For supplementary modes like picker mode, Helix shows what to press next in a neat pop up.
When you press space, you can see that a pop-up comes up that says all keys and their uses, so that you can read and follow.
Another one I suggest you try is press the g key and read all the subkeys and their functions.
Pressing the g key
Access the tutor
Helix has an interactive tutorial available to get you started, like the Vim tutor.
Open a terminal and run the command:
helix --tutor
This will take you to a text, which you will read and perform actions as described.
A beginner should complete this tutorial since it gives you a lot of day-to-day shortcut practice inside a sample text.
Essential Keybindings
Helix works flawlessly right out of the box. You do not need any configuration files to make any part of the editor work in the beginning.
But, since it depends on keybindings, before going to other areas, let's see some essential shortcuts to get you started.
Shortcuts to move around the text in Normal mode.
Description
Shortcuts
Move one character left/bottom/top/right
h/j/k/l
Move to the start of the next word
w
Move to the start of the next word (punctuations included)
W
Move back to the start of the word
b
Move back to the start of the word (punctuation included)
B
Move to the end of the next word
e
Move to the end of the next word (punctuations included)
E
Move to the last line of the text
ge
Move to the first line of the text
gg
Move to the nth line
<n>G
Move to the start of the line
HOME
Move to the end of the line
END
Move page up
PgUp
Move page down
PgDn
Shortcuts to change the text in Normal Mode
Description
Shortcut
Insert before cursor (Enter insert mode)
i
Insert after cursor
a
Insert at the beginning of the line
I
Insert at the end of a line (append)
A
Open a new line below cursor and enter insert mode
o
Open a new line above cursor and enter insert mode
O
Replace character under cursor
r<character>
Delete/cut character under cursor (or selection)
d
Yank (copy) selection
y
Paste selection
p
Paste before cursor
P
Yank (copy) to a named register a
"<a>y
Paste from a named register a
"<a>p
Undo a change
u
Redo a change
U
💡
Always use registers to yank texts. This way, it is easy to confirm where a copied text is and easier to paste later.
🚧
The deletion shortcut d actually cuts the selected word and stored. So, if you have some texts yanked, and then deleted some other text, the deleted text will be the one pasted when you press p. So, use registers for copying important text.
Helix doesn't need a user-written config file to work since it comes with many usable defaults. Still, changing away from defaults needs a config file.
Helix uses the TOML configuration file, located at ~/.config/helix/config.toml.
First, create the directory if it does not exist.
mkdir -p ~/.config/helix/
Now, create a file inside this directory like:
touch ~/.config/helix/config.toml
A different theme
Helix comes with a lot of themes preinstalled, and you don't want to create a long config for it.
Open Helix in a terminal:
helix
Inside Helix, in Normal mode, enter :theme, press a space, and press the TAB key.
You can see that themes begin to show preview. Press TAB to scroll through the live preview of themes. When you spot a theme of your choice, note the name of the theme and press Enter.
📋
If you have downloaded the Helix binary, then set of themes are in the runtime folder. Make sure you placed it properly as the documentation say.
Upon pressing the enter key, the theme will be applied to the current session.
To make it permanent, you need to add one line to the Helix config file.
Edit the config file with your favorite text editor.
helix ~/.config/helix/config.toml
And add the line
theme = "theme-name"
For example,
theme = "tokyonight"
Language support
Helix comes with Language Server Protocol Support preset, so there is no need to worry about configuring the LSP.
Still, you need to setup the language server though.
I am using Arch Linux in this example, and in Arch Linux, most of the language server you need are available in the official repository.
To set up CSS support, install the vscode-css-language-server
sudo pacman -S vscode-css-languageserver
Helix will spot this , and you can start working on CSS files from your next start.
0:00
/0:52
CSS Language Completion in Helix
To set up Rust support, install the rust-analyzer package:
Helix supports multiple cursors out of the box. You can duplicate your cursor downward by pressing Shift + c in Normal mode.
0:00
/0:22
Multiple Cursors in Helix
This lets you edit several lines at once. If you end up with multiple cursors by accident, press , to collapse back to a single cursor.
Wrapping Up
Helix is a decent modal editor, that offers most of the modern features you would expect in the convenience of an easier learning curve.
I won't suggest replacing Neovim or Vim with Helix if you have mastered those editors. But, if you are into modal editing, or terminal-based text editing in general, Helix is the best place to start.
Will you use Helix for all your coding purposes? Or you have another editor that meets all your needs? Do mention in the comments.
Ubuntu works reasonably well out of the box, but a fresh installation still leaves plenty of room for improvement. A few tweaks, some essential software, and a handful of lesser-known settings can help you get a more comfortable, productive, and personalized desktop experience from day one.
In this guide, let's look at some of the first things worth doing after installing Ubuntu 26.10.
Perform a System Update
Before installing new applications or customizing the desktop, it is a good idea to check for any available system updates. Ubuntu installation images are not updated daily, so there may already be security patches, bug fixes, and package updates waiting to be installed.
The easiest way is to launch Software Updater from the Activities Overview and let it handle the process.
This command refreshes the package repository information and installs the latest available updates. Taking care of updates first helps ensure a stable and secure foundation before moving on to other post-installation tasks.
Install Media Codecs
Due to licensing and copyright restrictions in certain countries, Ubuntu does not include support for some popular media formats such as MP3, MPEG-4, and AVI out of the box.
Fortunately, installing support for these formats is straightforward. The ubuntu-restricted-extras package bundles media codecs, Microsoft TrueType fonts, and a few additional components that improve compatibility with common audio, video, and office documents.
sudo apt install ubuntu-restricted-extras
💡
If you are using an Ubuntu flavor such as Kubuntu, install the corresponding package instead. For example, Kubuntu users should install kubuntu-restricted-extras.
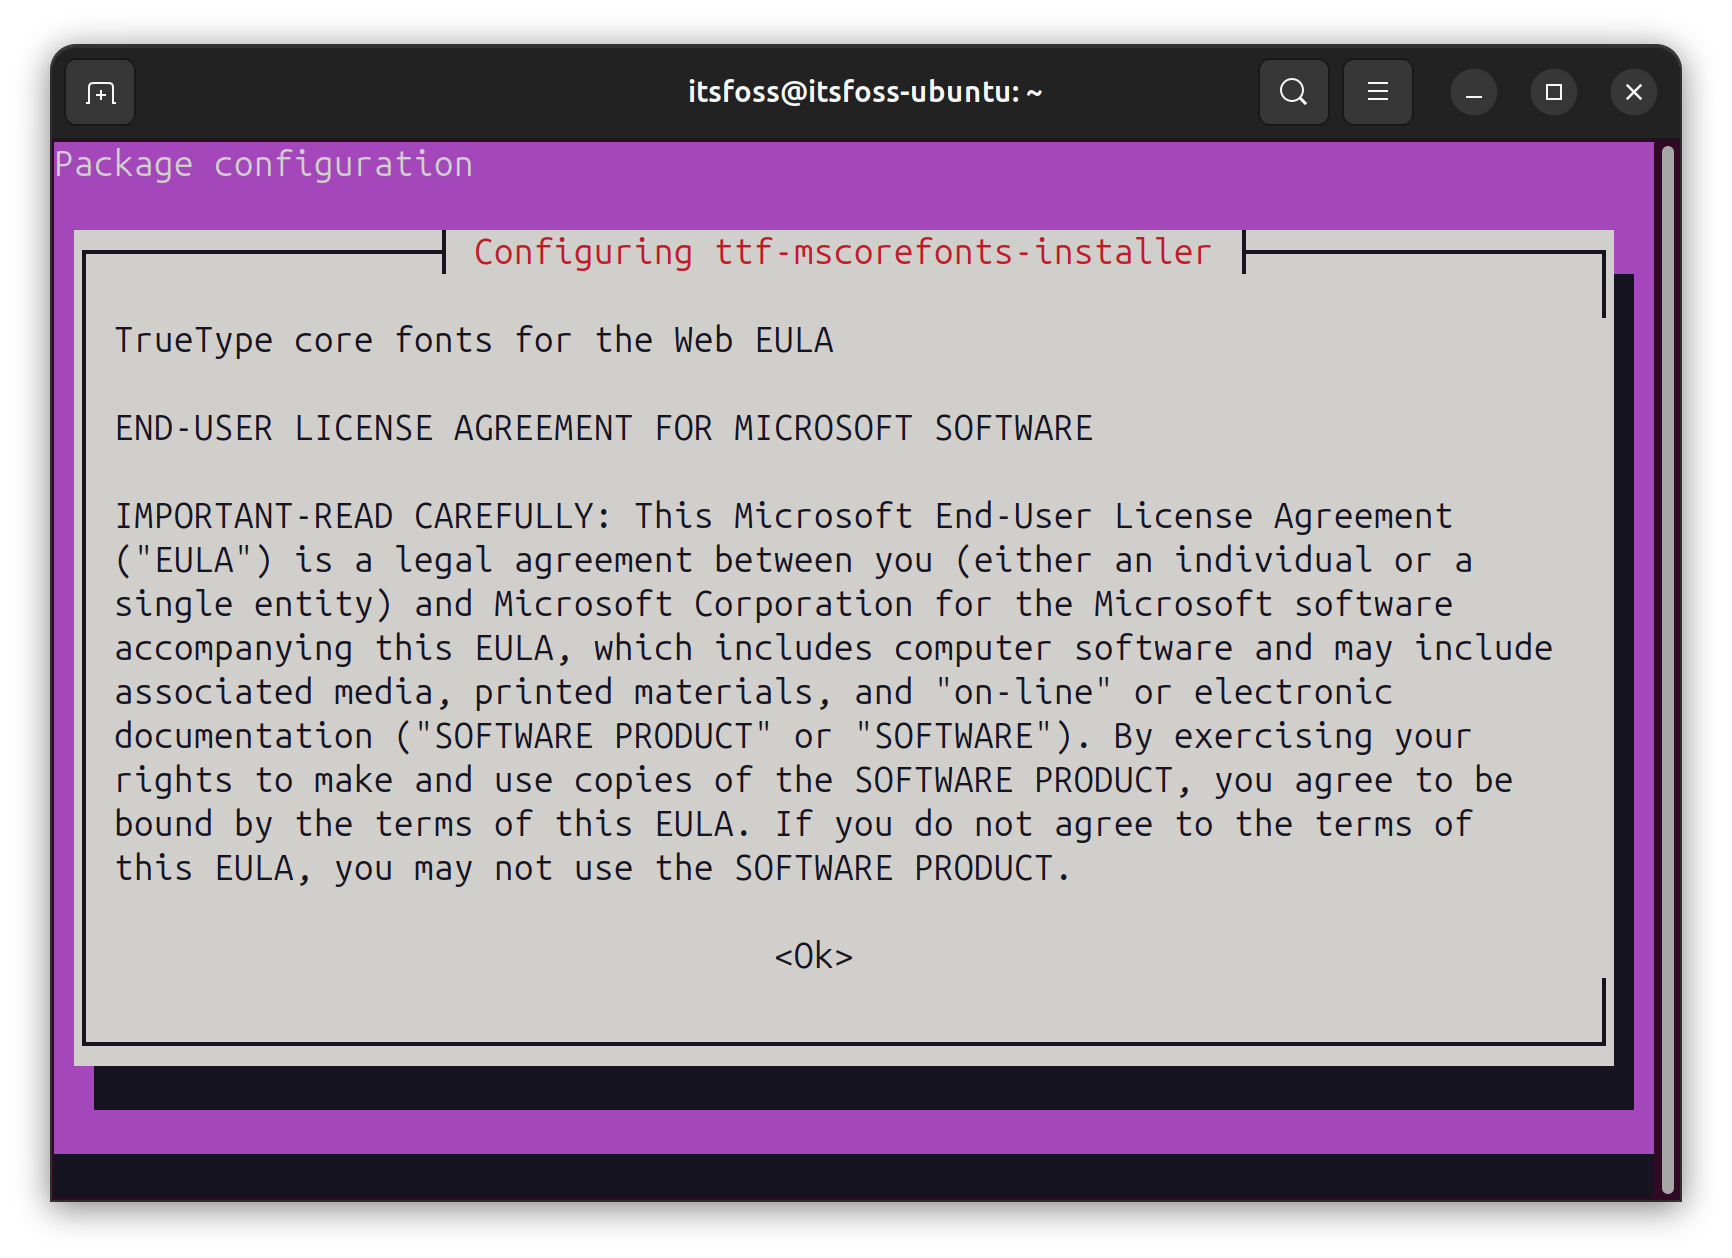
If you see the EULA or the license screen, remember to use the tab key to select between the options and then hit enter to confirm your choice.
Accept Microsoft EULA
Try the AI Voice Input
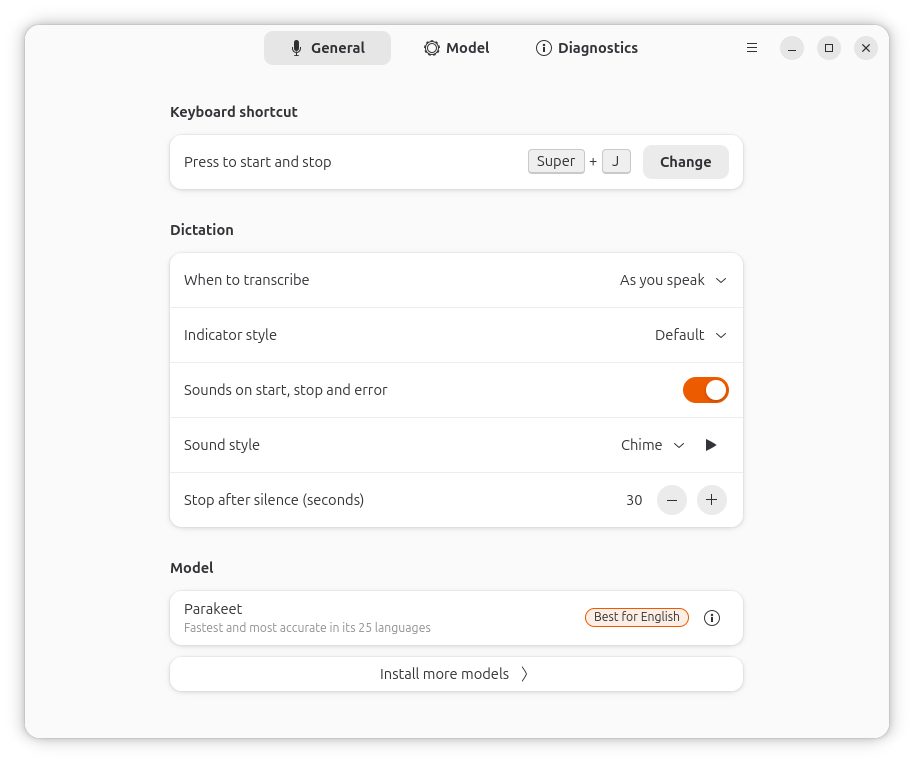
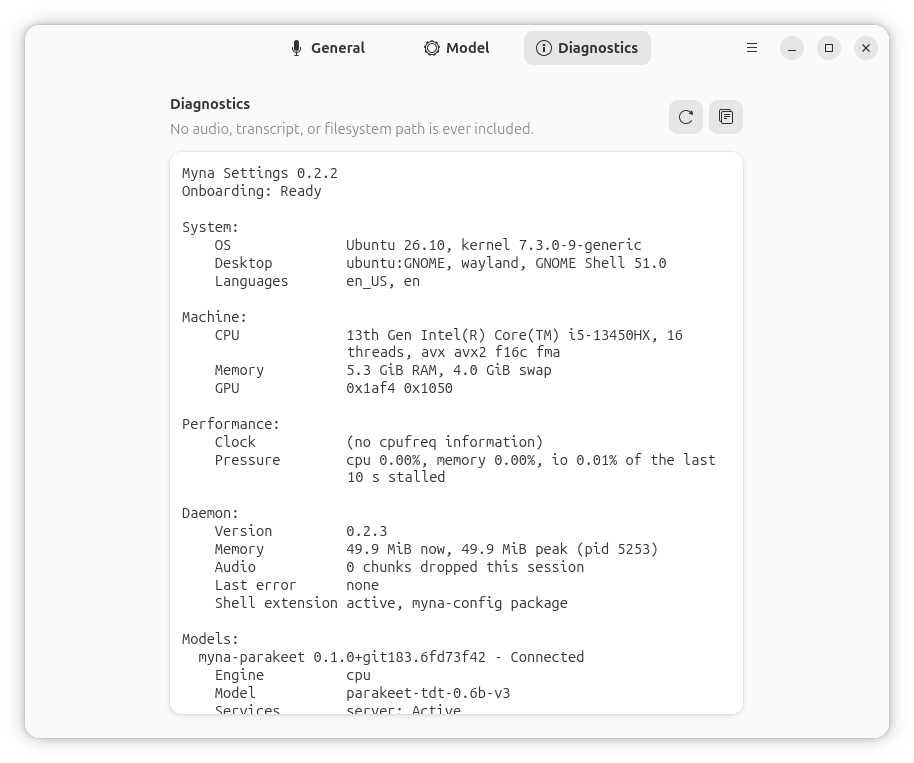
Typing isn't always the fastest way to get text into a computer. Whether you're taking notes, drafting an email, or quickly capturing an idea, speaking can sometimes feel more natural. Ubuntu 26.10 introduces Myna, an optional speech-to-text feature that brings local voice dictation directly to the desktop.
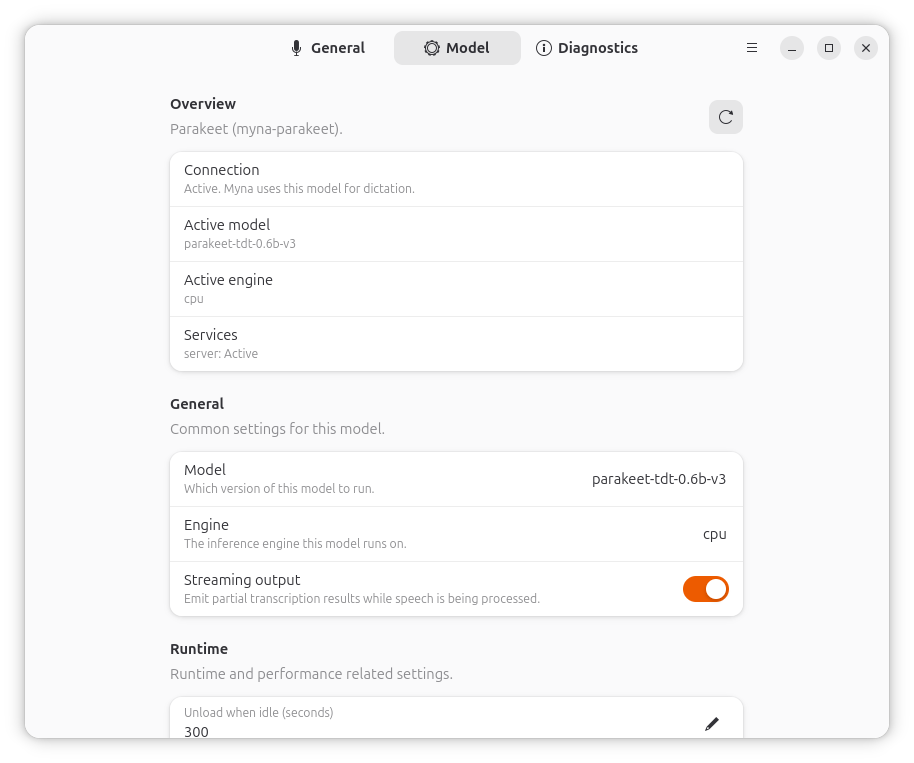
Myna AI Voice Input
What makes Myna particularly interesting is its privacy-focused approach. Speech recognition runs entirely on your machine, and once the required model is downloaded, no internet connection is needed for transcription. Simply place the cursor in a text field, press the configured shortcut, and start speaking. Do keep in mind that Myna is currently offered as a technology preview, so you should expect some rough edges while the feature continues to mature.
Change Wallpaper and Accent Colors
A different wallpaper and accent color can completely change the look of the desktop without installing any additional software.
To get started, right-click on an empty area of the desktop and select Change Background. From there, you can choose one of the included wallpapers or use the Add Picture button to select an image from your collection.
Change Wallpaper in Ubuntu
💡
It's possible to set a wallpaper directly from the file manager by right-clicking an image and selecting the wallpaper option. However, this is not always the best approach, as the image may later be moved or deleted from its original location, resulting in a missing background.
While you're there, consider exploring the available accent colors as well. Choosing an accent color that complements the wallpaper can give the desktop a more cohesive and polished appearance. 🎨
Enable Flatpak support
Ubuntu promotes Snap as its primary universal packaging format, and you'll find plenty of applications available through it. However, not every developer distributes their software as a Snap package. In the Linux desktop world, you'll frequently come across applications that are available only through Flatpak.
For that reason, it makes sense to enable Flatpak support early on. Start by installing the required package:
sudo apt install flatpak
Once installed, add the Flathub repository, which serves as the primary source for most Flatpak applications:
After adding Flathub, restart the system to ensure everything is integrated properly. You'll then be able to install and manage Flatpak applications from the command line.
We have a dedicated article explaining Flatpak support in Ubuntu. Give it a read, if you want more Flatpak setup requirements.
Familiarize Installing New Applications
At some point, you'll want to go beyond the default applications that come with Ubuntu. The good news is that Ubuntu has one of the largest software ecosystems in the Linux world, making it easy to find and install both open-source and proprietary software.
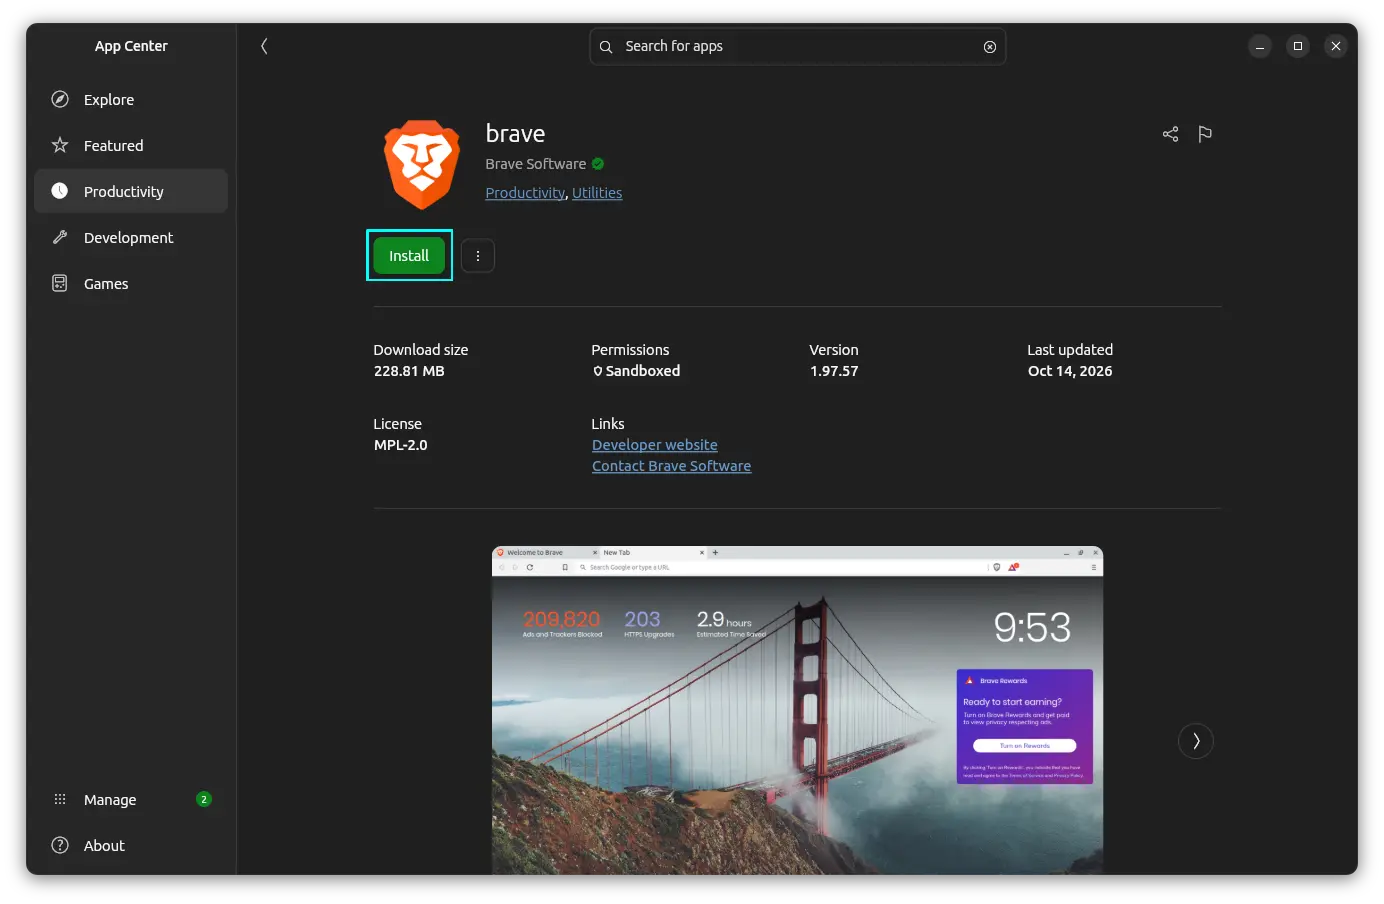
For those who prefer a graphical approach, open the App Center, search for the application you need, and click Install. Ubuntu's App Center supports both DEB and Snap packages, though it generally prioritizes Snap applications when both formats are available.
Install Application via App Center
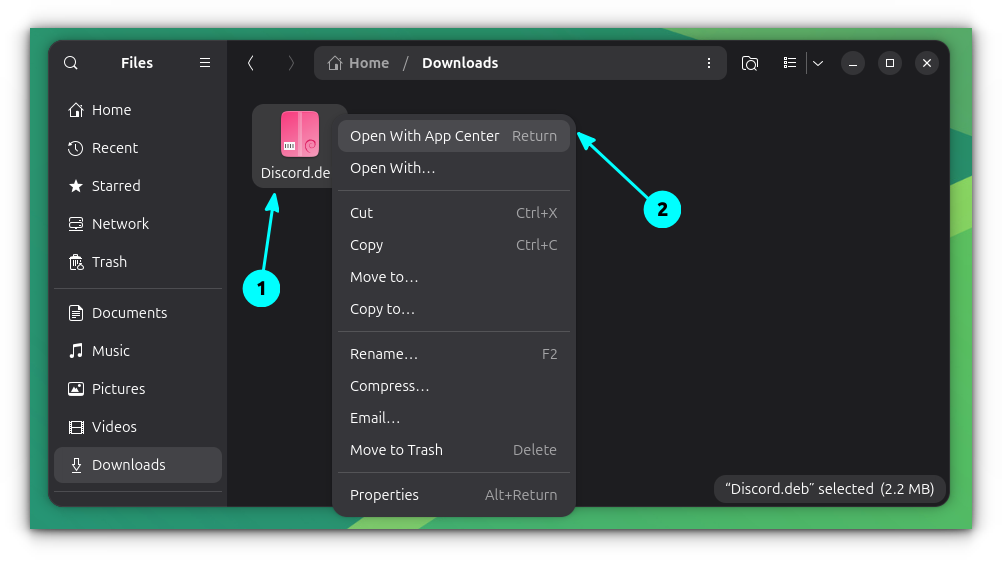
Many software vendors also provide Ubuntu packages directly on their websites as .deb files. After downloading one, right-click the file and select Open With → App Center. From there, simply click Install to add the application to your system.
Open Deb file with App Center
Install Extension Manager
One of GNOME's biggest strengths is its extension ecosystem. Many of the desktop tweaks that Ubuntu users enjoy, including custom docks, app indicators, and advanced tiling features, are powered by GNOME extensions behind the scenes.
While extensions can be installed manually, managing them quickly becomes inconvenient once you start experimenting with a few. The Extension Manager application provides a much cleaner way to browse, install, update, enable, and disable extensions from a single place.
sudo apt install gnome-shell-extension-manager
Add Your Favorite Apps to the Dock
The Dock in Ubuntu provides quick access to running applications and can also serve as a launcher for the programs you use every day.
Adding applications to the dock is simple. Open the application grid using the Show Apps button or press the Super key, then right-click the desired application and select Pin to Dock. Once added, applications can be rearranged by dragging and dropping them to your preferred position.
0:00
/0:14
Pin application to Dock in Ubuntu
The dock itself is also highly customizable. You can change its position, adjust icon sizes, enable auto-hide, and tweak other behavior from the system settings to better suit your workflow.
Customize the Dock
Ubuntu provides you a Dock that host the pinned and opened application on the left edge of your screen. Since it is based on a customized version of GNOME's Dash to Dock extension, there is plenty of room for customization.
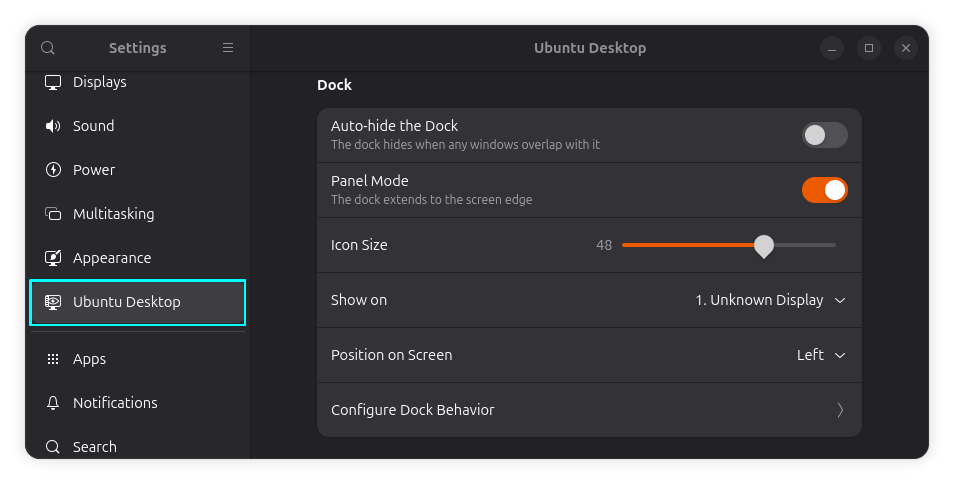
For basic adjustments, head to Settings → Ubuntu Desktop → Dock. Here, you can change the dock's position, enable auto-hide, adjust icon sizes, and control how the dock behaves on your desktop.
Dock Settings
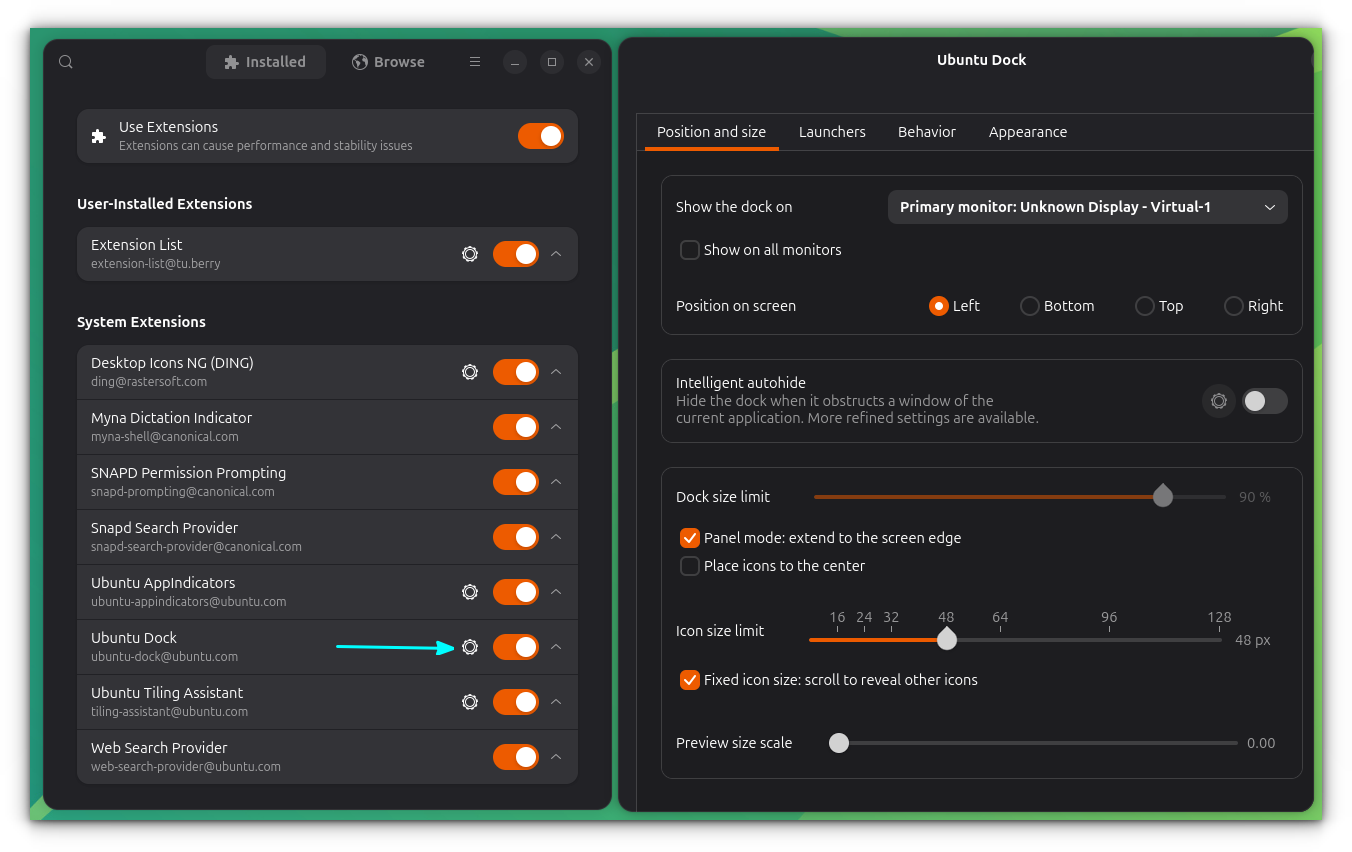
If you want more advanced options, open Extension Manager, select Ubuntu Dock, and access its settings. This exposes additional tweaks that are not available in the regular system settings, giving you greater control over the dock's appearance and behavior.
Extensive Ubuntu Dock Settings
Click to Minimize
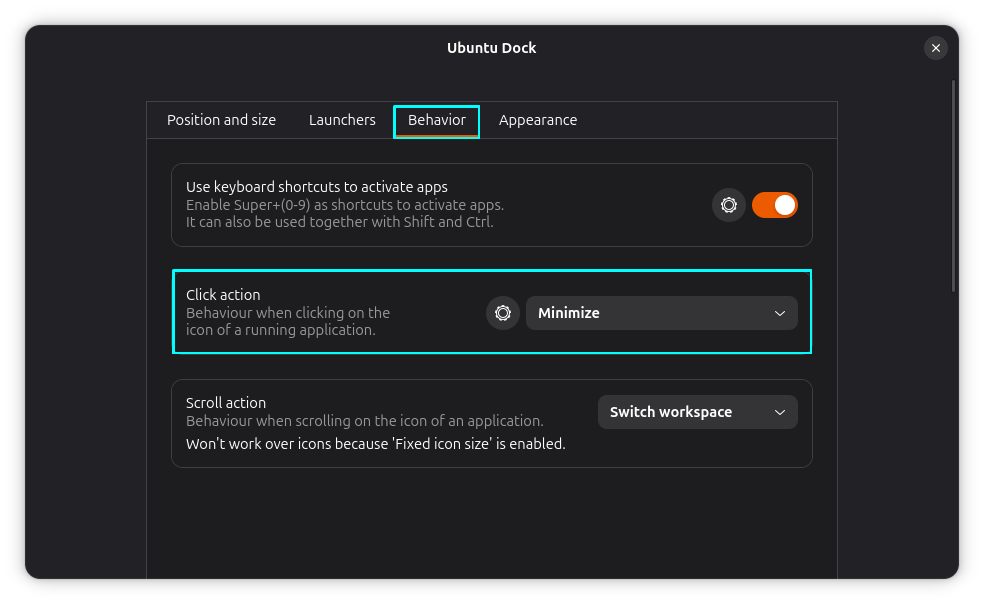
Open Extension Manager, click the settings button next to Ubuntu Dock, and switch to the Behavior tab. Here, locate the Click Action option and change it to Minimize. Once enabled, clicking the icon of an open application will minimize its window.
Click to Minimize Settings
At this point, when you click on the icon of an opened app in the Dock, it will be minimized to the taskbar.
Or, you can set what I do on my system. Set the Click action to Focus, minimize or show previews.
This setting combines the best of both worlds. If an application has a single window open, clicking its dock icon minimizes it. If multiple windows are open, Ubuntu displays window previews instead, making it easier to switch between them.
Install Extensions
Extensions can add new features, improve existing workflows, or completely change how the desktop looks and behaves.
With Extension Manager installed, discovering new extensions becomes straightforward. Open the application, switch to the Browse tab, search for an extension, and click Install.
It's usually better to install a few extensions that genuinely improve your workflow and ignore the rest.
Get Familiar with Tiling
Recent Ubuntu releases have significantly improved the tiling experience. Simply drag a window by its title bar to the top of the screen to reveal available tiling zones. Dropping the window into one of these zones automatically snaps it into place.
What makes the experience particularly useful is the tiling assistant. After placing a window, Ubuntu can suggest other open applications to fill the remaining screen space, making it easy to create an organized workspace without manually arranging every window.
Ubuntu Tiling
If you prefer keyboard shortcuts, the traditional tiling keybindings are also available. And because Ubuntu's tiling functionality is powered by the Ubuntu Tiling Assistant extension, many aspects of its behavior can be customized through Extension Manager to better match your workflow.
Take Care of Your Wellbeing
Many of us spend hours in front of a computer without realizing how much time has passed. Whether it's work, studying, gaming, or binge-watching, it's easy to skip breaks and stay glued to the screen longer than intended.
The Wellbeing feature is designed to help with that. Similar in concept to digital wellbeing tools on mobile devices, it allows you to track screen usage and configure reminders that encourage healthier computer habits.
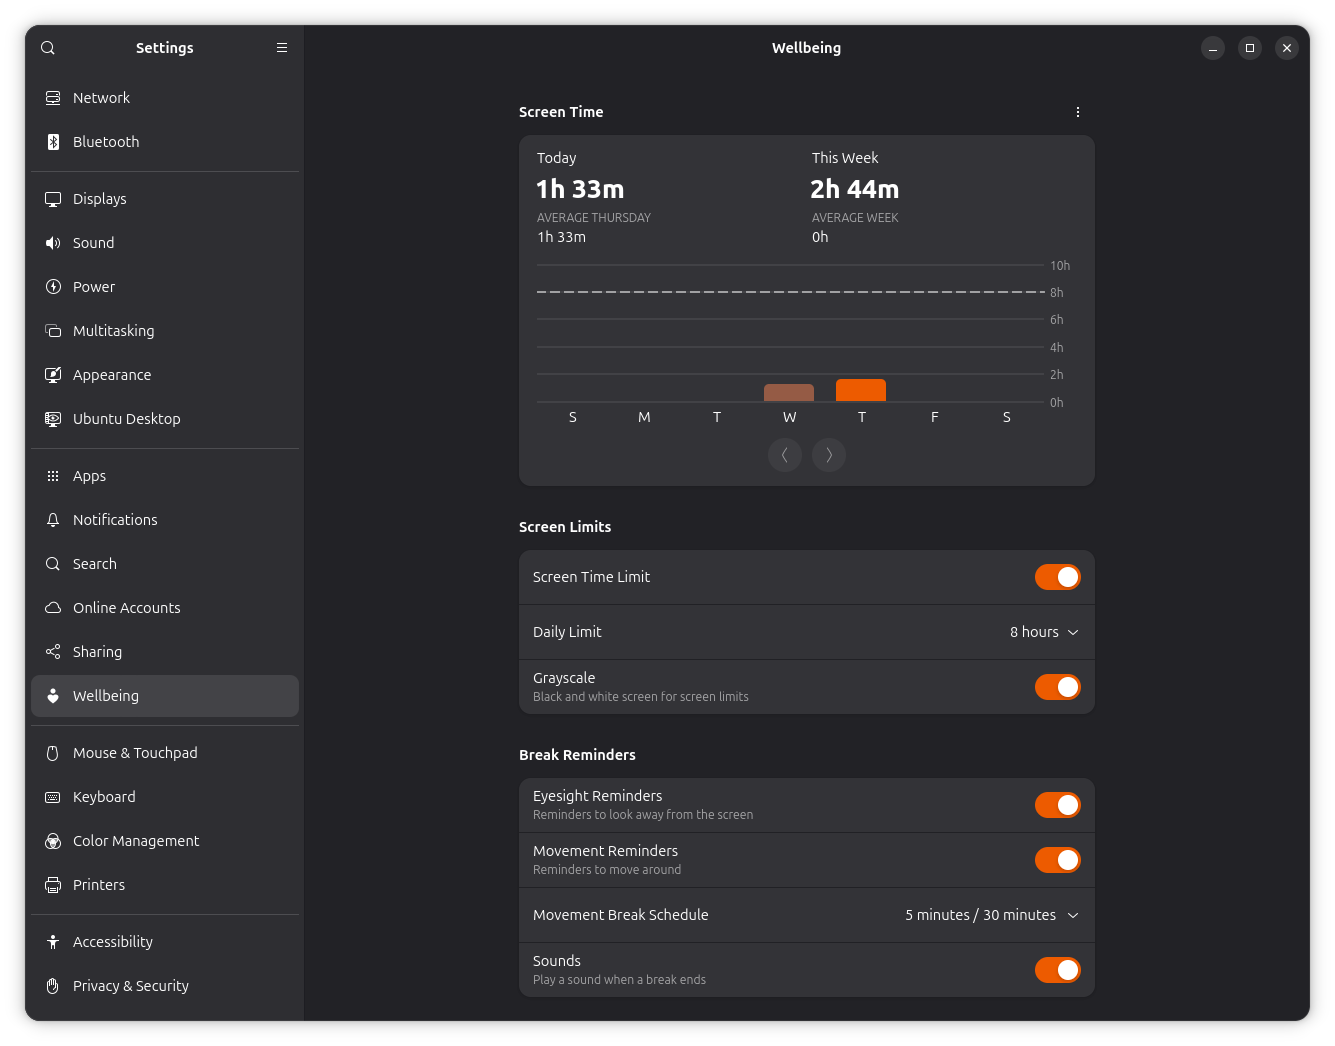
Wellbeing Settings
To get started, open Settings and navigate to the Wellbeing section. From here, you can set daily screen time limits, enable eyesight reminders, configure movement breaks, and even choose whether the display switches to grayscale once a screen time limit has been reached.
Use Your Monitor's HDR Capabilities
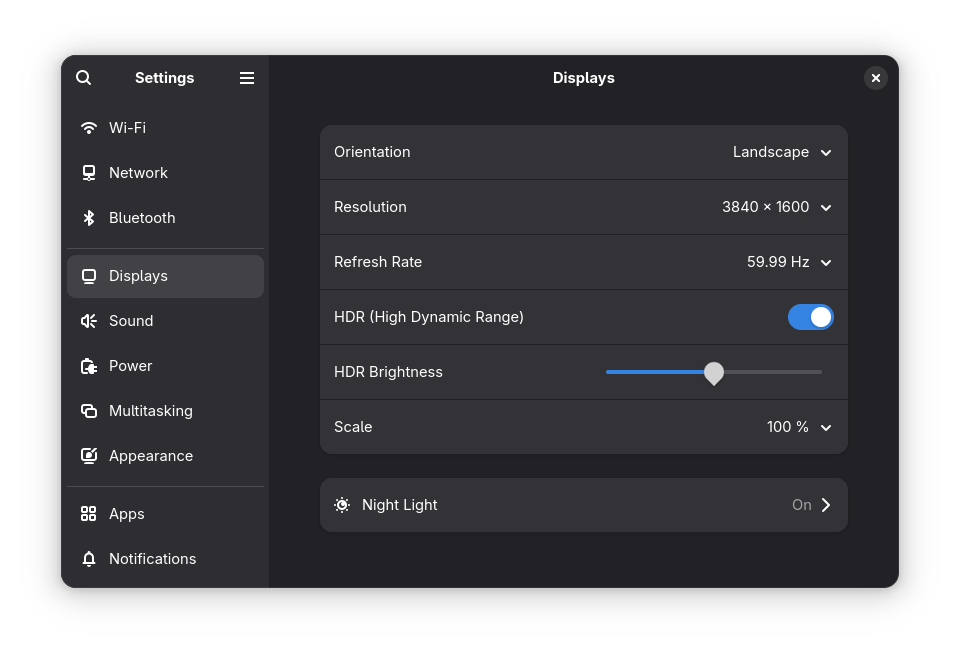
If you own a monitor with HDR functionality, then you can take advantage of the HDR support that works with displays of the BT.2100 standard. With this, you get perks like improved brightness, deeper contrast, and a wider color gamut for more vibrant visuals.
To enable this, you will first need to connect a compatible monitor. Then, go to Settings -> Displays page. If everything went well, then you will be shown the HDR and HDR Brightness options.
HDR Settings
Show Battery Stats in Panel
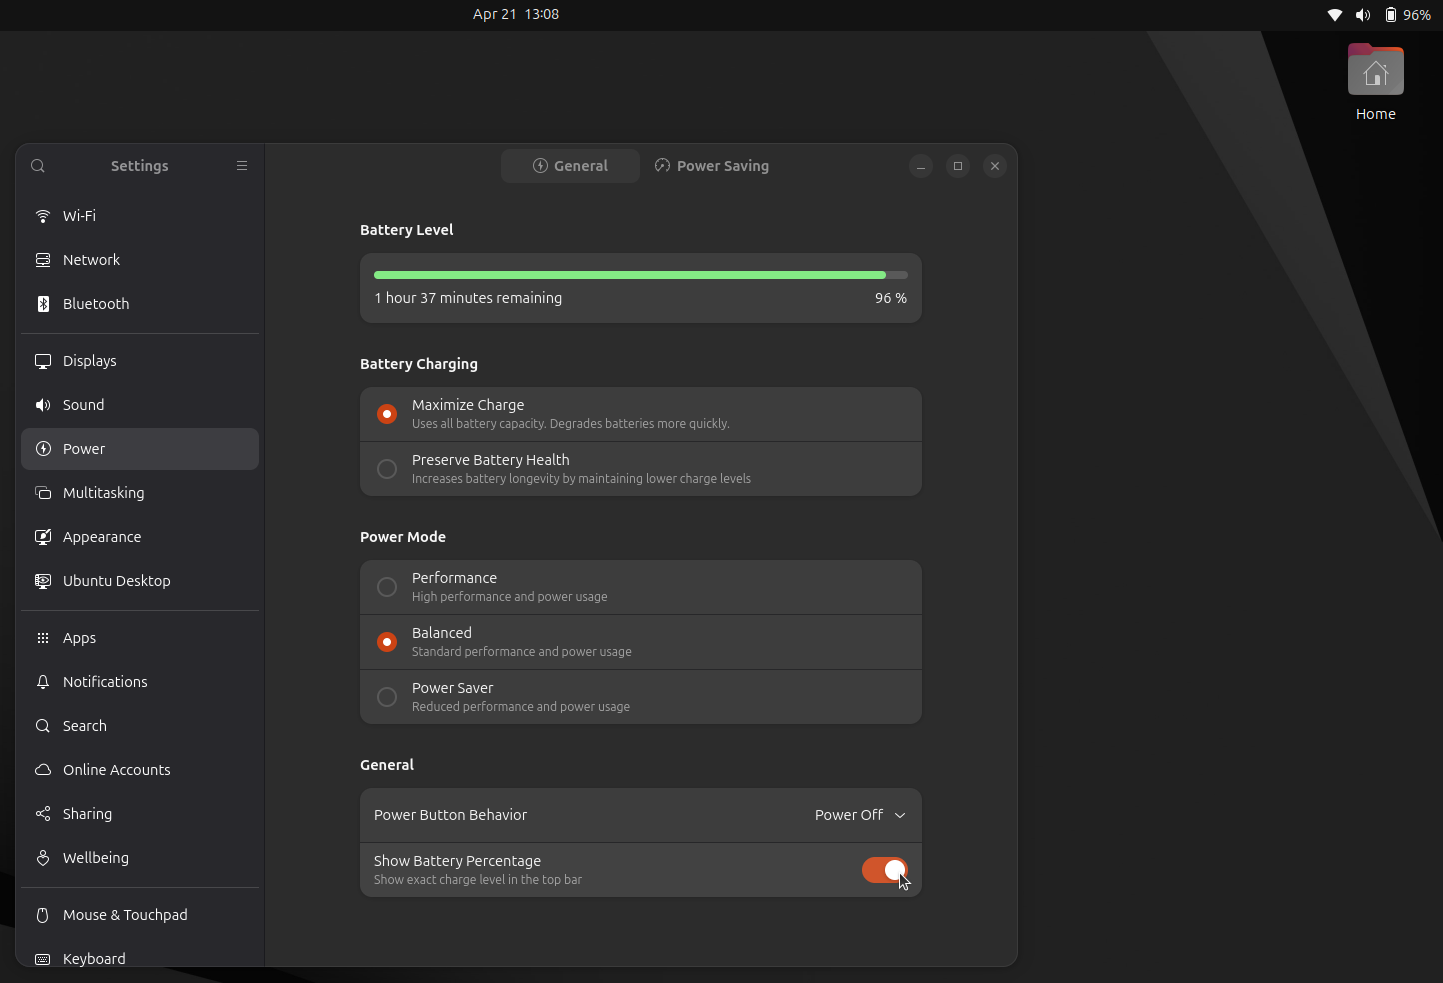
If you are a laptop user who is always on the go and cannot risk your device's battery dying out, then enabling the on-screen display for battery percentage is a must-have for quick battery charge level checks.
To enable this, go to Settings -> Power, then go to the General page and enable the Show Battery Percentage option.
That is not the only way you can spice up the top panel. There are some nice customizations that you can add.
Show Battery Percentage
Disable Automatic Screen Blank
Ubuntu enables automatic screen blanking by default to save power when the system is idle. While that makes sense for many users, it may not be ideal if you frequently step away from your desk, follow long-running tasks, or keep information visible on the screen for extended periods.
Similar to the previous suggestion, go into the Power settings, but instead of General, go into "Power Saving" and uncheck the "Automatic Screen Blank" option. You can also tweak the delay time before the screen goes dark if you prefer this behavior.
✋
This is not a good idea for shared spaces like offices, cafés, or a family home with nosy people around.
Hide the Home Folder
Ubuntu places a Home folder icon on the desktop by default. While some users appreciate the quick access, others prefer a cleaner desktop with an unobstructed view of their wallpaper.
0:00
/0:09
Hide Home Folder from Desktop
If you'd rather keep the desktop free of extra icons, right-click on an empty area of the desktop and select Desktop Icons Settings. From there, disable the Show Home Folder option.
Set What Shows in the Search
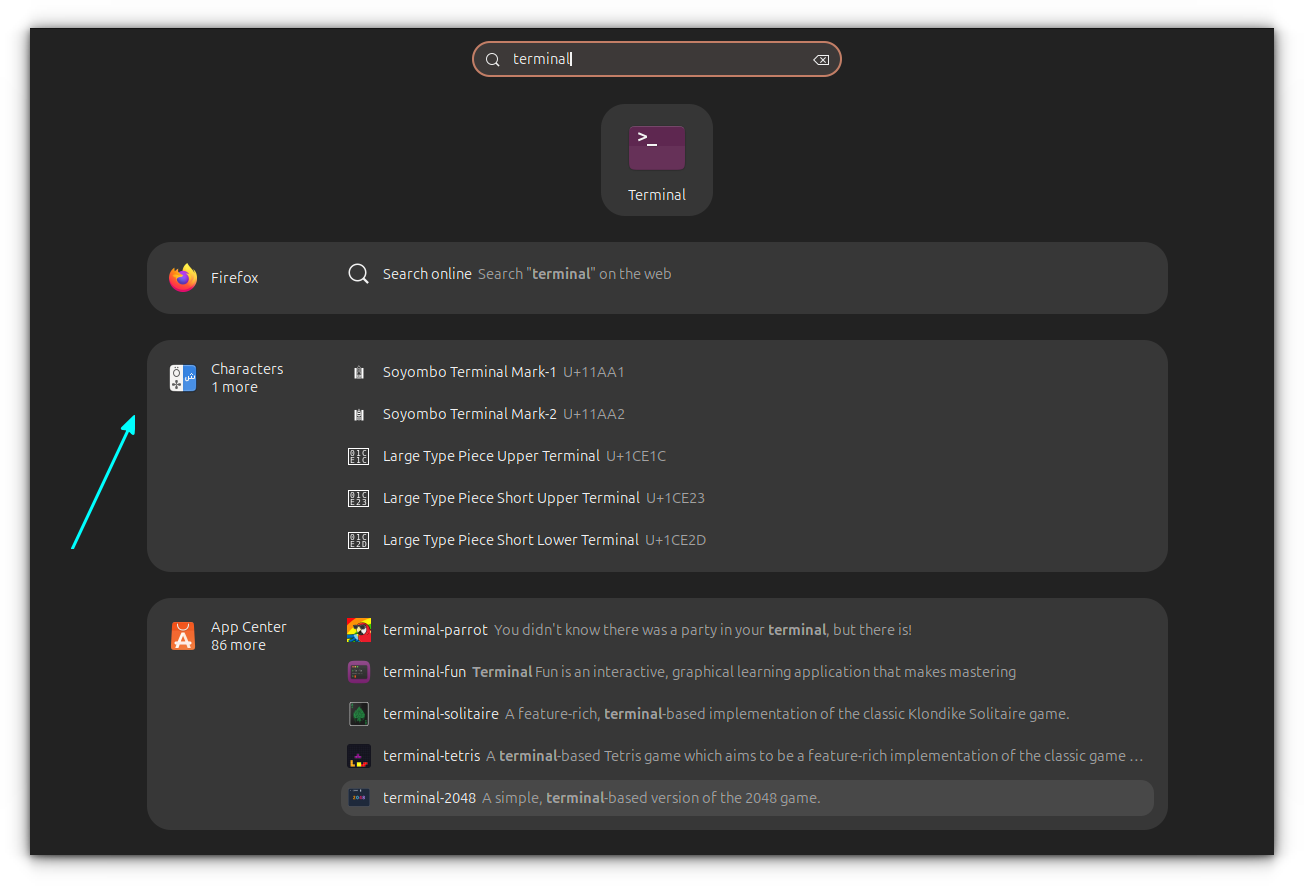
When you perform a search using GNOME Search, it include more than just applications and files. Categories such as characters, emojis, settings, and other providers may also appear, which can make the results feel a bit cluttered depending on how you use your system.
Search Results
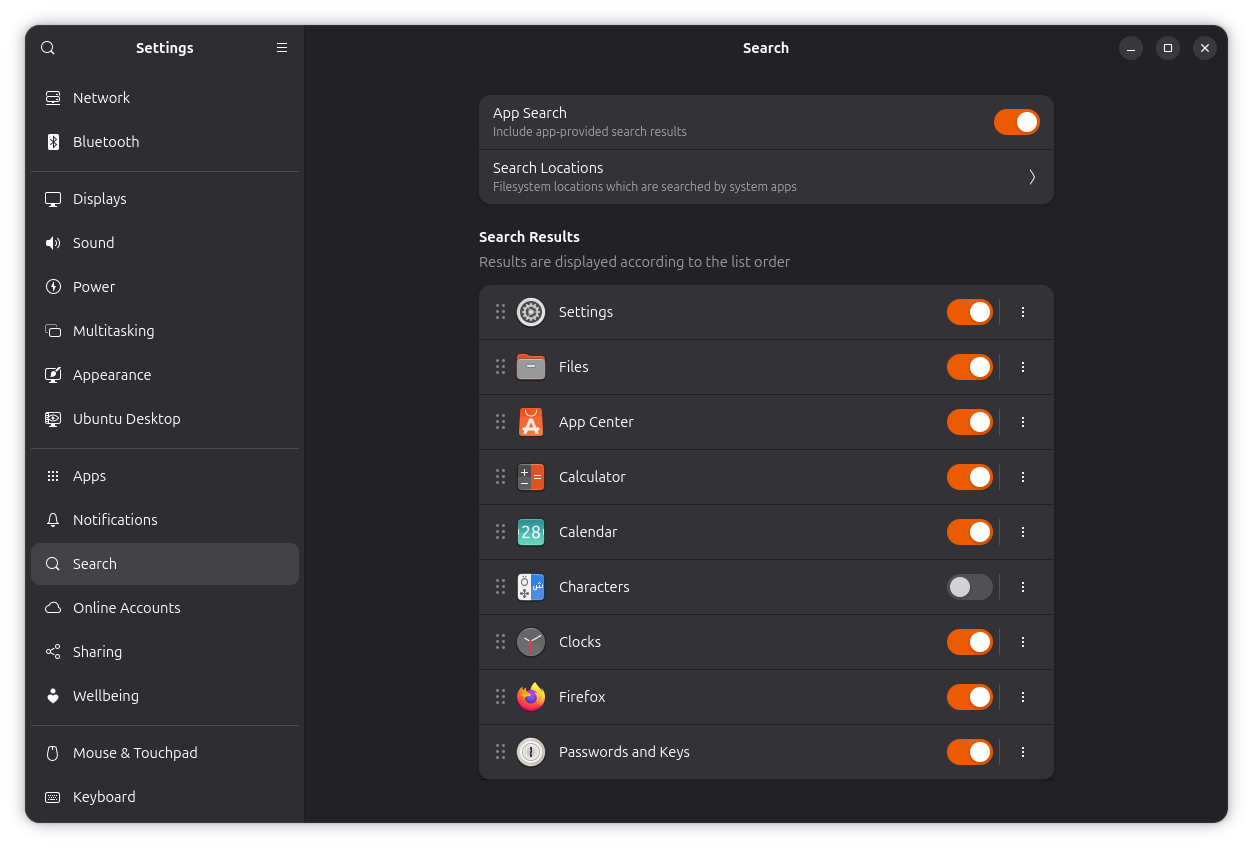
To customize this behavior, open Settings → Search. From here, you can disable search providers you don't use and reorder the remaining ones based on priority. For example, if you never search for emojis through GNOME Search, you can disable the Characters provider entirely.
Search Settings
Install Curl and Git
Ubuntu does not come with curl or git installed by default. A bit curious, because curl is commonly used to download files, interact with web APIs, and fetch installation scripts directly from the terminal. Git, on the other hand, is the most widely used version control system and is often required when working with source code, cloning repositories, or following developer-focused guides.
You can install both packages with a single command:
sudo apt install curl git
Even if you don't need them immediately, having these tools available can save time later. Many open-source projects assume that curl and git are already installed and use them throughout their installation and setup instructions.
Learn Keyboard Shortcuts
Keyboard shortcuts are one of the easiest ways to become more productive on Ubuntu. While almost everything can be done with a mouse, knowing a handful of shortcuts can make launching applications, managing windows, and navigating the desktop significantly faster.
The good news is that GNOME makes discovering shortcuts easy. In most modern GNOME and GTK applications, pressing Ctrl + ? opens a dedicated shortcuts window that neatly organizes all available keyboard shortcuts. Spending a few minutes exploring these can reveal useful actions that might otherwise go unnoticed.
Accessibility settings are often associated with specific needs, but several of them can be genuinely useful for everyone. Ubuntu includes a number of small quality-of-life features that can make interacting with the desktop more comfortable and efficient.
Locate the Cursor
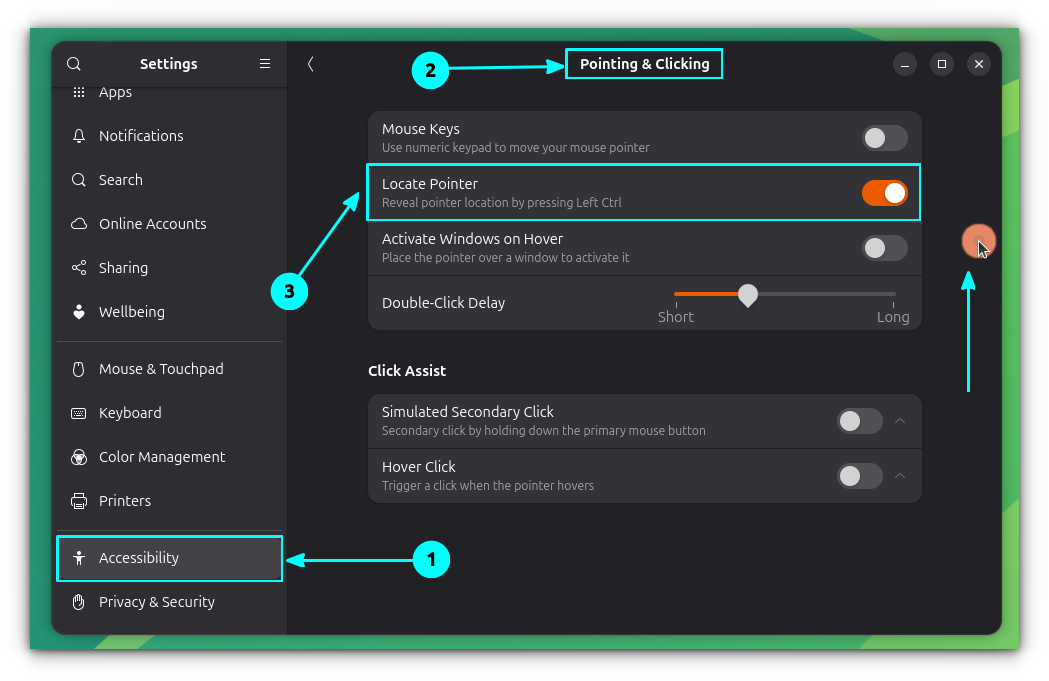
If you work with multiple monitors or frequently have several windows open, there will eventually be a moment when the mouse pointer seems to disappear into the clutter. Instead of wasting time hunting for it, GNOME includes a built-in feature that highlights the pointer on demand.
Open Settings → Accessibility → Pointing and Clicking and enable Locate Pointer. Once enabled, pressing the left Ctrl key triggers a ripple animation around the mouse cursor, making it instantly visible on the screen.
Location Pointer Settings
Reduce Motion Animations
GNOME's animations generally look polished on modern hardware, but they are not essential to the desktop experience. If you prefer a more immediate feel or use older hardware, reducing animations can make the interface feel slightly more responsive.
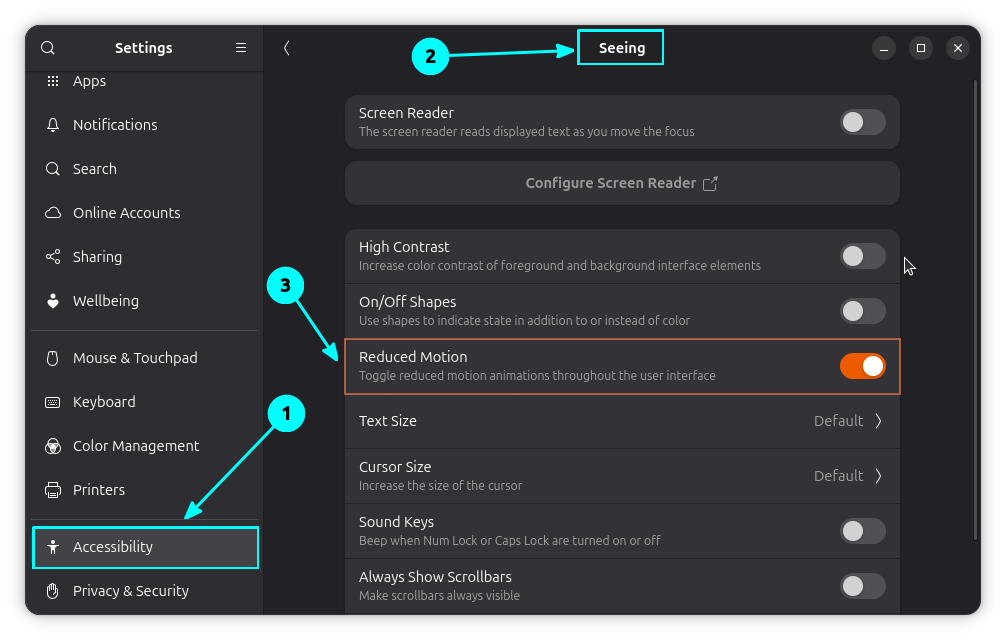
To enable this setting, head to Settings → Accessibility → Seeing and turn on Reduced Motion. GNOME will minimize many of its transition and animation effects throughout the desktop.
Reduced Motion Settings
Don't expect dramatic performance improvements, especially on newer systems. However, on less powerful hardware, or if you simply prefer a snappier and less animated interface, this small tweak can make the desktop feel a bit more streamlined.
Get Overamplification
Ubuntu offers an accessibility feature that can boost audio output beyond the normal limit.
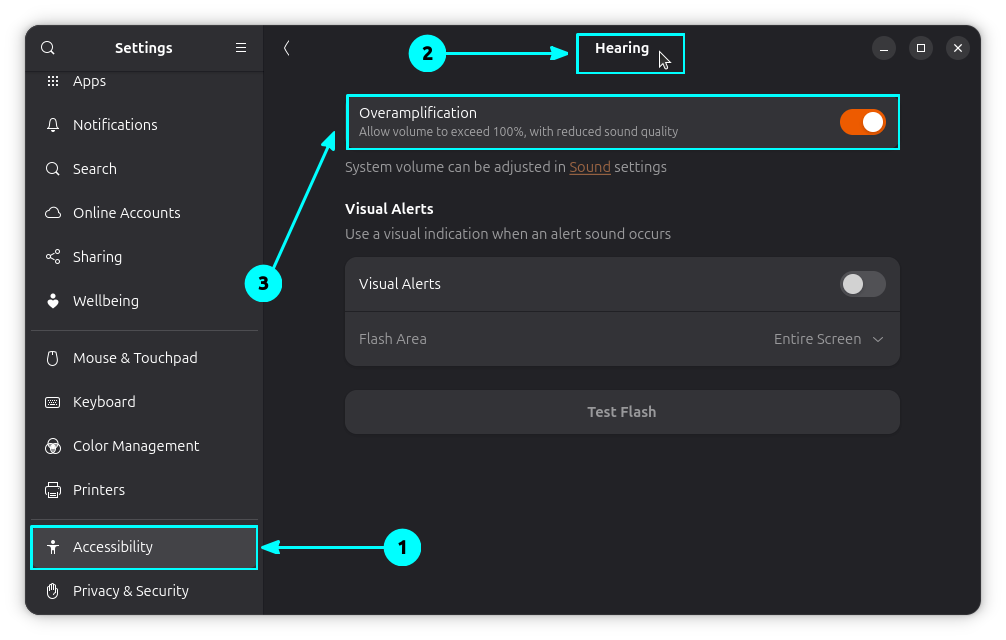
To enable it, open Settings → Accessibility → Hearing and turn on Overamplification. Once enabled, the system volume can be increased above 100% when needed.
Overamplification Settings
Keep in mind that this is achieved through software amplification, so pushing the volume too high may introduce distortion or reduce audio quality. Still, it can be a useful option when dealing with particularly quiet recordings, low-volume speakers, or headphones that need a little extra boost.
Wrapping Up
One of the things I appreciate about Ubuntu is that it works well with its default settings while still offering plenty of ways to tailor the experience. You don't need to apply every tweak mentioned here. Pick the ones that match your workflow and ignore the rest.
If you're new to Ubuntu, start with the essentials and explore gradually. Over time, you'll discover which settings, extensions, and tools genuinely improve your day-to-day experience, helping you build a desktop that feels truly your own.
I spend a lot of time in the terminal. Whether it is writing scripts, editing configuration files, or managing remote servers, the terminal remains the place where I get most of my work done. But when a project becomes slightly complex, I often find myself reaching for the comfort of a graphical code editor like Zed.
I'll be honest, while I can appreciate why people love tools like Vim and Neovim, learning a modal editor has always felt like more of a commitment than I was willing to make.
My editing needs are fairly straightforward, and spending hours memorizing keybindings, configuring plugins, and building a workflow from scratch never felt like a worthwhile investment for me.
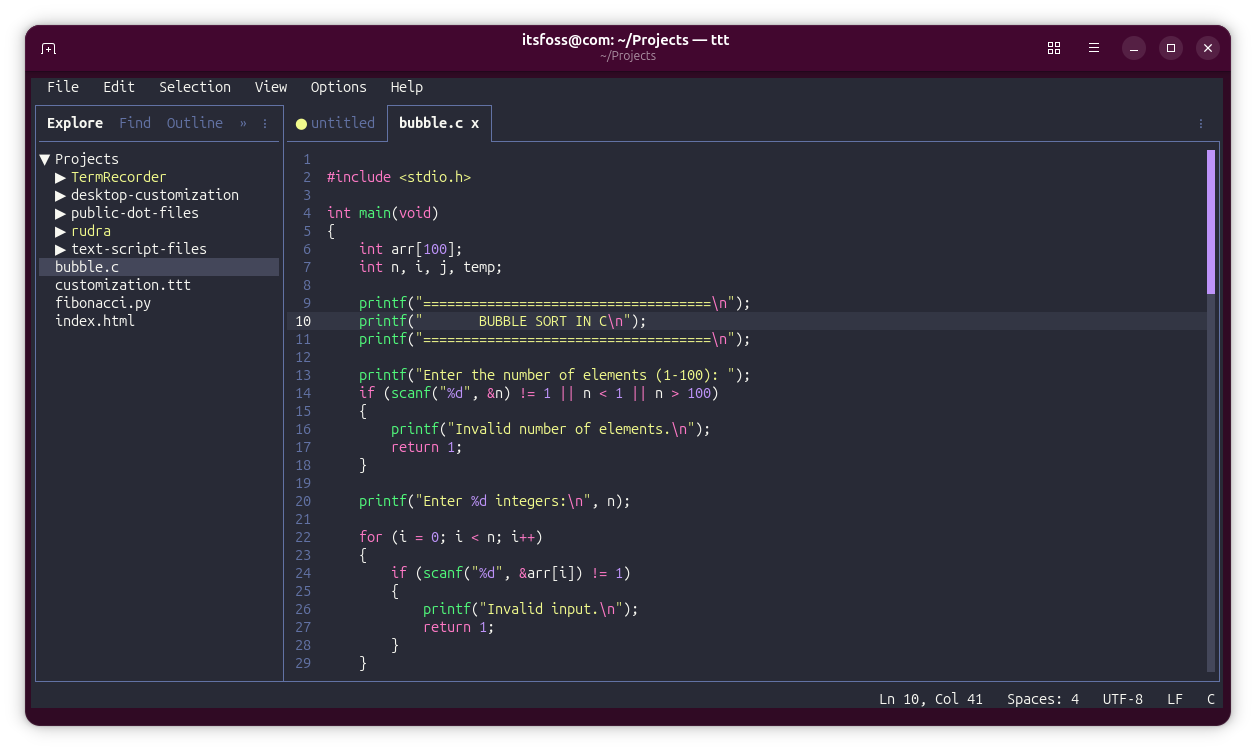
That's why TTT caught my attention. The project describes itself as a real alternative to VS Code, Zed, and Sublime Text that runs entirely inside the terminal.
✋
Like most of the new open source software, TTT is also developed with the help of AI assistants.
Installing TTT
On Linux, to install TTT, you can use the official installer script. That's fashion these days. No package, just an installer script curled right into your system.
curl -sSfL https://raw.githubusercontent.com/eugenioenko/ttt/main/install.sh | sh
This will install the binary in ~/.local/bin. To run it, open your favorite terminal and use the command:
ttt
There are also prebuilt binaries available to download so that you can place it in a folder of your choice and use it in portable mode.
TTT features I liked
Instead of trying to emulate traditional terminal editors, it aims to provide a modern, GUI-like editing experience in the terminal application with virtually no configuration required.
Sure, not all of these features might be unique, but they are good to have in an editor.
Syntax Highlighting
TTT uses textmate-go for syntax highlighting, a Go implementation of Microsoft's TextMate engine that powers syntax highlighting in VS Code. It claims to support more than 120 languages out of the box, giving it a surprisingly mature editing experience for a terminal-based application.
Syntax Highlighting
Multi-Cursor Editing
Multi-cursor editing is one of those features I started appreciating after spending some time with Helix. It's something I now instinctively look for in any editor.
Thankfully, TTT ships with multi-cursor support out of the box, so there's no need to install plugins or configure anything before getting started.
The workflow feels familiar if you've used modern editors before, like Sublime Text.
Pressing Ctrl+D selects the next occurrence of the highlighted text, while Alt+Click lets you place additional cursors exactly where you need them.
Multi-Cursor Editing
Mouse Support
Many terminal editors advertise mouse support, but often that simply means you can click around and scroll. TTT goes much further than that.
The mouse interactions felt surprisingly close to what I'd expect from a graphical editor rather than a typical terminal application.
You can click to position the cursor, drag to select text, and right-click to access context menus.
0:00
/0:30
Mouse Support in TTT
The latter ended up being my favorite part because the menu isn't just a generic list of actions. Depending on where you click, TTT presents relevant options, making the whole experience feel far more polished and GUI-like than most terminal editors I've tried.
LSP and Auto Completion
A code editor doesn't feel complete these days without intelligent auto-completion, and TTT checks that box through Language Server Protocol (LSP) support.
Getting it up and running is fairly straightforward as you only need to install the language server for the programming language you work with.
Once configured, you get the kind of code completion and language-aware features you'd expect from a modern editor, but without leaving the terminal.
LSP Autocompletion
Multi-folder Workspaces
Multi-folder workspaces allow you to group related folders into a single workspace and treat them as one project, much like VS Code's multi-root workspaces.
What makes this even more useful is that the workspace can be saved to a workspace.ttt file and reopened later with the exact same setup. So instead of manually opening the same collection of directories every time, you can simply load the workspace and continue where you left off.
For example, I have this customization.ttt file that has the content:
Now, I can always open this workspace by using the command:
ttt --workspace ~/Projects/customization.ttt
You don't need to manually create this file since you can add location to a workspace and later save it all via File -> Save Workspace As option.
0:00
/0:41
Multifolder Workspaces
Modern Search with Ripgrep
TTT uses ripgrep under the hood, which is already a favorite among developers thanks to its speed and ability to handle large projects without feeling sluggish.
In practice, this means you get fast, project-wide search capabilities directly inside the editor.
Combined with shortcuts like the Ctrl+K F for workspace search and Ctrl+K R for search and replace, it feels much closer to the experience you'd expect from a modern GUI editor than a typical terminal-based tool.
Search in TTT
💡
You need to have ripgrep installed on your system.
Git Integration
TTT provides a dedicated Changes panel where you can stage, unstage, discard, commit, pull, push, and sync repositories without dropping back to the command line.
The built-in diff viewer is particularly nice to work with because it combines Git diffs with syntax highlighting, making code changes easier to read.
The Git gutter indicators and inline blame information help provide context while editing.
If you're working with multiple repositories in a workspace, TTT automatically groups changes by repository, which keeps things organized when juggling several projects at once.
0:00
/0:33
Git Integration
Integrated Terminal
You may find it funny that one of my favorite features in a terminal-based editor is... another terminal. But in practice, I found it incredibly useful.
Whenever I needed to run a command, I didn't have to open a split terminal in my terminal emulator or switch to another tab. Everything stayed inside TTT, which helps maintain focus on the task at hand.
TTT's integrated terminal is a full terminal emulator rather than a basic command prompt. It supports multiple terminal tabs, true-color rendering, scrollback, and can be toggled between panel and fullscreen modes with keyboard shortcuts.
For a project that aims to bring a GUI-like experience into the terminal, this feature fits perfectly, eliminating one more reason to leave the editor while working.
0:00
/0:41
Integrated Terminal
Plugins
TTT already comes with many of the features I normally install plugins for in other editors. But the more I explored it, the more I appreciated the approach.
TTT supports Lua-based plugins that can add commands, panels, and keybindings, allowing you to extend the editor without turning it into a configuration project.
Plugins run inside a sandboxed environment and must explicitly request permissions to approve each plugin's capabilities.
To add even more convenience, you can install plugins through a dedicated panel within the TUI.
TTT ships with a decent collection of built-in themes, including popular options like Dracula, Monokai, etc., making it easy to find something comfortable without downloading anything extra.
The built-in theme picker offers live previews as you browse themes, and you can customize virtually every aspect of the interface through JSON files, from syntax highlighting and diff colors to the sidebar, status bar, and even terminal colors.
Themes in TTT
Wrapping Up
After spending some time with TTT, my biggest takeaway isn't that it's a great terminal editor. It's that this thing often doesn't feel like a terminal editor at all. In many ways, it feels like a full-blown GUI application that just happens to live inside a terminal window.
Now, I don't know how many of you will actually approve of that direction. The Linux and terminal communities have long maintained a clear distinction between TUIs and GUIs, and plenty of users prefer terminal applications precisely because they don't try to mimic desktop software. TTT deliberately blurs that line. Whether that's a good thing or not will ultimately depend on what you want from a terminal editor.
I found TTT's approach refreshing. It takes many of the conveniences people expect from modern GUI editors and brings them into the terminal with surprisingly very few compromises. If that idea sounds appealing, TTT is absolutely worth a look.
Most Linux users benefit from GNU Readline without realizing it. It is the library responsible for Bash's interactive command-line editing, providing familiar features like cursor movement, command history, and basic tab completion.
I came across a new tool called Flyline that takes Bash command completion to an entirely different level. No special configuration is required.
0:00
/0:56
For anyone who has control over their shell environment, Flyline could become a must-have terminal tool.
Flyline takes a different approach entirely. Instead of layering on top of Readline, it replaces it outright. It is built in Rust and ratatui to render richer, more interactive terminal interfaces than Readline.
Exploring Flyline features
When I installed Flyline for the first time and started using it, the difference was immediately noticeable. Command suggestions appeared as I typed, making it quicker to complete commands and move through my workflow. It makes working in the terminal noticeably faster.
IntelliSense style autosuggestion
As soon as you start typing, Flyline displays a completion popup right next to the cursor with matching suggestions. This keeps the suggestions close to where you're working, making it easy to complete commands without breaking your typing flow.
0:00
/0:29
Flyline IntelliSense Suggestion
You can cycle through the available suggestions by pressing the Tab key, with the selected entry being updated on the command line in real time. If you prefer, the Up and Down arrow keys work just as well, and the completion list can also be navigated using the mouse.
For longer lists, Flyline includes a functional scrollbar that lets you quickly jump through the available suggestions. Personally, I found it faster to keep typing and narrow down the results rather than reaching for the mouse, but it's nice to have the option.
Once you've found the suggestion you want, press Enter to insert it into the command line and close the completion popup.
Fuzzy search and path completion
Traditional command completion usually expects you to type characters in the correct order. For example, typing pamc won't normally suggest pacman, since the entered characters don't match the expected sequence.
0:00
/0:29
Fuzzy Search
Flyline addresses this with fuzzy search support. Instead of requiring an exact character order, it tolerates minor typos and partial matches, making it much easier to find the command you're looking for. This means you can type a bit more naturally without worrying about getting every character in the right place.
The same fuzzy matching also works for file and directory paths. As you type, Flyline presents matching paths based on your input, allowing you to navigate deep directory structures with fewer keystrokes. I found this particularly useful when working with long or nested paths, where a small typo would normally require me to backtrack and start over.
Automatic completion synthesis (a lifesaver)
Not every command line tool ships with a completion script. Install a new CLI tool and you keep on pressing tab, and nothing happens. No suggestions appear.
When that's the case, Flyline can generate one automatically by parsing the command's --help output and available man pages.
I noticed this while trying ffmpeg, which didn't have a completion script on my system. When I typed:
ffmpeg --<Tab>
Flyline prompted me to generate a completion script for the command. After confirming, it analyzed the available documentation and created a completion definition on the fly. From that point onward, option completion for ffmpeg worked as expected.
0:00
/0:28
Synthesize Suggestions
This is also useful for commands with dozens, or even hundreds, of available options. Instead of repeatedly opening the man page or running --help to look up an argument, I could simply rely on the generated completions and discover the available options as I typed.
It makes working with feature-rich command-line tools much more convenient.
Customize the cursor (for vanity)
This isn't exactly a productivity feature, but it does make the terminal feel a bit more lively.
If you've used the Kitty terminal emulator, you might be familiar with its cursor animations. Flyline brings similar effects to virtually any terminal emulator, letting you customize how the cursor looks and behaves.
To explore the available cursor options, run:
flyline set-cursor --help
This displays the various settings you can tweak, including cursor style and animation effects.
For example, the following command adds a cursor trail that closely resembles Kitty's animated cursor, even if your terminal emulator doesn't support it natively.
Flyline also gives Bash's reverse history search a much nicer interface. Instead of the traditional incremental search prompt, it presents your command history in a dedicated view where you can see each command in full, search through previous entries, and even check when a command was executed.
Refined History
Just like command completion, history search also supports fuzzy matching. This makes it easier to find an older typed command, even if you don't remember the exact sequence of characters.
What impressed me the most, though, was the Canceled Commands feature. The first time I pressed Alt+R, the list was empty. However, every command I subsequently interrupted with Ctrl+C, was automatically added there.
Cancelled Commands
Remember, it is the commands that are interrupted without executing are added to the cancelled list, and not those commands that are executed and then pressed CTRL+C.
This list is kept separate from your regular shell history, so searching your normal command history with Ctrl+R remains unaffected, while cancelled commands are available through Alt+R. The only limitation is that the list is maintained per terminal session, so it is cleared once you close or reset the terminal.
Working with AI agents
Flyline can also work with your favorite AI assistant to turn plain English into executable Bash commands. Once you've configured an AI agent, you can simply describe what you want to do in natural language, and Flyline will ask the agent to generate the corresponding command.
For example, you could type something like:
ai: list files older than three days
Pressing Alt+Enter, or simply Enter if you've configured a trigger prefix such as ai:, sends the prompt to the configured AI agent. Flyline then displays the generated command with syntax highlighting before you decide whether to run it. If the agent returns additional information in Markdown, Flyline renders that as well.
I didn't test this feature personally. I will let you try and comment your experience with it.
Prompt customization
Flyline doesn't just enhance command editing, it also offers extensive prompt customization. You can build rich prompts with dynamic widgets, animations, left and right prompts, transient prompts, live time displays, and even your own custom widgets that run shell commands in the background.
The project's documentation goes into great detail, complete with examples and screenshots for the various customization options. Rather than covering each one here, I've put together a sample configuration that combines several of these features, including a subtle animation. Simply append the following to your ~/.bashrc to give it a try.
The easiest way to install Flyline is by using the official installation script. Open a terminal and run:
curl -sSfL https://github.com/HalFrgrd/flyline/releases/latest/download/install.sh | sh
The installer downloads the latest release and automatically updates your ~/.bashrc to load Flyline, so there's no need to perform any additional setup manually.
Once the installation is complete, launch the interactive tutorial with:
flyline run-tutorial
I recommend going through the tutorial before you start using Flyline. It walks you through onboarding, making it much easier to get comfortable with the enhanced editing experience.
Is there anything similar for ZSH?
When I started using Flyline, apart from its intellisense style completion, I can't say it felt like a first in a lifetime moment, because I kind of used a similar functionality in ZSH for some time.
Flyline is designed exclusively for Bash, so you can't use it with Zsh.
But, the combination of zsh-syntax-highlighting, zsh-autosuggestions, and zsh-autocomplete covers many of the features you'd expect from an IntelliSense-like command-line interface.
Together, they offer inline suggestions, syntax highlighting, and interactive command completion that make working in the terminal much more comfortable.
ZSH Autosuggestion, Syntax Highlighting and Auto Complete
If you pair these plugins with a prompt framework like Starship or a Powerline-style prompt, you can build a polished and highly productive terminal environment.
Wrapping Up
Flyline is one of the new breed of terminal tools that are built in rust to be faster and provide features that either require too much config effort or not possible in classic GNU tools at all.
From intelligent command completion and fuzzy search to AI-assisted command writing and prompt customization, Flyline adds plenty of quality-of-life improvements without changing the shell you've grown accustomed to.
Give Flyline a try. It's already a capable tool, and with active development, it'll be interesting to see how it evolves in the future.
The GNOME Extensions ecosystem is packed with tools that let you customize almost every part of the desktop. Whether it's changing the appearance of the top panel, replacing the app launcher, adding visual effects, or making the interface behave exactly the way you want.
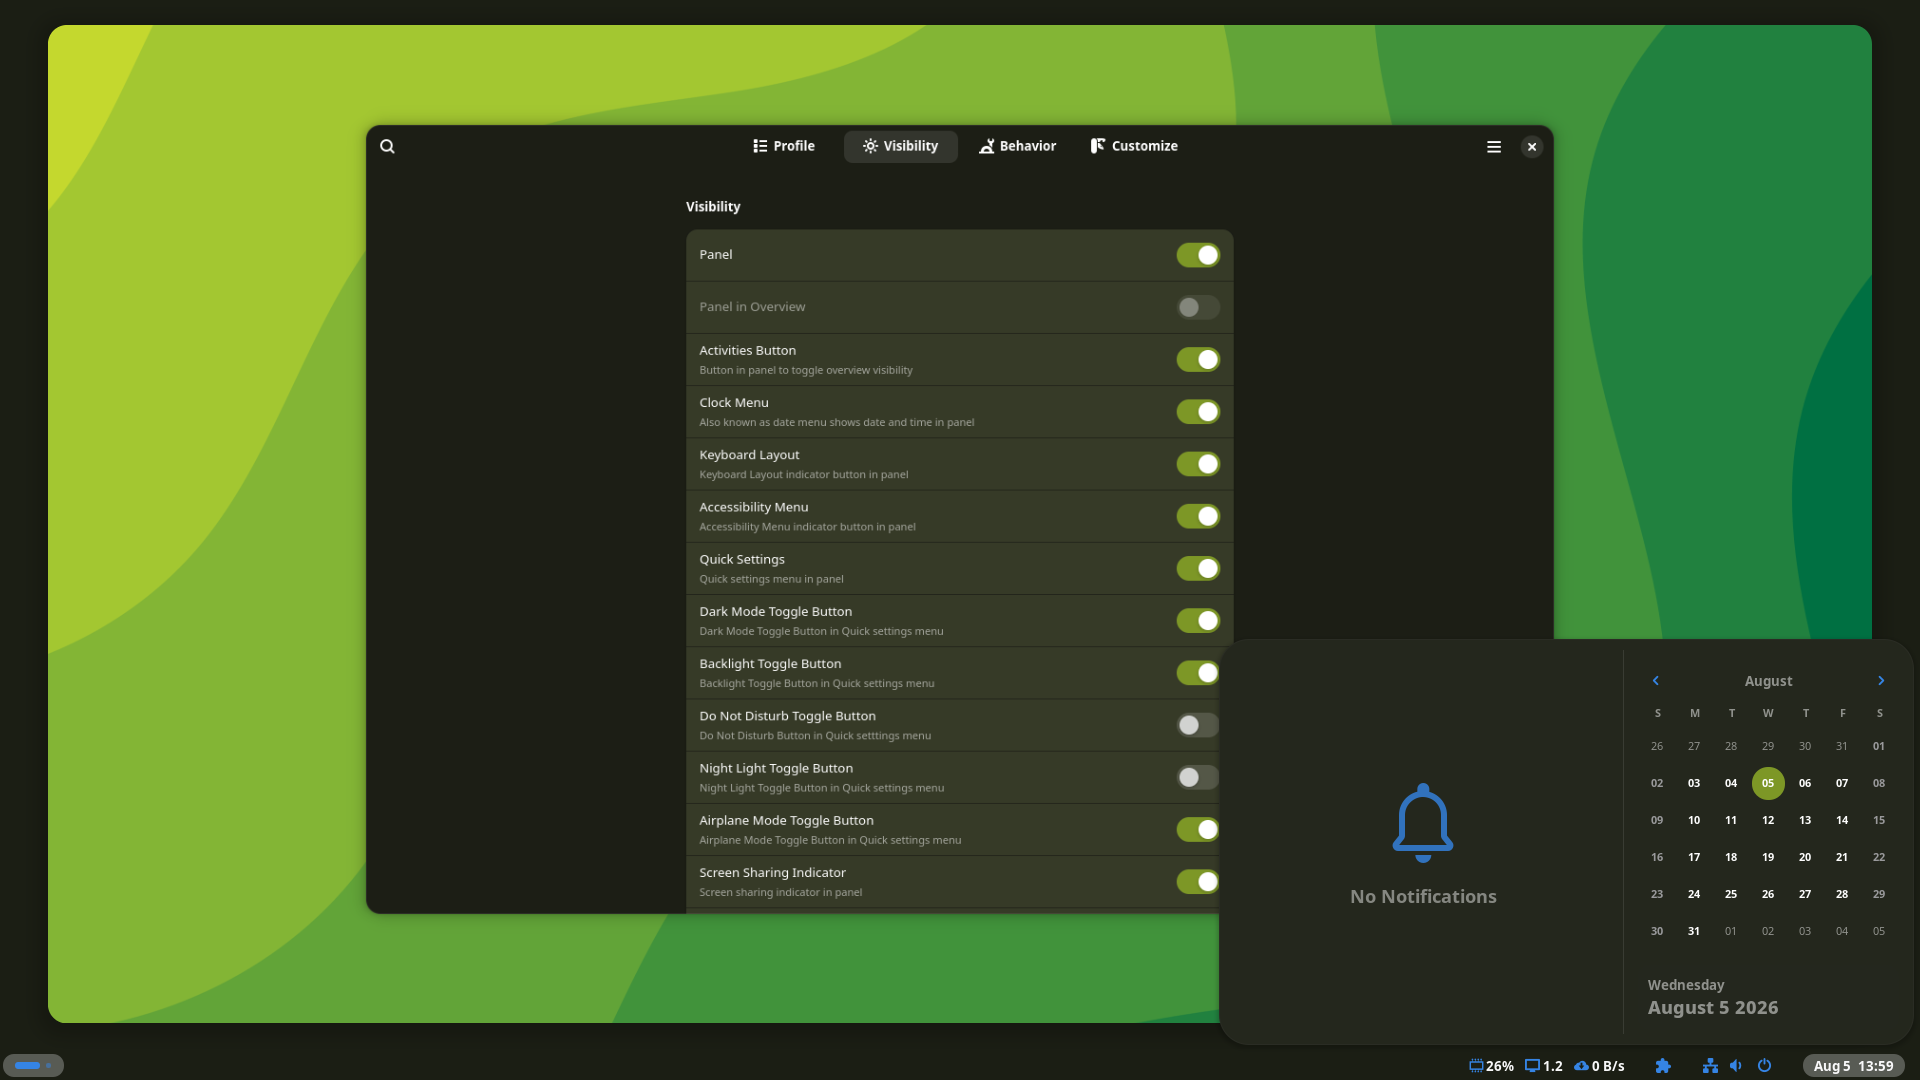
If there is one customization extension that deserves to be installed first on a fresh GNOME setup, it's Just Perfection.
As the name suggests, the extension lets you tweak countless parts of the GNOME Shell. From small visual adjustments to larger interface changes, it gives you an impressive amount of control without requiring you to edit configuration files.
In fact, the number of available tweaks is so extensive that it deserves an article of its own, which we already have and you can read it here.
The screenshot below contains effects of another GNOME Extension called User Accent Color which we will see in a later section.
Just Perfection
Some of the highlights include:
Change the position of the panel, clock, and notification indicators.
Adjust the size and corner radius of the Activities Overview.
Show or hide individual panel items.
And that's just a glimpse. I recommend checking the project's official README to explore its exhaustive list of features.
2. User Themes
Installing a GTK theme changes the appearance of your applications, but it doesn't affect the GNOME Shell itself.
That's because the Shell uses its own theme, separate from GTK. If you want to customize the top panel, Activities Overview, Quick Settings, and other Shell components, you'll need the User Themes extension.
Once installed, you can apply any compatible gnome-shell theme stored in your ~/.themes directory using the GNOME Tweaks application.
0:00
/0:22
Shell Theme applied to Tokyo Night
It's a small extension, but an essential one if you're interested in desktop theming.
3. Wallpaper Slideshow
If you like refreshing your desktop without manually changing wallpapers every few days, Wallpaper Slideshow is an excellent extension to have.
It automatically cycles through images from a folder of your choice at configurable intervals, turning your wallpaper collection into a dynamic slideshow. The extension also supports downloading Bing's Wallpaper of the Day if you prefer fresh backgrounds without maintaining your own collection.
Wallpaper Slideshow
Better yet, it automatically detects changes to your wallpaper folder, so newly added images become part of the rotation without any extra setup.
You can control the slideshow from the Quick Settings menu or the desktop context menu, and the extension even remembers its queue across reboots, allowing the slideshow to resume where it left off.
It's a simple way to keep your GNOME desktop feeling fresh with minimal effort.
4. User Accent Colors
One of the nicest visual touches in modern desktop environments is having the system's accent color automatically match your wallpaper. If you've wanted the same experience on GNOME, User Accent Colors is worth a look.
The extension extracts the dominant accent color from your current wallpaper and applies it across the desktop, including GNOME Shell, Adwaita applications, and adw-gtk3 themed GTK3 applications.
It can also generate matching tinted themes and even recolor supported icon packs, giving the entire desktop a much more cohesive appearance.
The result is a desktop that automatically adapts whenever you change your wallpaper, without manually tweaking themes or accent colors. If you're building a visually consistent GNOME setup, this extension is an excellent finishing touch.
5. Dash to Dock
By default, GNOME only displays the Dash while you're in the Activities Overview.
Many users, however, prefer having a dock that's always visible and keeps their favorite applications within easy reach.
Dash to Dock transforms the built-in GNOME Dash into a fully customizable dock that can be positioned on any edge of your screen. You can tweak its size, behavior, transparency, auto-hide options, and much more.
The only thing I personally miss is a ripple-style hover animation. Fortunately, the next extension offers a different take on desktop navigation.
6. Dash to Panel
While Dash to Dock focuses on creating a dock, Dash to Panel takes things a step further.
It merges the GNOME top bar and Dash into a single panel, giving the desktop a layout that feels much closer to Windows.
0:00
/0:10
Dash to Panel in GNOME
If you're switching from Windows 10 or Windows 11, this extension makes GNOME feel instantly familiar.
Beyond changing the layout, Dash to Panel offers a surprising amount of customization. You can:
Change the panel's color, opacity, and appearance.
Show or hide individual panel items.
Keep the original GNOME top panel while using only the dock functionality.
Customize various behaviors to suit your workflow.
0:00
/0:07
Dash to Panel as a dock
It's one of the most feature-rich panel extensions available for GNOME.
7. Dhruva Dock
Dhruva Dock is the newer addition to the GNOME extensions ecosystem, and it has quickly gained attention thanks to its polished appearance and smooth animations.
The dock supports true magnification effects, includes an integrated clock, and offers several preset themes alongside color customization options.
0:00
/0:10
Dhruva Dock
Unlike many dock extensions, Dhruva Dock isn't limited to the screen edges. You can position it almost anywhere on your desktop, giving you much more flexibility when designing your workspace.
Its fluid animations are easily one of its strongest selling points.
8. Blur My Shell
Few visual tweaks change the look of GNOME as much as adding blur effects, and Blur My Shell has become the go-to extension for that purpose.
What started as a simple blur utility has gradually evolved into a comprehensive customization tool. Besides adding blur to the Activities Overview and various Shell components, recent versions even allow blur effects to be applied to application windows.
Blur My Shell
The extension also lets you configure different blur pipelines, giving you fine-grained control over which parts of the desktop should be blurred and by how much.
While it doesn't offer the level of control found in Wayland compositors like Hyprland, and older hardware may struggle with the added effects, it's still one of the best visual customization extensions available for GNOME.
9. Dynamic Music Pill
If you frequently listen to music while working, Dynamic Music Pill is an extension worth checking out.
Instead of displaying a simple scrolling track title in the panel, it presents your currently playing music inside an elegant pill-shaped widget with playback controls.
0:00
/0:29
Dynamic Music Pill
You can place it either on the top panel or alongside the Dash, depending on your preferred layout.
Beyond its attractive design, the extension also includes several useful features:
Adaptive colors based on the album artwork.
Multiple visualizer modes.
Playback controls with configurable click actions.
Synchronized lyrics.
Transparency and appearance settings.
It's a great combination of functionality and visual polish.
10. Top Bar Organizer
If you've ever wished you could rearrange the items on GNOME's top panel, Top Bar Organizer makes that incredibly easy.
Unlike many customization extensions, it doesn't overwhelm you with dozens of configuration options. The interface is refreshingly simple.
0:00
/0:45
Top Bar Organizer
You simply drag and drop panel items between the three available sections:
Left Top Bar Box
Center Top Bar Box
Right Top Bar Box
That's all there is to it.
Whether you want the clock on the left, system indicators in the center, or a completely custom layout, this extension makes it possible in just a few clicks.
11. Arc Menu
GNOME's built-in search is one of its strongest features. It lets you quickly launch applications, find files, perform calculations, and much more, all from a single interface.
That said, many users still prefer having a traditional application launcher that's always available.
Arc Menu is much more than a simple Start Menu replacement. It offers an impressive collection of menu layouts inspired by different desktop environments and operating systems.
Arc Menu Layputs
Want a Windows 11-style Start Menu? That's available. Prefer a macOS-inspired launcher? You can switch to that with just a few clicks.
Beyond the layouts, Arc Menu provides extensive customization options. You can change icons, tweak the appearance, reposition the menu, customize categories, and fine-tune almost every aspect of the launcher.
If you enjoy experimenting with different desktop layouts, Arc Menu is one of the most versatile extensions you can install.
12. Burn My Windows
Even the developers describe Burn My Windows as a "useless" extension.
I couldn't disagree more.
If you enjoy desktop animations, this extension is pure fun. Instead of the standard open, close, and minimize animations, it lets you replace them with dozens of eye-catching effects.
Burn My Windows
Some of my favorites include Apparition, Broken Glass, Incinerate, and Matrix, though there are plenty more to experiment with.
It won't make you more productive, but it definitely adds some personality to your desktop.
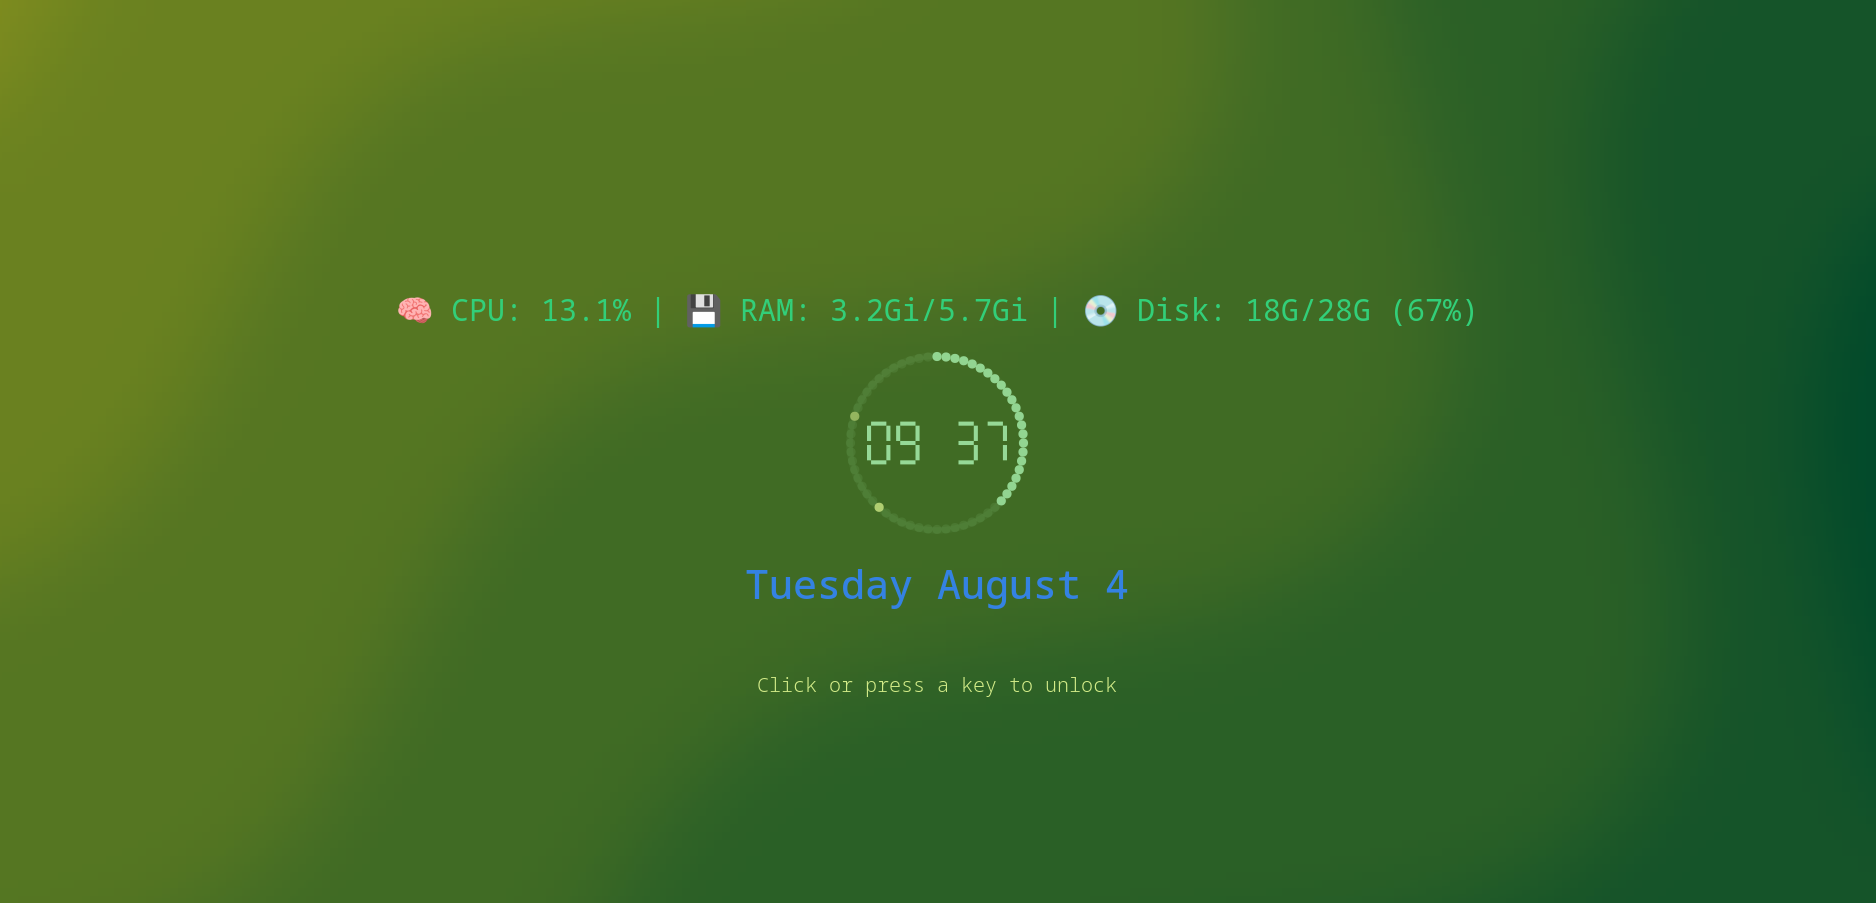
13. Customize Clock on Lock Screen
The GNOME lock screen doesn't offer much room for customization out of the box.
This extension changes that by letting you customize the appearance of the lock screen clock.
Customized Clock on Lockscreen
One particularly interesting feature is the ability to display the output of shell commands. That opens up several possibilities, such as showing inspirational quotes, system information, weather updates, or any other text generated by a script.
For example, I used the command below to print the system details as shown in the screenshot above:
Whenever you move or resize a window, it behaves like a flexible sheet rather than a rigid rectangle, recreating one of the most iconic desktop effects from the early days of Linux desktop customization.
It certainly makes interacting with windows a lot more enjoyable.
15. Compiz Magic Lamp Effect
Continuing the nostalgia, Compiz Magic Lamp Effect recreates another classic animation from the Compiz days.
Instead of windows simply disappearing when minimized, they smoothly stretch and collapse into the dock using the familiar Magic Lamp animation.
0:00
/0:08
Magic Lamp Effect
The effect looks particularly good when paired with dock extensions like Dash to Dock, making window animations feel much more polished than the default GNOME behavior.
If you're already using one of those docks, this extension is a perfect companion.
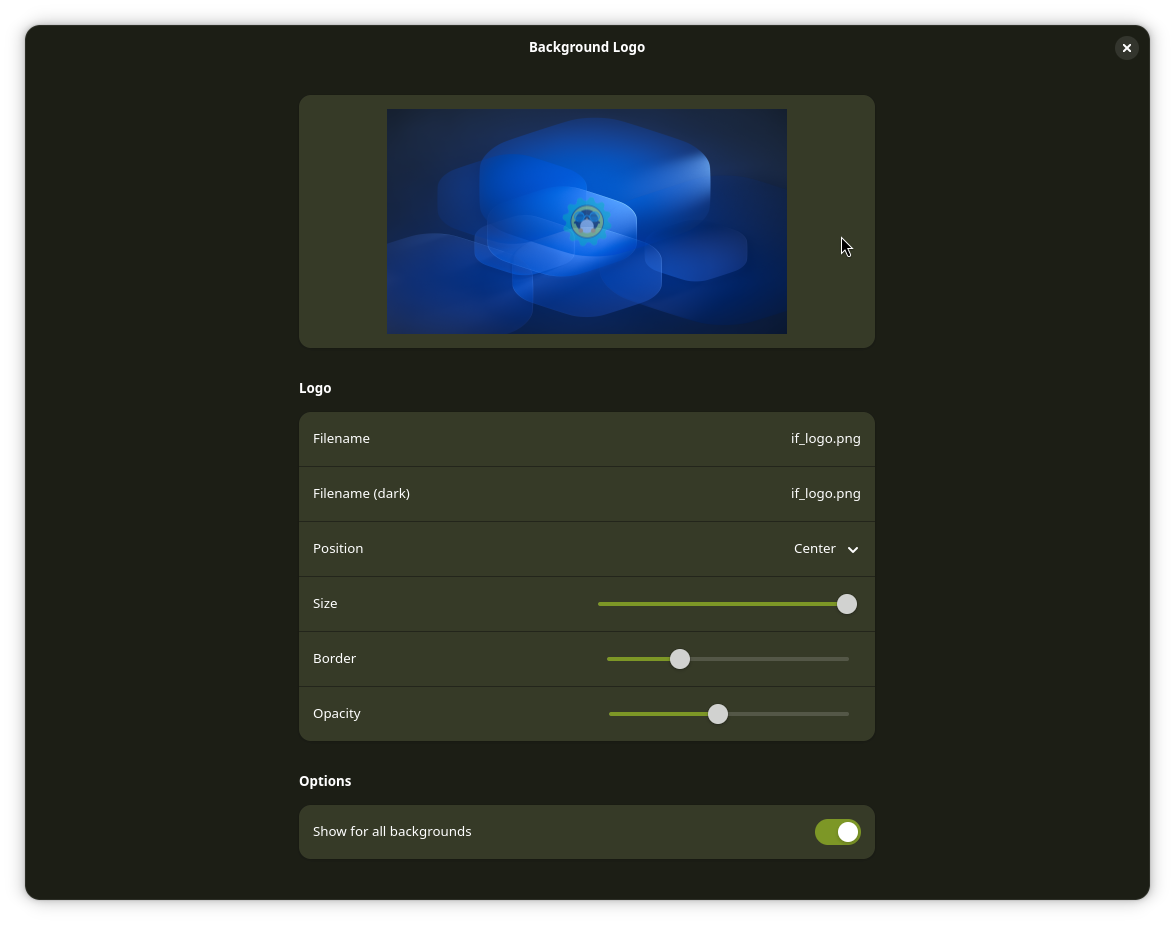
16. Background Logo
Sometimes the smallest tweaks can make your desktop feel a little more personal.
Background Logo lets you place a logo or image directly on top of your desktop wallpaper without modifying the wallpaper itself. Whether you want to display your favorite Linux distribution's logo, your organization's branding, or a custom SVG, the extension makes it easy.
Background Logo settings
It may not be an essential customization, but it's a nice option for users who enjoy putting their own stamp on every part of their desktop.
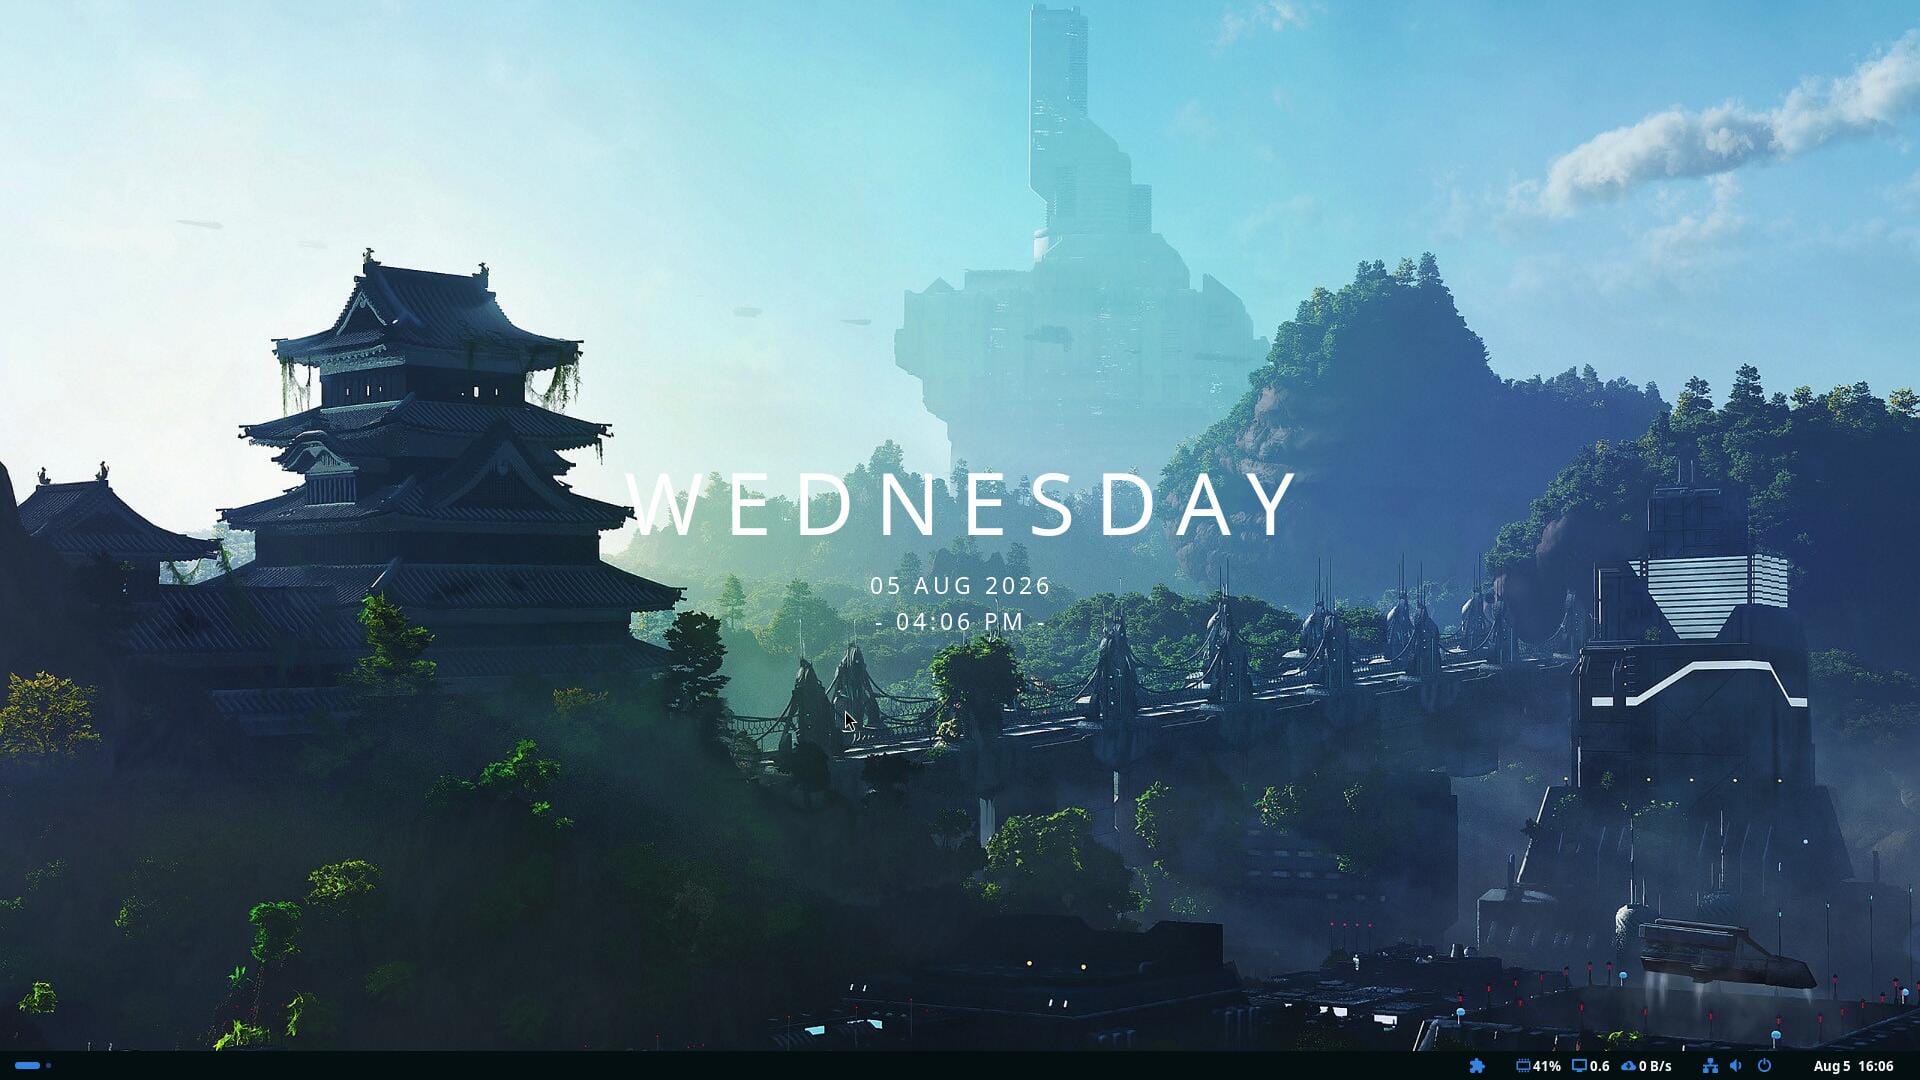
17. Modern Clock
If you like the clean desktop widgets found in KDE Plasma, Modern Clock brings a similar experience to GNOME.
Instead of placing the time in the top panel, this extension adds a modern-looking desktop clock widget inspired by KDE's Modern Clock. It sits directly on your desktop and blends nicely with minimalist wallpapers, making it a subtle yet attractive addition to your workspace.
Modern Clock
Unlike the standard GNOME clock, this one is meant to be part of your desktop rather than the shell interface. If you're building a customized desktop with widgets and visual enhancements, Modern Clock fits right in.
Wrapping Up
One of GNOME's greatest strengths is the flexibility offered by its extension ecosystem. While the desktop intentionally keeps its default experience clean and minimal, these extensions allow you to shape it into almost anything you want.
Whether you're looking for a Windows-like taskbar, a macOS-inspired launcher, beautiful blur effects, playful window animations, or simply more control over the interface, there's an extension here that can help.
Of course, you don't have to install all of them. In fact, I'd recommend starting with a few that solve problems in your daily workflow and then gradually adding more as needed.
Did I miss one of your favorite customization extensions? Let me know in the comments. I'd love to check it out.
Whether you're a developer, system administrator, or simply someone who spends a lot of time in the terminal, juggling multiple terminal sessions can be messy and frustrating.
A terminal multiplexer helps you keep everything organized, letting you manage several sessions from a single interface while making your workflow much more efficient.
While tmux and GNU Screen are the names most Linux users are familiar with, there are many more similar terminal multiplexer tools available. As someone who like to explore new tools, I spent some time and came up with this list for you.
📋
Many terminal emulators let you split your screen into panes, but splitting a screen isn't the same as multiplexing it. For this list, I am focusing on tools that offer real session value beyond arranging windows.
Zellij
Zellij describes itself as a terminal workspace rather than just a multiplexer, with an emphasis on delivering a polished experience from the moment you launch it.
It aims to provide sensible defaults while still leaving plenty of room for customization.
Zellij
One of the things that sets Zellij apart is its focus on usability. Built-in layouts, a plugin system, and collaborative sessions are all part of the experience, but the project's philosophy is that you shouldn't have to trade simplicity for advanced functionality.
This makes it approachable for newcomers while still offering enough flexibility for users who want to tailor their workspace.
While this is not a ranking list, Zellij is the first one on this list because I have used it on a daily basis for the past several months.
TUIOS
While most terminal multiplexers focus on helping you manage terminal sessions, TUIOS takes that idea a step further by presenting itself as a terminal window manager.
TUIOS tries to bring concepts you'd expect from a tiling window manager, such as workspaces, automatic tiling, and window management, into your existing terminal.
TUIOS
The workflow is centered around a modal interface inspired by Vim, letting you switch between managing windows and interacting with terminal applications.
Alongside features like a command palette and workspace organization, TUIOS also supports automation through tape files, making it suitable for users who want to build repeatable terminal workflows instead of just juggling multiple shells.
Wezterm
You probably know WezTerm as a feature-rich terminal emulator. But there's more to it than meets the eye.
WezTerm includes a built-in multiplexer, allowing you to create and manage persistent sessions without relying on a separate tool.
Wezterm as a Terminal Multiplexer
It integrates multiplexing directly into the terminal and supports local domains. While it lets you connect to remote domains over SSH and other tmux like features, this requires you to spend some time configuring.
Kitty + Abduco
If you're already using Kitty as your terminal emulator, you don't necessarily have to switch to a traditional multiplexer. Pairing it with abduco gives you a lightweight way to keep terminal sessions running in the background while letting Kitty handle everything on the frontend.
0:00
/0:30
Kitty with Abduco
It's a simple combination that sticks to the Unix philosophy of using small tools that do one job well.
The primary job of abduco is to detach and reattach terminal sessions, leaving the rest to your terminal emulator.
Kitty complements this nicely with features like tabs, splits, and a polished interface, giving you a workflow that feels familiar while still providing session persistence.
tmate
Rather than reinventing the multiplexer experience, tmate builds on tmux and adds secure session sharing, making it easy to collaborate, troubleshoot problems, or provide remote assistance without asking someone to install extra software.
0:00
/0:46
Tmate
The biggest addition is the ability to generate a connection string that others can use to join your session.
By default, these shared sessions are relayed through tmate's public servers, although you can host your own relay if you prefer to keep everything under your control. If you never need to share your terminal, however, plain tmux is likely the better fit.
Boo
At first glance, boo might look like just another GNU Screen alternative. In reality, it's a fairly different take on terminal multiplexing.
Built on Ghostty's terminal emulation library, boo keeps track of the actual terminal state, allowing it to recreate a session exactly as you left it, even after you've detached and reattached.
0:00
/0:46
Boo
The project also leans into automation. Besides keeping sessions alive, it includes commands that let scripts and AI agents inspect or interact with detached sessions without needing a live terminal connection.
Okena
Okena combines terminals, tabs, panes, and projects into a single interface, with a strong focus on helping you pick up exactly where you left off.
Close the application, reopen it later, and your workspace is restored much like you never left.
Okena
That persistence model is what makes Okena different. Unlike tmux or GNU Screen, it doesn't keep sessions running in the background after the application closes, nor is it designed for detached SSH workflows or remote session management.
Instead, the emphasis is on restoring your local workspace, making it feel more like a modern development environment than a server-backed multiplexer.
Seance
Seance, built with GTK4 and libadwaita, takes a desktop-first approach to terminal session management. It feel more like a modern Linux application than a traditional keyboard-driven multiplexer.
It offers a clean interface with configurable key bindings, workspace management, and session persistence across restarts, so you can reopen the application and continue where you left off.
However, it isn't designed around detached server sessions or remote SSH workflows. Instead, it focuses on providing a polished experience for managing terminal workspaces on your local Linux desktop.
Wrapping Up
As you can see, there's no shortage of ways to organize your terminal workflow. Some of these tools have been around for decades, while others are reimagining what a terminal workspace can look like. The thing is that there's no single "right" choice. It all comes down to how you work.
Whichever you choose, learning to use a terminal multiplexer is one of those skills that pays off over time. Once it becomes part of your workflow, your muscle memory, there is no going back to normal terminal sessions.
Kitty is a popular terminal emulator that supports many modern features. Focused on power users, it offers a wide range of customization that other terminals often lack.
For example, it includes a functional image display protocol and smooth cursor animations.
I have shown Kitty tweaking in the past, and in the regards, I would like to discuss Kittens today.
Kittens are functional units that extend the features of the Kitty terminal or work as standalone programs. They have direct access to the running Kitty instance.
Kitty comes bundled with several of these kittens, written in Go, which we will explore in detail later. You even have the option to create your own custom Kittens in Python, if you find a specific need that hasn't been solved yet.
Some Cool Default Kittens
🚧
In my opinion, it is important to remember that many kittens are Kitty terminal exclusive. Before you build muscle memory around it, make sure you aren't planning to switch to a different terminal emulator anytime soon.
Themes
Let's start with the most popular tool first. If you use Kitty daily, you have likely come across this utility at some point.
Themes is a kitten that allows you to change your terminal color scheme interactively without editing any configuration files. Kitty includes a wide variety of preset themes that you can access by running a simple command:
kitten themes
Apply themes in Kitty
In the overlay window, you can easily scroll through both dark and light themes to see a live preview. Once you find one you like, just press Enter and follow the prompts to set it as your preferred theme.
💡
Latest versions of Kitty now support automatic theme changes based on your system's dark and light mode. This is a very convenient feature if you want your terminal to stay in sync with your global OS settings.
In my opinion, this is a feature I really miss when using Ghostty. While Ghostty has a similar interface, you still have to manually edit your configuration file to apply the theme name after you pick one.
Fonts
If you have found a new font and want to set it as your terminal choice, this kitten has you covered. You can launch the interactive interface directly in your terminal using a simple command:
kitten choose-fonts
Choose Fonts
This tool allows you to perform several actions within a single interface. You can select new fonts, preview how they look, and even fine-tune specific font faces.
The utility makes it much easier to manage your typography without guessing how a font will appear in your workspace. It handles the complex parts of the setup so you can focus on finding the perfect look.
Choose files
Choose files is a comprehensive file picker designed for Kitty and other GUI applications on your system. It functions similarly to fzf but is specifically optimized for finding and managing files.
Choose Files
This tool offers several powerful features, including the ability to select multiple files at once. It intelligently respects .gitignore rules in your git directories to keep your workflow clean.
To use it, run:
kitten choose-files
You can also select non-existent files to trigger a "save file" option or choose entire directories. In my opinion, this file picker will completely change the way you interact with files in your terminal.
Quick access terminal
If you remember Yakuake in KDE, you are already familiar with the concept of a drop down terminal for quick tasks. Kitty offers similar functionality through the Quick Access Terminal Kitten.
You can launch this feature at any time using a simple command in your terminal:
kitten quick-access-terminal
0:00
/0:19
Quick Access Terminal
If you want to personalize the experience, you can customize the tool using a specific configuration file. Simply create or edit quick-access-terminal.conf inside your ~/.config/kitty/ directory to adjust its behavior.
GPU accelerated dock panel
The Panel kitten is something truly special. It creates a desktop panel for you that functions much like i3bar.
0:00
/0:13
Kitten Panel
While some might feel this is a bit overpowered for a terminal application, the panel is quite interesting for minimal use cases. It even allows you to set tools like btop as your actual desktop wallpaper.
In my opinion, this is an incredible feature for anyone who loves a unique workspace. You heard that right, and here is a great example of how it looks in action.
A diff tool
The diff kitten is an excellent tool available directly within Kitty. It offers several advanced features like side-by-side comparisons, syntax highlighting, and even image diffs or recursive directory comparisons.
To use it, you simply pass the file names as shown in the command below:
kitten diff file1 file2
Diff Files
Other interesting Kittens
I use the terminal daily for standard update tasks and editing text files. If you are deeply involved in terminal usage, there are many kittens available for very niche use cases.
For example, the Broadcast kitten allows you to type text simultaneously across multiple Kitty windows. There are also SSH related kittens designed for editing files and even a specialized SSH supported clipboard.
In my opinion, these specific tools are essential for power users who manage remote servers regularly. Feel free to experiment with these options to make your terminal life significantly more productive.
Assign keybindings/alias for quick access
All these kittens can be bound to keyboard shortcuts or aliases so you don't have to manually run the command every time. This makes your workflow much faster by giving you instant access to your favorite actions.
I will show you how I mapped the kittens in my own configuration file. It is a straightforward process that keeps everything organized and easy to access.
The most important step is to make sure your chosen keys are uniquely assigned. You want to avoid any conflicts with existing terminal options or system-wide shortcuts.
In the below code, I mapped the F1 key to get the file chooser kitten in multiple file select mode.
map f1 kitten choose-files --mode=files
Adding the following line to your shell configuration file (~/.bashrc) to add an alias to the diff tool:
alias d="kitten diff"
Now, you can run:
d file1 file2
To get the difference between them.
Another example, let's map the F2 key to get a quick access terminal:
map f2 kitten quick-access-terminal
Wrapping up
So, we have seen how kittens can improve your terminal productivity. While most of these have separate alternatives like fzf for file selection or difftastic for diffs, integrating them directly into your terminal with a clean UI is commendable.
Kitty also offers a desktop-ui kitten that lets you integrate the file picker into all your GUI apps. Since this can cause issues with some applications and is something I use rarely, it remains out of scope for this guide.
In my opinion, the seamless integration of these tools makes Kitty feel much more cohesive than a standard terminal emulator.
Did you find any of these kittens useful enough to replace your existing tools?

 Login