My homelab runs on 5 machines with around 30 Docker containers. For a long time, the way I reached them was a bookmarks folder full of entries like http://100.101.12.4:8096.
Tailscale took care of getting me into my network from anywhere, but once I was in, I was back to remembering which box ran what on which port.
The usual fixes each have a catch. A reverse proxy with your own domain works, but it's one more thing to maintain, and every new app means touching two config files instead of one. Giving each container its own Tailscale sidecar gets you nice names, but it also turns the Machines page into a list of containers, each with its own auth key and state volume.
When Tailscale released Services, it looked like the thing I had actually wanted: names for apps, not for machines. I've been running my containers that way since, and this is a write-up of how it works, how to set it up by hand, and the two things worth knowing before you start.
What a Tailscale Service actually is
A Service is a name plus a virtual IP on your tailnet, for example jellyfin.your-tailnet.ts.net. It doesn't belong to a device. Instead, one or more of your machines advertise it, and Tailscale routes clients to them.
So your Docker host stays a single machine in the tailnet, and the apps on it become Services. Access rules can point at a Service directly, so you can let someone reach Jellyfin without giving them the whole host.
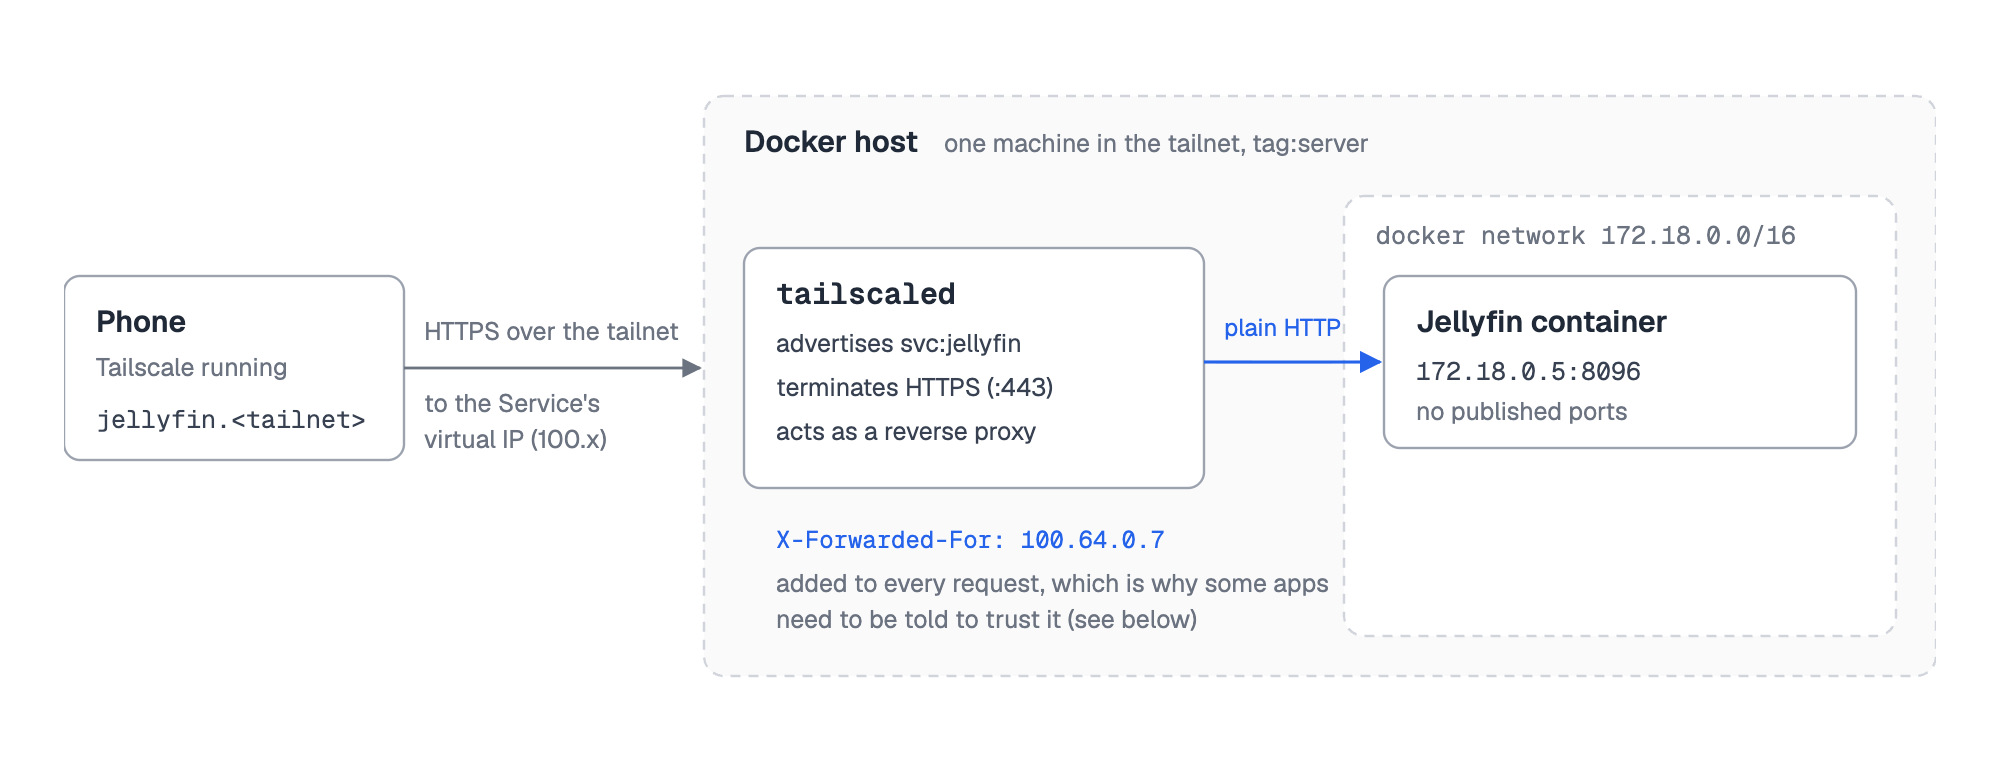
Here is what a request looks like once it's set up:
Two details in that picture matter later: tailscaled on the host terminates HTTPS and talks plain HTTP to your app, and it adds an X-Forwarded-For header. To your app, Tailscale behaves like a reverse proxy.
Setting one up by hand
Before automating anything, it's worth doing it manually once for a single container. You need three things.
1. A tagged host. Services are advertised by tagged machines, so give your Docker host a tag:
sudo tailscale up --advertise-tags=tag:server --reset
2. A policy that allows it. In the admin console under Access controls, the tags must exist, and an auto-approver saves you from clicking "Approve" for every Service:
3. The Service itself. On the Services page of the admin console, choose Advertise, then Define a Service, name it jellyfin and give it the tag:container tag. Then, on the host, point it at the app:
This assumes Jellyfin publishes port 8096 on the host. If HTTPS certificates are enabled for your tailnet (DNS page in the admin console), https://jellyfin.your-tailnet.ts.net now works from every device that runs Tailscale.
For one app, that's fine. For 30, it gets old quickly: one definition in the console and one serve command per app, plus published ports again. And nothing updates by itself when you add, remove or move a container.
Why I ended up scripting it
The part that bothered me most was that the configuration lived in two places. The app was defined in a Compose file, and how to reach it was defined somewhere in the admin console and in tailscaled's state. Remove a container and its Service just stays there.
Traefik solved the same problem for reverse proxies years ago with Docker labels, and I didn't find anything like that for Tailscale Services. So I wrote a small Go program that does it, DockTail. It runs as one container per host, watches Docker events, and turns labels like these into the steps above:
With an OAuth client (Services: Write, Devices Core: Write, scoped to tag:server) it also creates the Service definition, so the manual console step goes away. Note that Jellyfin has no ports: section: the traffic goes straight to the container's IP on its Docker network.
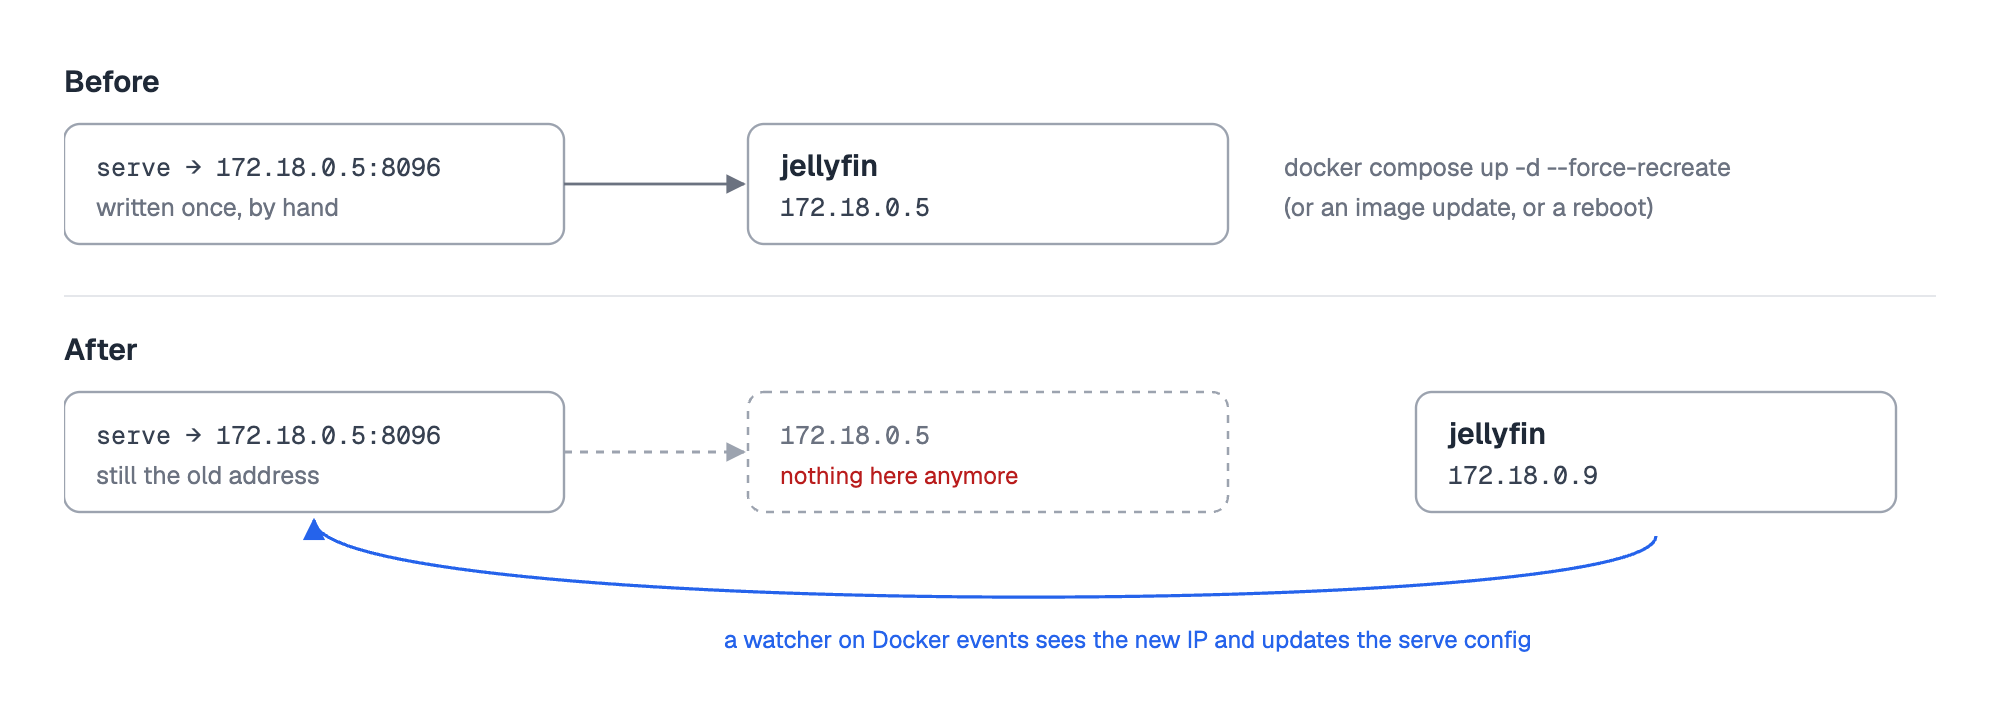
That's also why this needs something that watches Docker. If you skip published ports and point serve at a container IP by hand, it breaks the next time the container is recreated:
DockTail is open source (AGPL-3.0). You don't need it to use Services, though, and everything in the next section applies either way.
Two things worth knowing
If a Service doesn't show up, it's almost always the tag. The host needs to be tagged (check tailscale status), and if you haven't set up an auto-approver, the Service waits for you on the Services page.
Apps that check proxy headers may complain at first, because Tailscale adds an X-Forwarded-For header. Home Assistant answers with "400: Bad Request" until you trust the proxy in configuration.yaml:
On a Docker bridge network, use the address Home Assistant names in its log instead of 127.0.0.1. Jellyfin has the same setting under Dashboard → Networking → Known proxies, but it works fine without it.
Was it worth switching?
For me, yes. What I like most is that the network config now sits right next to the app in the same Compose file. Adding an app means adding labels, removing it takes its Service with it, and my Machines page shows machines again.
I'd still use a reverse proxy for anything public with my own domain. Tailscale Funnel is great for a webhook or sharing one thing with a friend, but it's not a replacement for that. And if you run a handful of containers that rarely change, the manual tailscale serve route above is perfectly fine and needs no extra tool.
My homelab started small, and so did the annoyance.
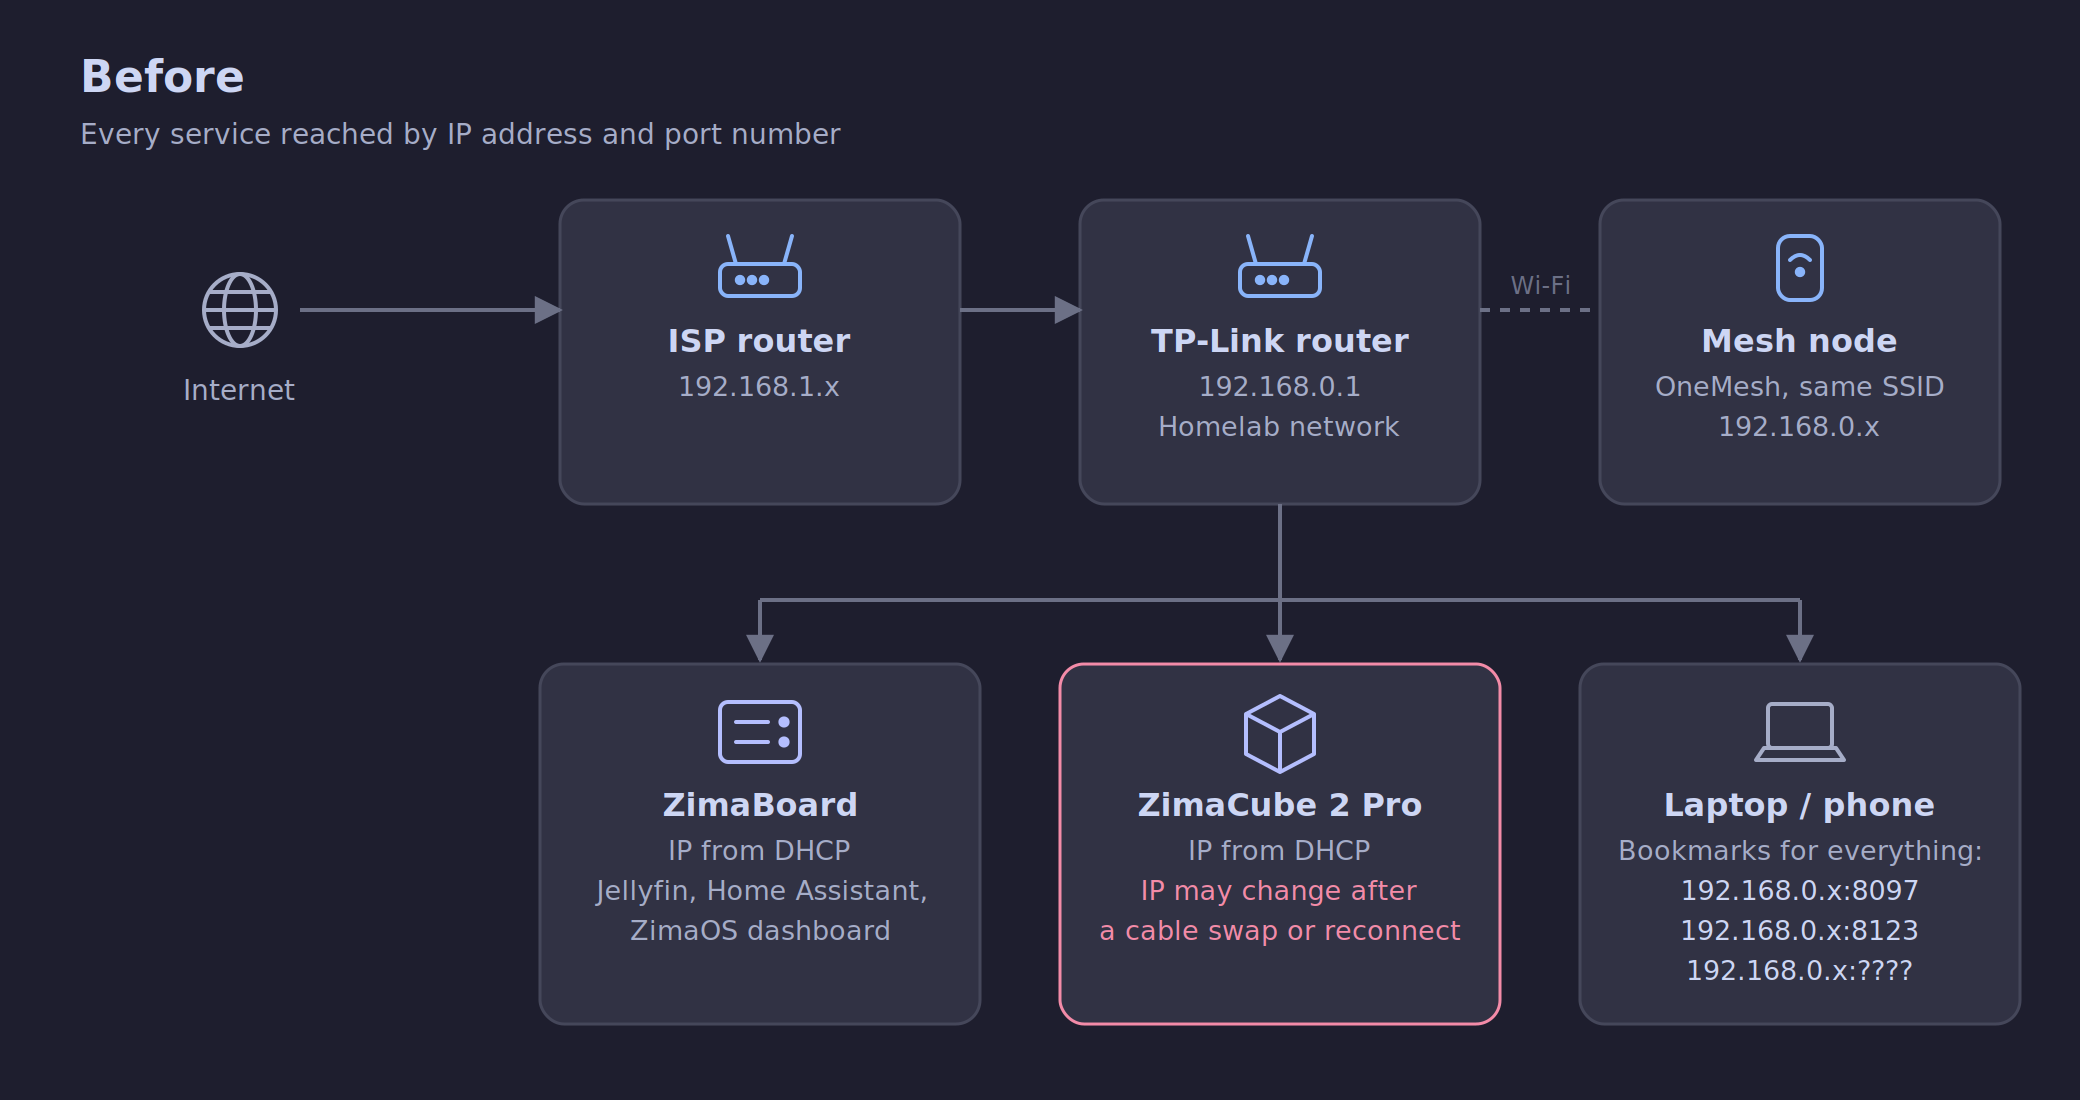
To open Jellyfin, I typed 192.168.0.x:8097. For Home Assistant, it was another IP and :8123. For Karakeep, Ollama and the rest, even more IP and port combinations to either remember or bookmark.
The bookmarks weren't reliable either. My ZimaCube got its IP address from the router like any other device. Swap a cable or let it reconnect, and it mostly came back with a different IP, breaking every bookmark and config pointing to it. That's worse for Jellyfin because typing a full combination IP address and port number with a TV remote will give you a taste of medieval torture.
So, one weekend I decided to fix it. I started with assigning dedicated IP address to my Zima devices (ZimaBoard and ZimaCube) but ended up with a full network clean up.
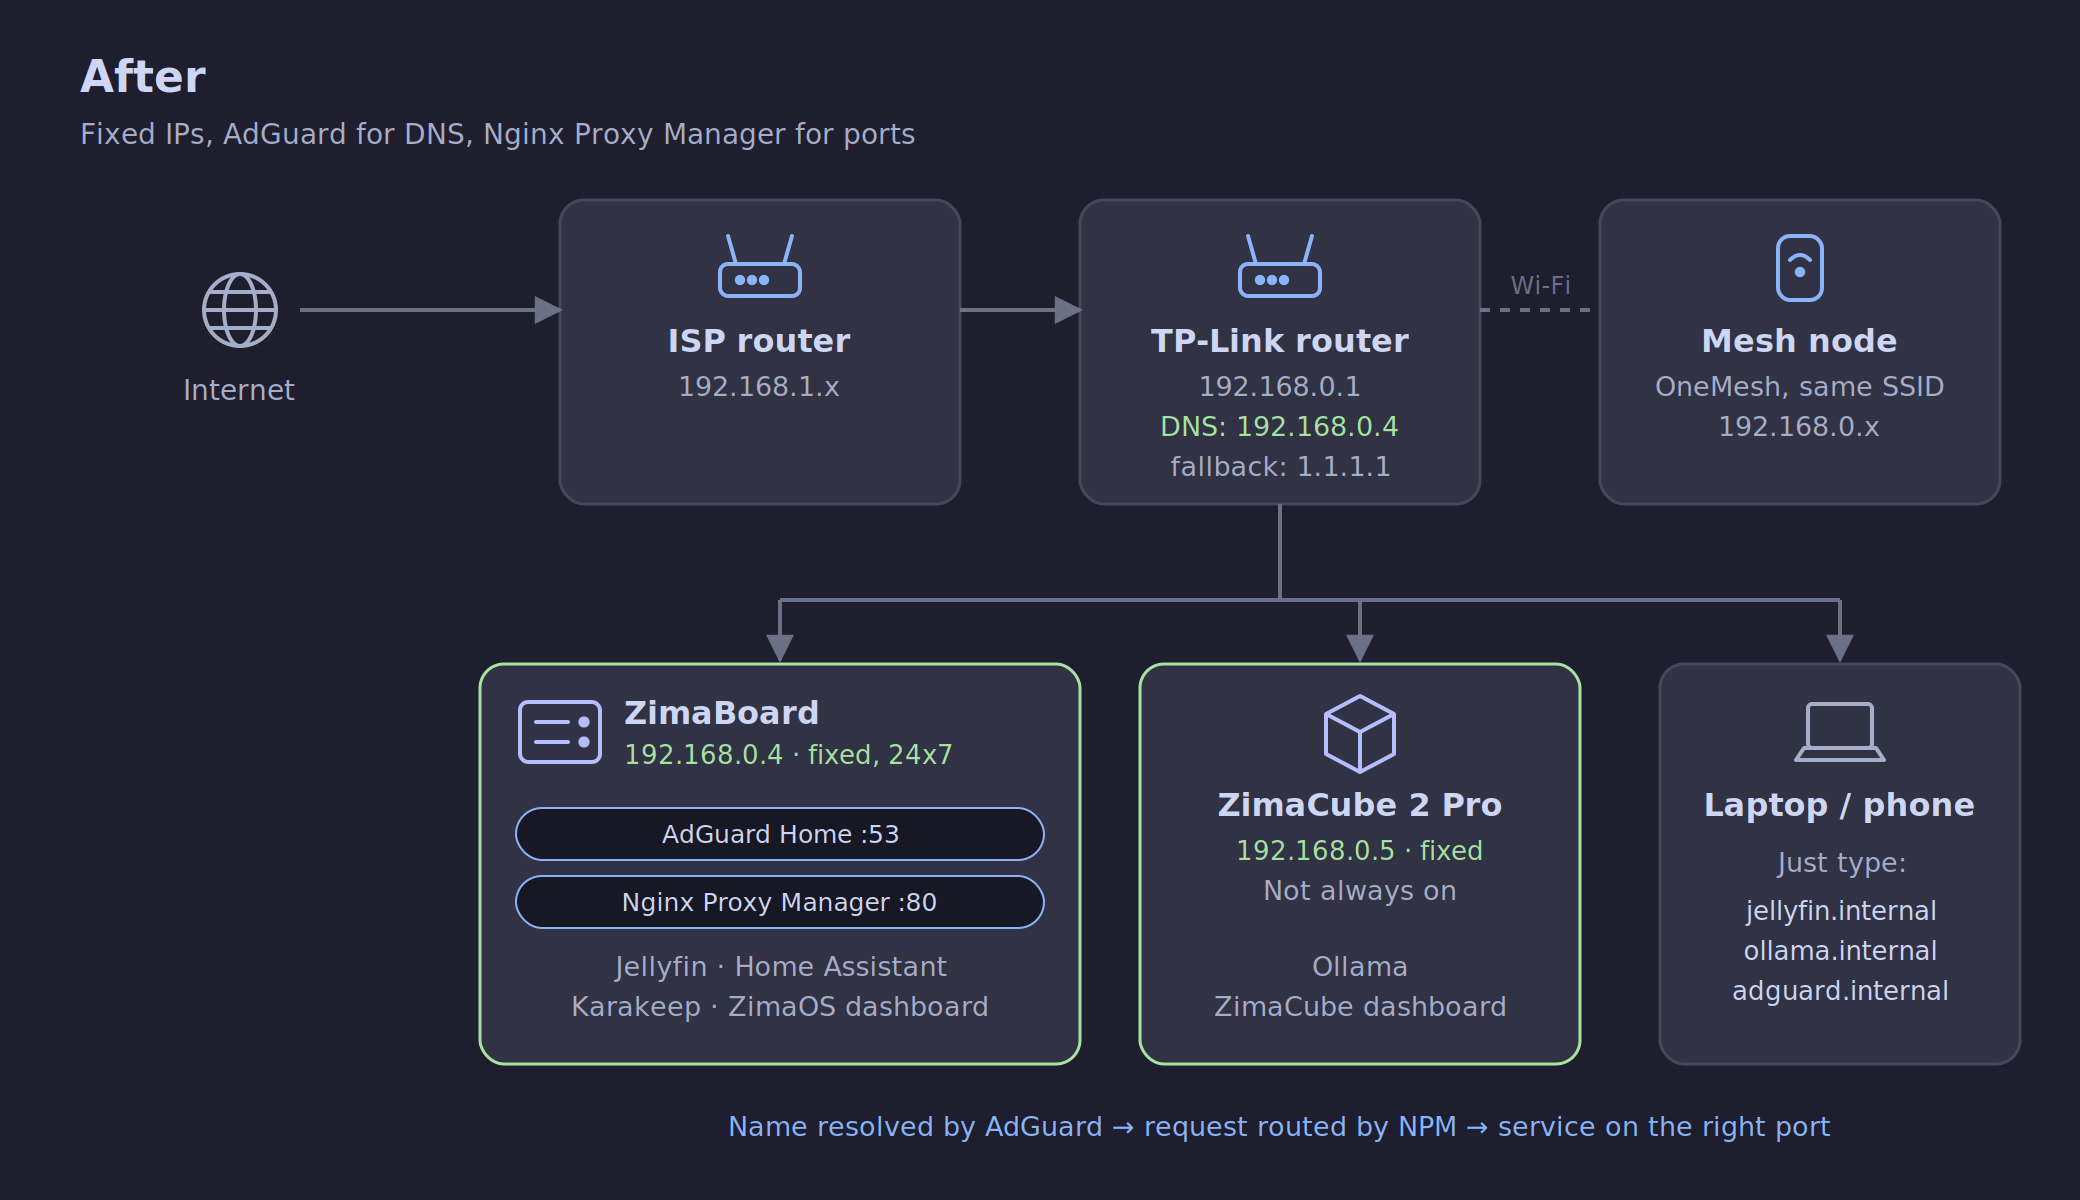
Now my setup is smooth with all the regular services running with a .internal domain. Now I just type jellyfin.internal in the browser. No IP, no port number. Saved me a midlife crisis.
My setup, before and after
Here's what my network looked like before the cleanup. The router from my ISP feeds a TP-Link router, which runs the homelab network, with a OneMesh node extending the Wi-Fi.
ZimaBoard consumes less power and runs services like Jellyfin that need to be on all the time. ZimaCube is a powerful device, and with Nvidia Ada RTX on it, I use it for local AI exploration. To cut down on my electricity bill, I only turn it on when I need it.
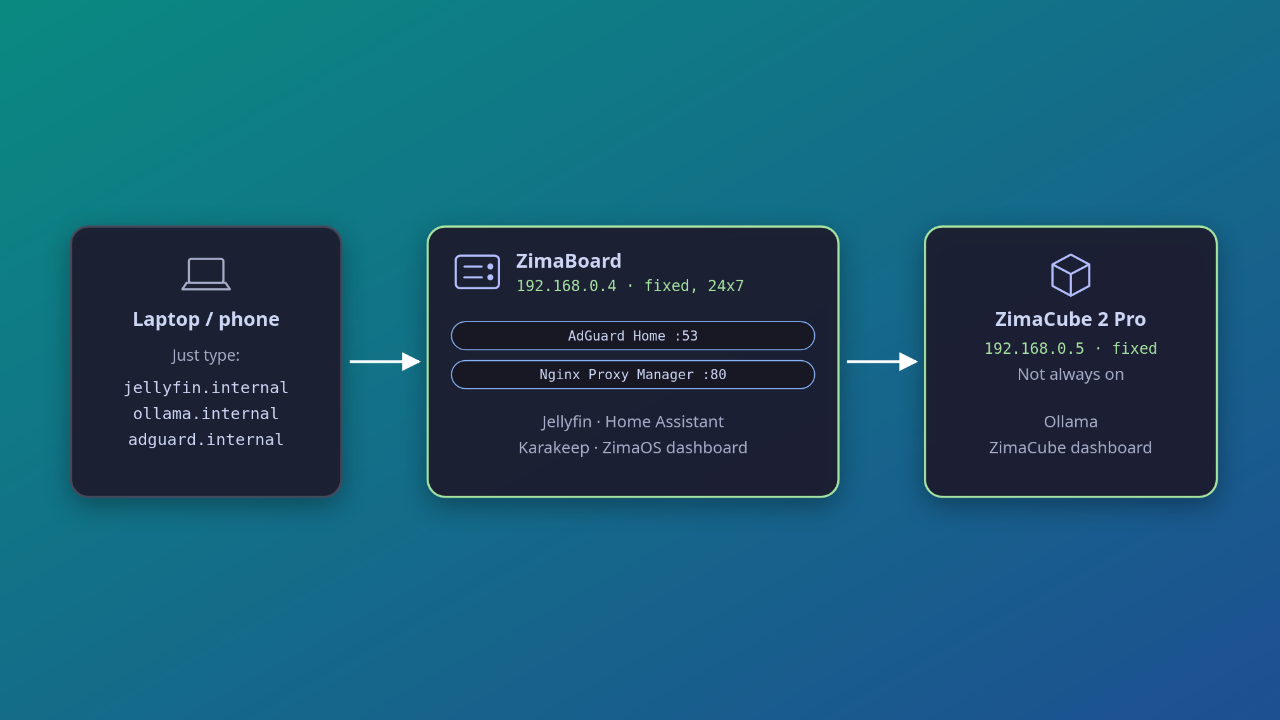
And here's what it looks like now. Both Zima devices have fixed IPs, the ZimaBoard handles DNS and the reverse proxy, and every service has a proper name.
The idea in a nutshell: AdGuard as DNS and Nginx Proxy Manager
The whole setup rests on two pieces working together. AdGuard Home, running as the network's DNS server, turns a name like jellyfin.internal into an IP address.
Nginx Proxy Manager then looks at which name you asked for and forwards the request to the right port. Because AdGuard can only work on the IP address, not port numbers.
Once that's in place, adding a new service is a two-step routine: one DNS rewrite in AdGuard, one proxy host in Nginx Proxy Manager. That's it.
🚧
This is my setup, built around my routers, my Zima devices, and the services I run in my homelab. Take inspiration from it and use it as a reference, but don't copy it blindly. Your IP addresses, ports, router menus and commands will almost certainly be different.
Step 1: Give the core devices fixed IPs
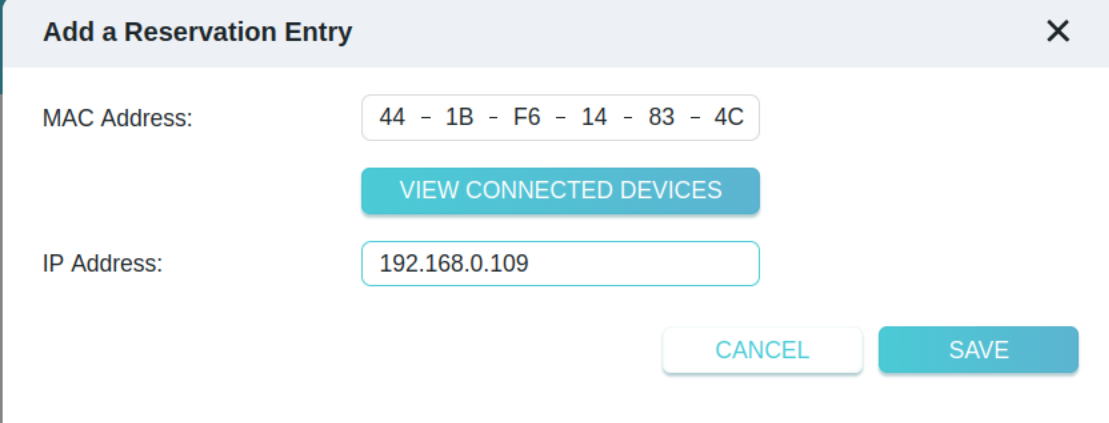
Everything in this setup depends on IP addresses that never change. If the DNS server's IP changes, the entire setup breaks. So the first job was setting DHCP reservations on the router.
On my TP-Link, this lives under Advanced -> Network -> DHCP Server -> Address Reservation.
It actually shows me the connected device and gives the option to reserve the IP from there itself.
That may not always be the case for all the routers. So, you can find the MAC address on Linux with:
ip link show
That will show the MAC address of the current device. You can use a networking command like arp to scan the mac address of other devices connected to your network. The best place still is the router for this activity because it sees all the connected devices to the network anyways.
💡
I also moved the start of the DHCP pool to 192.168.0.10, so no phone or laptop ever grabs an IP I've reserved.
Here's the addressing scheme I ended up with:
Device
IP
Notes
Router
192.168.0.1
Homelab network gateway
ZimaBoard
192.168.0.4
Runs 24x7, hosts AdGuard and Nginx Proxy Manager
ZimaCube 2 Pro
192.168.0.5
Not always on, runs heavier services
Dynamic pool
192.168.0.10 to 253
Phones, laptops, everything else
I have also assigned fixed IPs to Raspberry Pi and other SBCs in this setup. They are used for running local AI harnesses like Nanoclaw and Hermes agents. I am also setting up Frigate for the cameras. I will share my experience with those things in some later article.
Note that some devices may need to be rebooted or renew its DHCP lease to pick up the reserved IP.
📋
Since I used ZimaOS, things were more click click and install. For other setup, you will have to install and setup AdGuard DNS and Nginx Proxy Manager. Instructions can be found on their respective websites.
Step 2: Install AdGuard Home on the always-on box
AdGuard Home becomes the DNS server for the entire homelab network, so it has to be up all the time. My ZimaBoard runs 24x7 while the ZimaCube doesn't, so the choice was easy.
In the ZimaOS App Store, I installed the AdGuard Home (HOST) variant, not the regular one. Host networking lets AdGuard bind directly to port 53 and see the real IPs of clients. With Docker's default bridge network, traffic gets NATed through the container and you lose both.
The install shows a tips popup with a config script. Its wget command failed on my system with a "Can't be verbose and quiet at the same time" error, so I ran the same script with curl instead:
Don't skip sudo here. Without it, the script fails to create directories but still prints a success message.
I accepted the default config path, restarted the app from the ZimaOS dashboard, and opened http://192.168.0.4:3000 manually. Clicking the app icon doesn't work for host-mode apps.
💡
AdGuard offers AdGuard DNS as a paid cloud service. But its open source equivalent is free to install and use on your own device. That's what I used here.
When ports are already taken
The setup wizard asks for an admin port and a DNS port, and both clashed with something. Port 80 for the web UI was taken, so I set AdGuard's admin UI to 3786 instead.
Port 53 was more surprising. Unusual, right? Turns out I had a Pi-hole container running that I had completely forgotten about. I found it with:
sudo docker ps --format "{{.Names}}: {{.Ports}}"
Pi-hole and AdGuard do the same job, so there was no point running both. I removed Pi-hole.
Step 3: Point the network at AdGuard
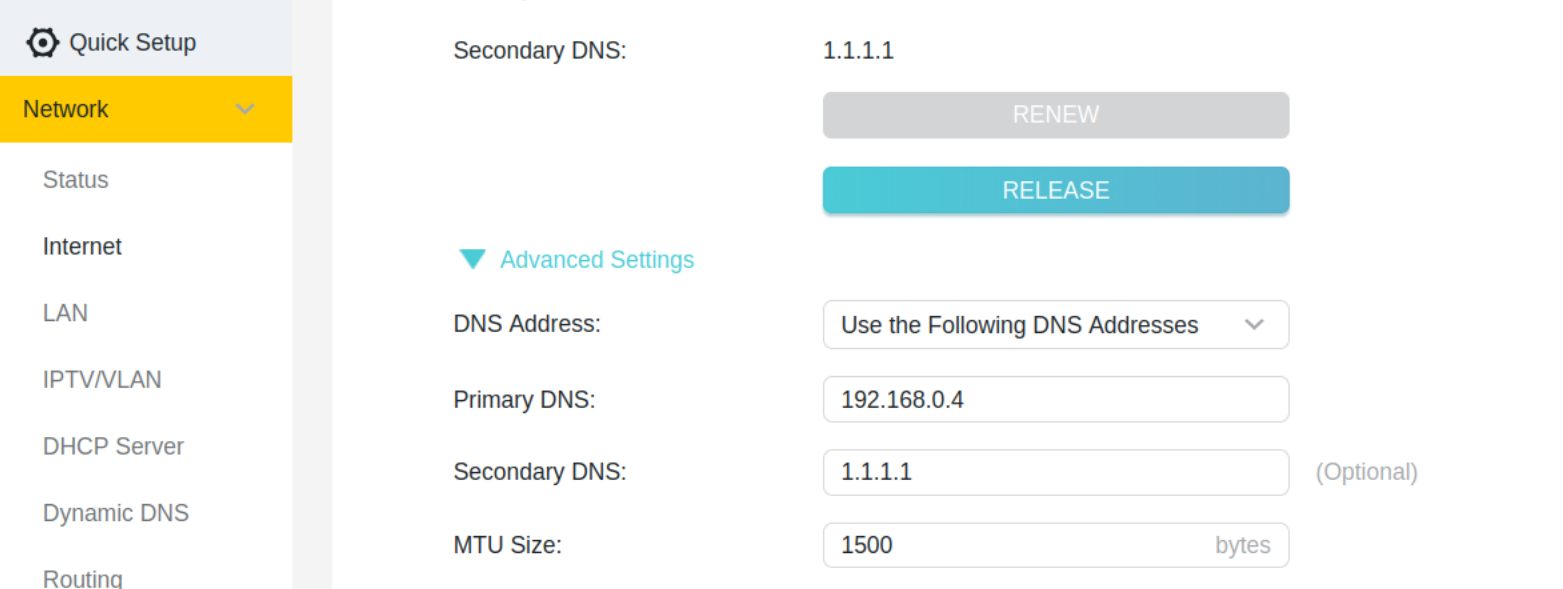
AdGuard was running, but no device was using it yet. On my TP Link, I went to Advanced -> Network -> Internet, expanded Advanced Settings, and switched DNS Address to "Use the Following DNS Addresses".
Primary DNS is AdGuard at 192.168.0.4, and secondary is 1.1.1.1. Here. 192.168.0.4 is the IP address of the ZimaBoard that has AdGuard running on it.
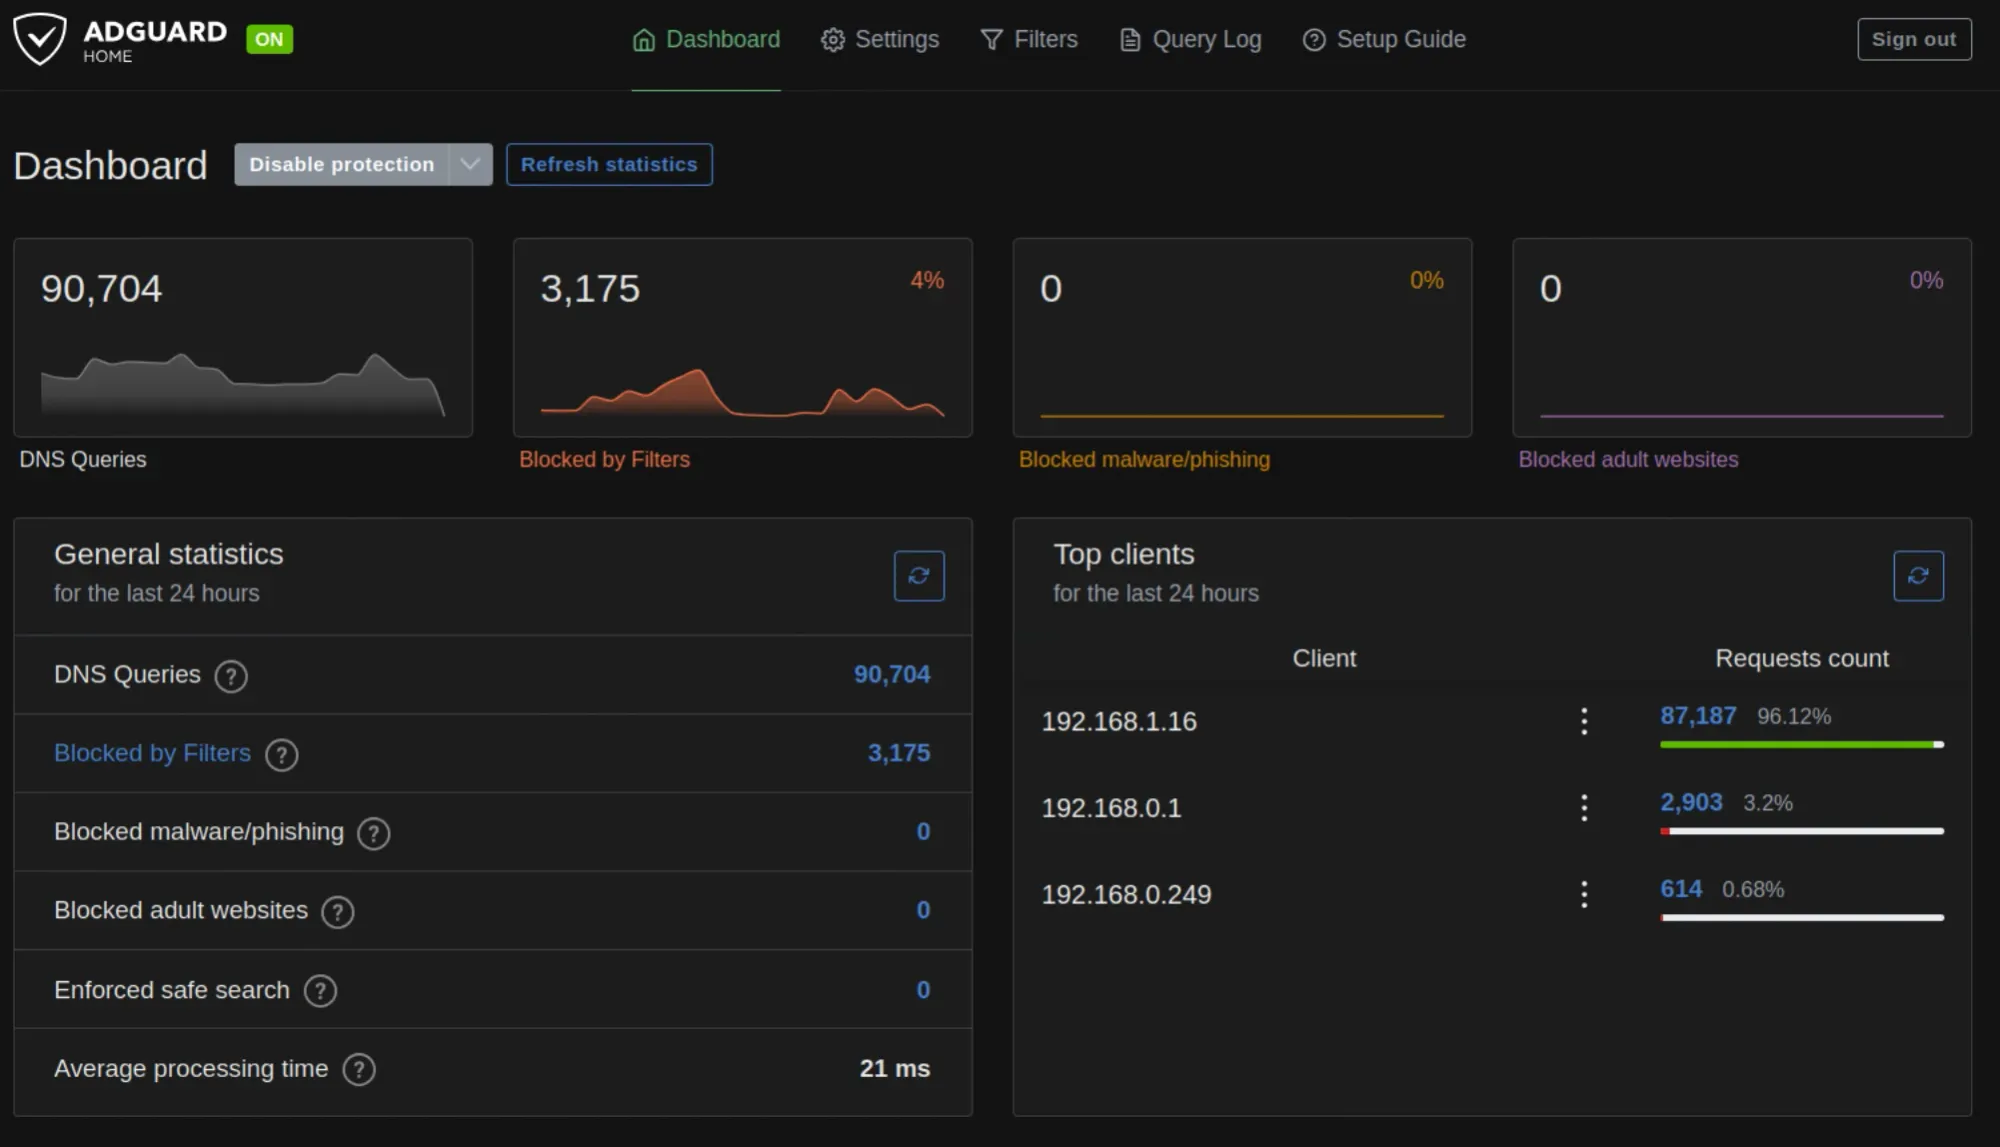
Here's what this setting actually does. Devices on the network still use the router as their DNS server, and the router forwards their queries to AdGuard. That's why AdGuard's query log mostly shows the router as the client, not individual devices. For per-device stats, setting AdGuard's IP in the DHCP Server page should work, so that the router hands it to devices directly.
📋
The 1.1.1.1 secondary is a safety net, so the internet doesn't go dark when the ZimaBoard is down. It comes with a trade-off, though. DNS clients don't always wait for the primary to fail before trying the secondary. When a query goes to Cloudflare instead, the ad slips through and .internal names don't resolve, since Cloudflare has no idea they exist. If you notice a hostname failing occasionally, this is the likely culprit.
When a device ignores the new DNS
While testing, I manually set 192.168.0.4 as DNS on a Linux laptop through GNOME's network settings. dig @192.168.0.4 google.com worked, but browser traffic never showed up in AdGuard's log. Running resolvectl status revealed the system was still using the router, as GNOME hadn't applied the change to the live connection.
Reconnecting to Wi-Fi fixed it. The more dependable way is doing it through nmcli:
Step 4: Create the .internal names with DNS rewrites
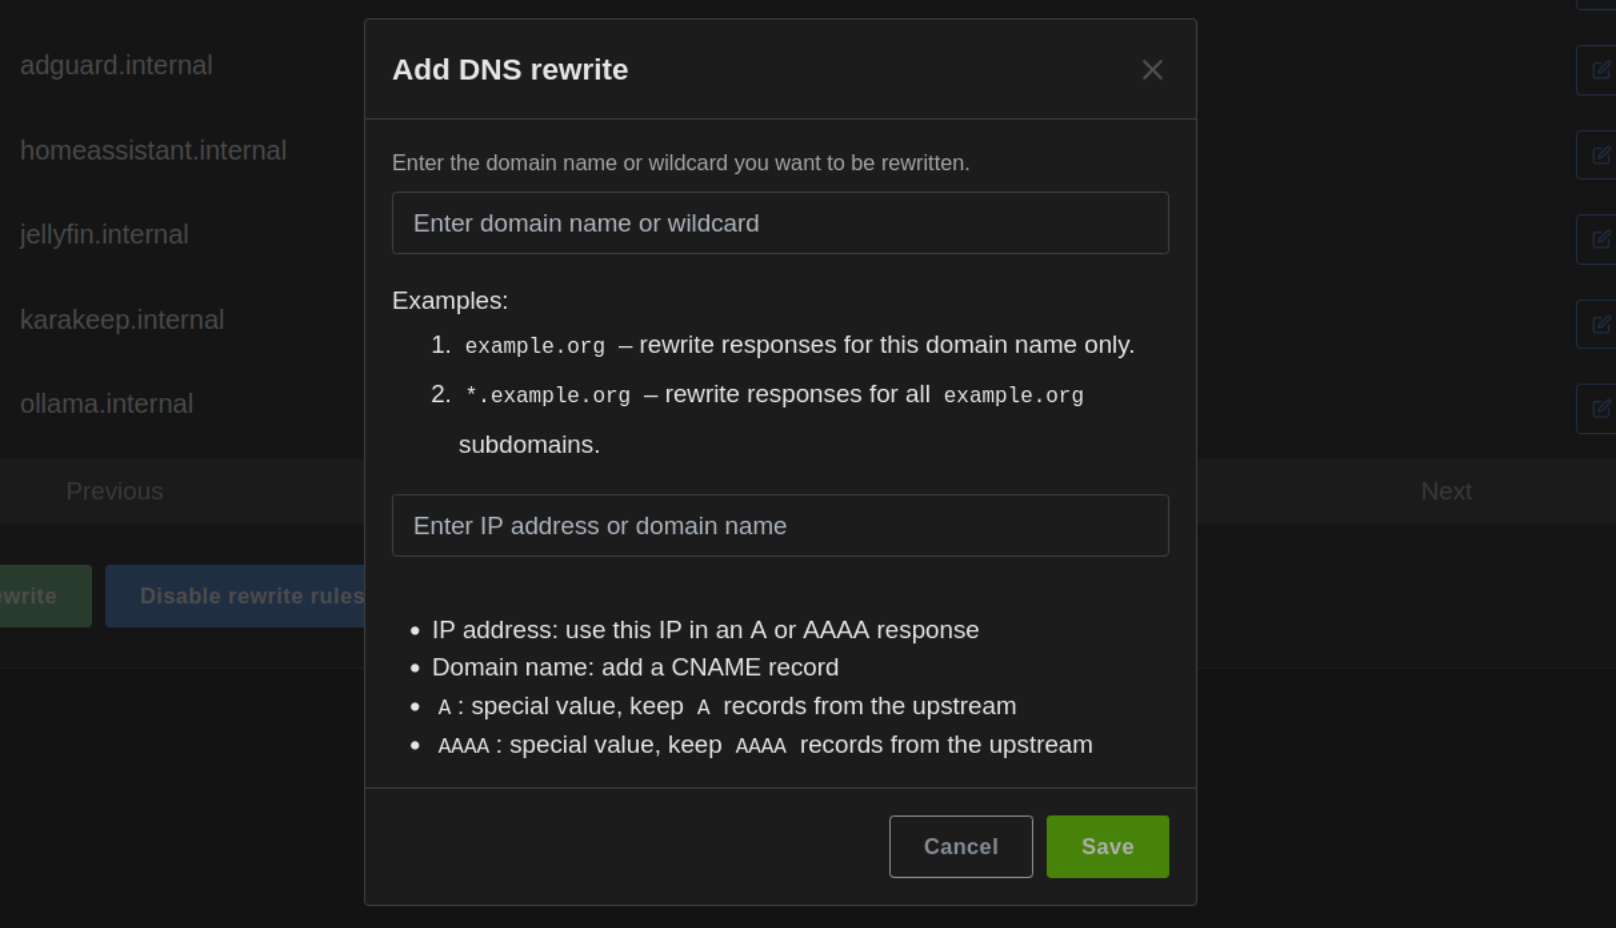
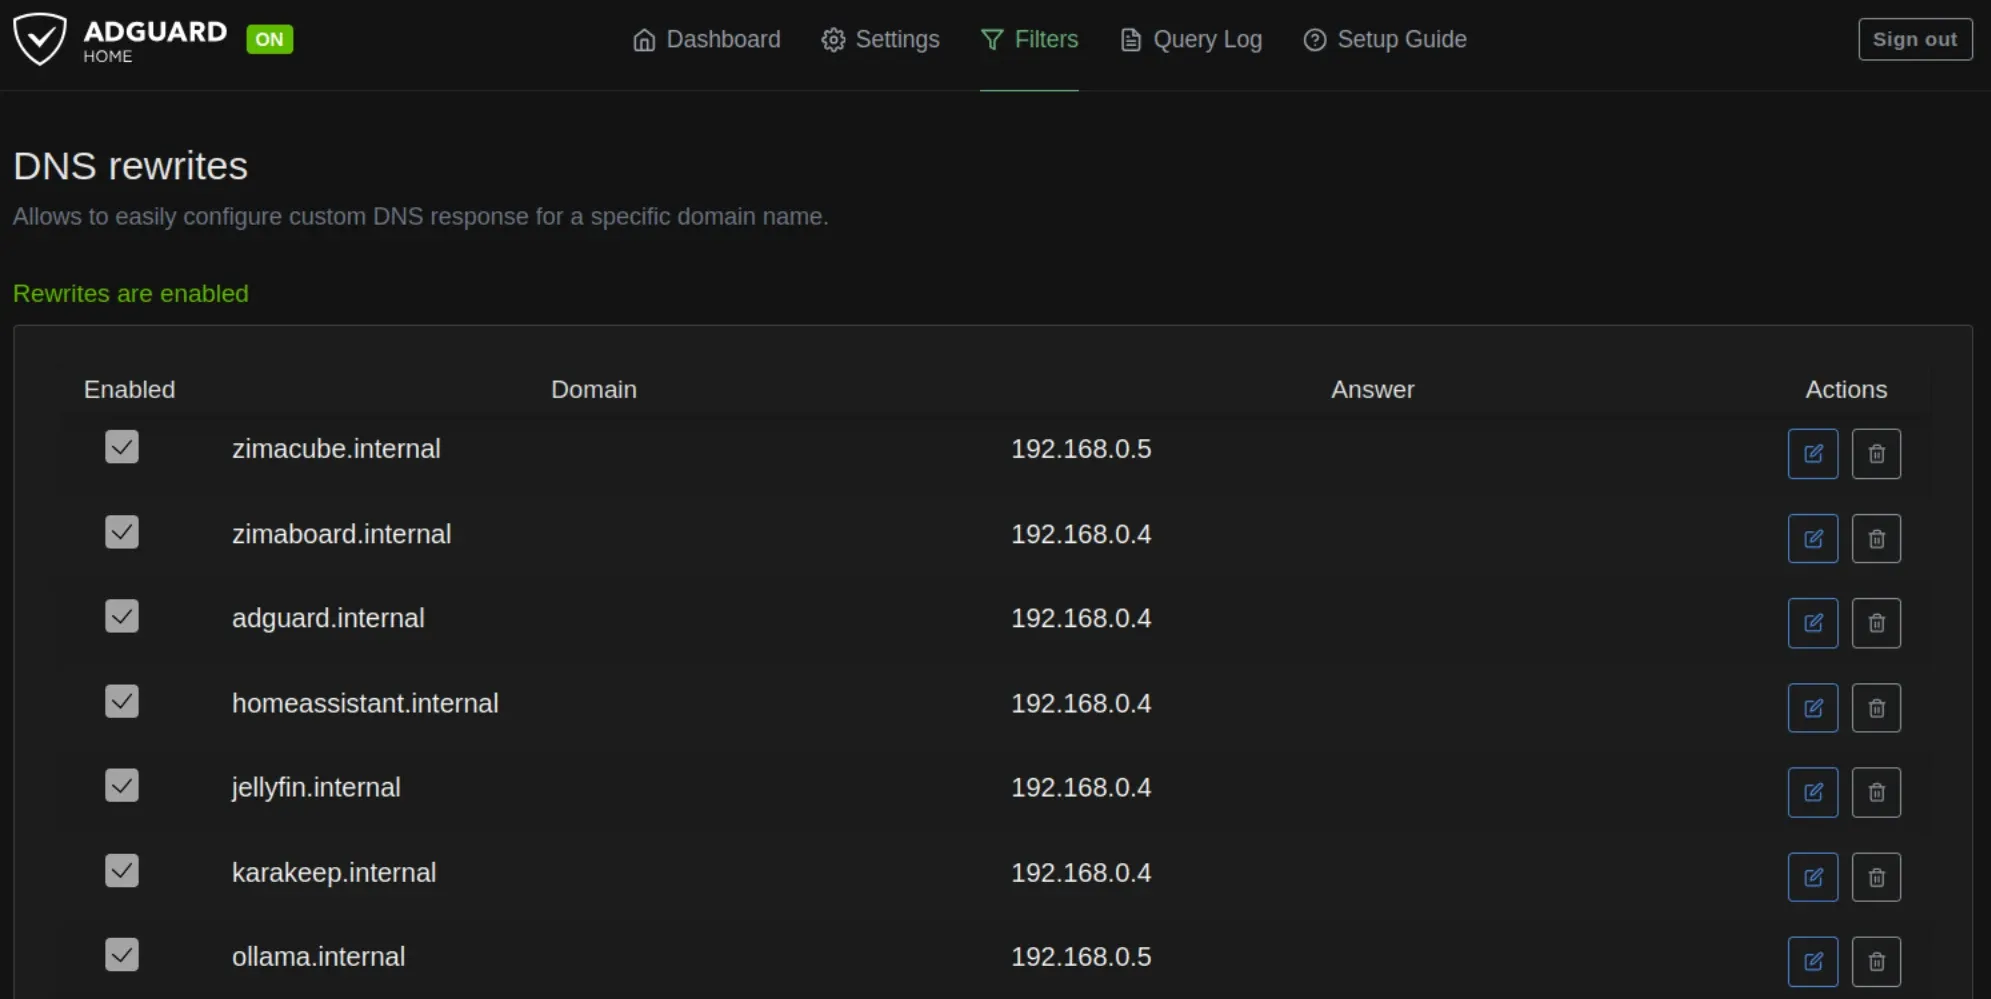
This is where the hostnames come to life. In AdGuard, go to Filters -> DNS rewrites -> Add DNS rewrite, enter a domain like jellyfin.internal, and point it to an IP address.
Here's the thing. ZimaBoard runs multiple services. DNS rewrite only accepts IP address, not port numbers. If I have to add jellyfin.internal and homeassistant.internal in the DNS, both will be pointed to the same 192.168.0.4 IP address. And they won't be resolved.
I mean, I could do zimaboard.internal:8097 and that would land me on Jellyfin but what's the point? A proper jellyfin.internal is what I would want. We need the port numbers.
This is why we need a proxy manager to properly map the domain names with both IP addresses and the port numbers. But a proxy manager cannot act as DNS and hence we need both AdGuard DNS in combination with a tool like Ngnix Proxy Manager.
📋
Why .internal? A good option was .local but it is reserved for mDNS (Bonjour, Avahi), so many devices resolve it outside your DNS server, which could lead to inconsistent results. .lan and .home aren't reserved and could become real domains someday, just like .dev did when Google bought it. .home.arpa is official but clunky to type. In 2024, ICANN permanently reserved.internal for private networks. It's short, readable, and will never clash with a real website. And it fits the entire homelab narrative.
Step 5: Use the port numbers with Nginx Proxy Manager
DNS only translates a name into an IP. It knows nothing about ports. To make http://jellyfin.internal work without :8097, something has to listen on port 80, check which hostname was requested, and forward it to the right port. That's a reverse proxy.
I'd have preferred Caddy, as that's what I use on some of my servers. But Caddy wasn't available as a one-click app in ZimaOS and I want to keep everything in Zima ecosystem. So I opted for Nginx Proxy Manager (NPM) as it does the same job with a web interface instead of a config file. Like AdGuard, it went on the always-on ZimaBoard.
Port 80 issue, again
NPM needs ports 80, 443 and 81 (its own admin UI). Port 80 was taken again, this time by zimaos-gateway, the process serving the ZimaOS dashboard for ZimaBoard. I confirmed it with:
sudo ss -tulpn | grep :80
The tempting fix is giving NPM a different port, but that defeats the whole purpose. You'd be back to typing port numbers.
Instead, I moved the ZimaOS dashboard to port 8888 from its Settings page. That was easy and that's why I like ZimaOS. It makes managing homelab a lot easier.
Anyways, the NPM install dialog still complained about port 80 for a while, and a full ZimaBoard reboot cleared that stale check.
Adding proxy hosts
Once installed, NPM's admin UI is at http://192.168.0.4:81. Log in with the default admin@example.com and changeme, and it asks you to set new credentials right away.
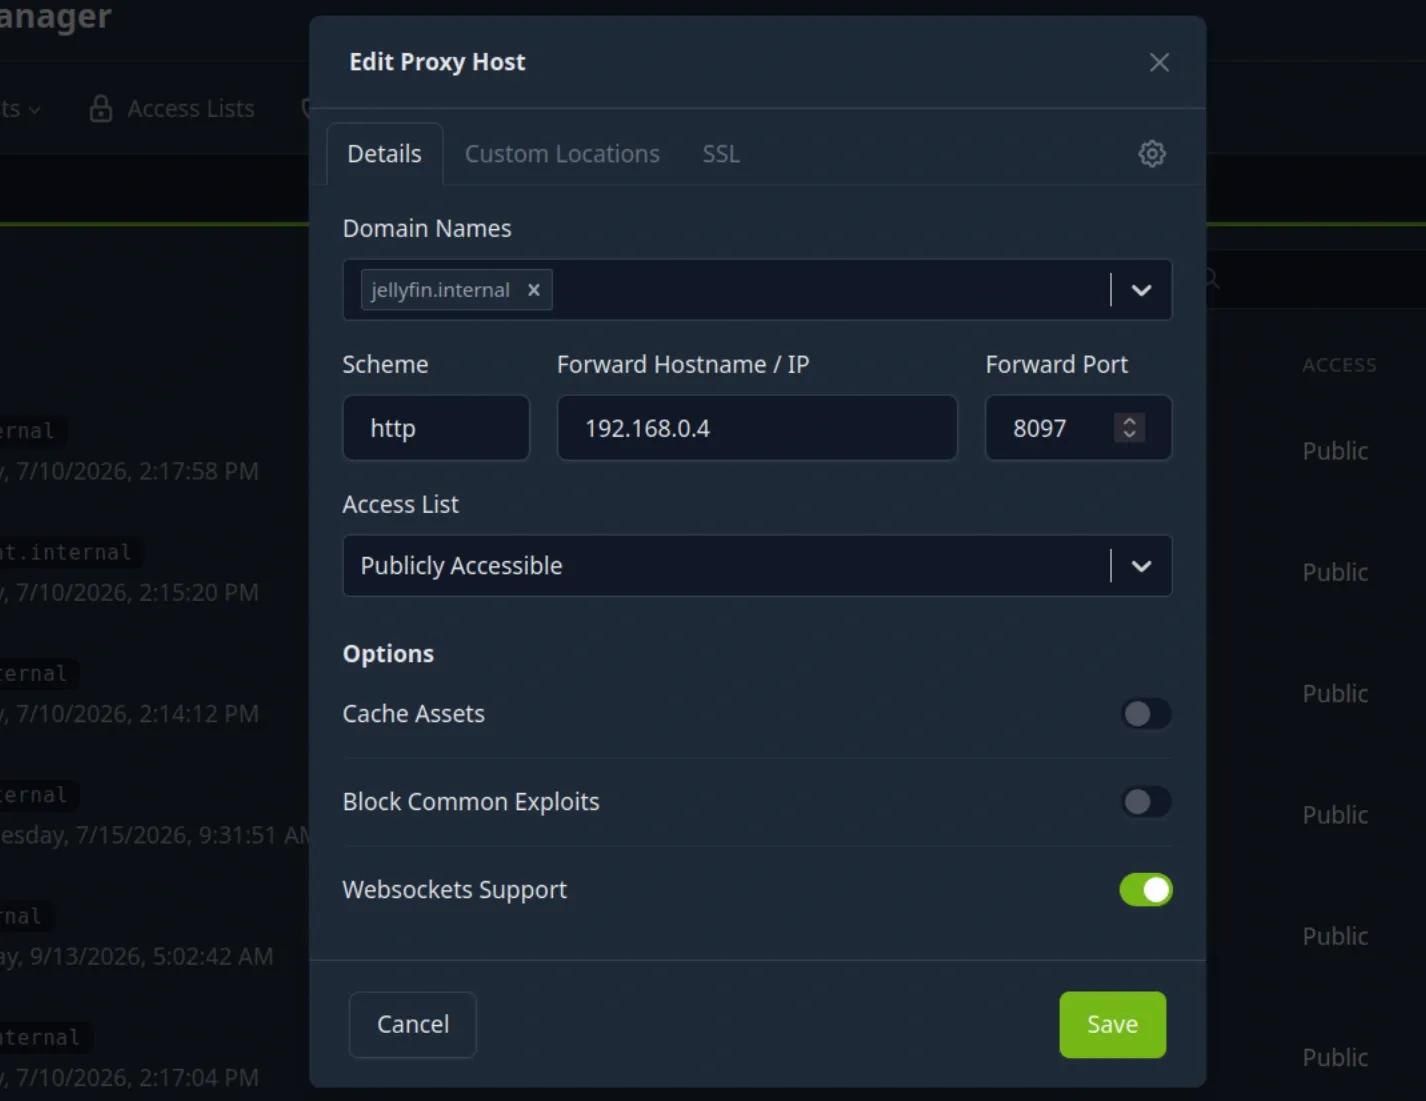
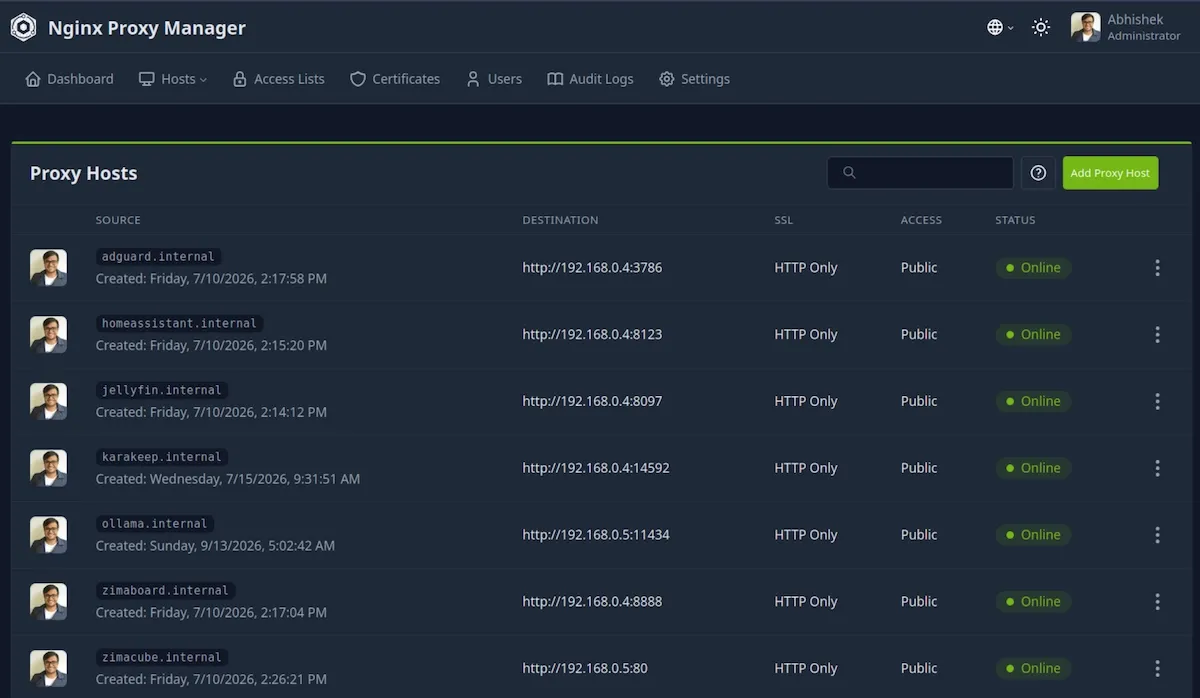
To add a service, go to Hosts -> Proxy Hosts -> Add Proxy Host and fill in the details.
Domain Names: the hostname, like jellyfin.internal
Scheme:http
Forward Hostname / IP: the IP of the device running the service
Forward Port: the service's actual port, like 8097
Websockets Support: on (Jellyfin and Home Assistant need it for live updates, and it doesn't hurt the rest so I always enable it)
📋
I left the SSL tab alone, since this traffic never leaves my home network.
Save it, open http://jellyfin.internal in a new tab, and there it is. No port number.
Here's how my proxy hosts look right now:
💡
The "Public" access label might look scary, but it only means NPM doesn't add its own login prompt. These names resolve only through my AdGuard, so nobody outside my network can reach them. To access it from outside, a service like Tailscale should be used.
Troubleshooting afterwards
Network setup never goes 100% trouble free. I did a face a couple of issues. Here are at least two that I recall (and have recorded):
Home Assistant threw a 400 error
Everything worked except Home Assistant, which returned 400: Bad Request through homeassistant.internal. Direct access on port 8123 was fine. Home Assistant rejects proxied requests unless it explicitly trusts the proxy, as protection against spoofed headers.
The fix goes in Home Assistant's configuration.yaml:
http:
  use_x_forwarded_for: true
  trusted_proxies:
    - 172.17.0.3   # NPM container's IP on the Docker bridge network
I found the NPM container's IP with sudo docker inspect nginxproxymanager | grep IPAddress, then restarted Home Assistant with sudo docker restart homeassistant.
One catch: this IP can change if the NPM container gets recreated. Trusting the whole bridge subnet (172.17.0.0/16) instead of a single IP is more durable.
Netflix stopped working on the TV
Shortly after switching DNS, Netflix on my smart TV refused to connect. AdGuard's query log showed two blocked domains in red: logs.netflix.com and nrdp26.logs.netflix.com. They're telemetry endpoints, but the Netflix app treats them as part of its connectivity check.
You can unblock an entry from the query log's menu in AdGuard, or add allowlist rules under Filters -> Custom filtering rules:
Restart the app on the TV and it should work again.
💡
If something else breaks after you enable AdGuard, the query log is the first place to look.
Port conflicts
Port conflicts came up three times during this project, so this little drill is worth keeping handy. To see which process is using a port:
sudo ss -tulpn | grep :<port>
The process name in the output tells you who the culprit is. If it says docker-proxy, check which container it belongs to:
sudo docker ps --format "{{.Names}}: {{.Ports}}"
Then decide whether to remove the conflicting container or move the other service to a different port. Just don't remap the port of the thing you're trying to make port-free, like NPM.
One more thing to keep in mind: all of this works only inside your home network. The .internal names exist only in your AdGuard, so they won't resolve when you're outside, unless you bring a VPN into the picture.
Adding a new service later
This is where all the effort I put in this setup pays off. When I deployed Karakeep a few days later, giving it a proper name took just two steps:
In AdGuard, add a DNS rewrite: karakeep.internal pointing to the ZimaBoard (192.168.0.4).
In Nginx Proxy Manager, add a proxy host: karakeep.internal forwarding to the service's IP and port (14592 in my case).
If the service does its own host validation, like Home Assistant, it may also need to trust the proxy.
Wrapping up
I did all this a few months ago and it has been running smoothly so far. HTTPS for the .internal names would be nice to have. Perhaps I will think about implementing it some weekend.
I am sure there are other, perhaps better (?) ways of doing this. For now, this setup works for me, and I no longer have to remember a single IP address or port number in my homelab. I hope it gives you a few ideas for taming your own.
I welcome your questions and suggestions. What else could I do here? What would you like to do about a similar setup?

 Login